GUIDE removing and refitting a frst (cvh) engine
6 posts • Page 1 of 1
GUIDE removing and refitting a frst (cvh) engine
This is a guide only, I and the web site this guide is one accept no responsibility for any accidents, damager or harm that my occur, if you feel you cannot complete a job or do it safely do not do it.
Here is a guide to removing/replacing an engine in a mk3 fiesta.
I have based it on a rs turbo engine, as I have a rs turbo and have since done a engine rebuild on it, which I might do a guide for too, but I’ll think about it.
First off, as I didn’t intend to do a guide for this I will not have pictures of locations for certain things so you will have to bear with it, but like all work on cars if you have any doubt about your ability to do it, best off getting help or letting someone else do it, but if you do it your self, have a Haynes manual to hand, although that will tell you how to removing the engine anyway, you can compared it to my guide if ya want,lol
I will do my very best to list all the tools you will need but don’t take it as gospel, 9 times out of 10 you get bad bolts/nut which need other tools to removing them etc
Tools needed
Car jack, bigger the better
Axle stands, 2 will do
Engine hoist/crane
Wheel chocks/bricks etc
Good strong rope, strapping or chains with shackles
Socket set, ½” drive a min really, with extensions etc etc
3/8” drive or ¼” drive stuff comes in handy too
Sockets needed, 7, 8, 10, 13, 15, 17, 18, 19, 30mm you don’t have it, get it!
6mm socket for jubilee clips if ya want too
Breaker bar or pipe for use on ratchet/T bar
Spanners, as above, full range really
Hammer
Copper hide mallet
Chisel/punch
*poss.* impact driver for use on the screws for disc’s
Screw drivers, various sizes both flat and Philips
torx bits (star bits)
Torque wrench (if ya got or can borrow one)
Adjustable spanner, med size
Circlip pliers
New parts you will or might need
New hub nuts x2
Anti freeze
Split pins (if you got them sort if track rod ends)
Bottom ball joint bolts (these can be a c**t at times)
Gearbox oil
Exhaust manifold gasket
Inlet manifold gaskets (might be worth getting a head set, it don’t come with head gasket and bolts, it’s just all small gaskets)
Other stuff you might/will need
Safety glasses (stop the cr@p failing in ya eyes, nothing worse!
WD40, poss. lots off it
Copper grease (recommended!!!!)
Something to lay on, cardboard or something
Latex gloves if that’s your thing, lol
Rag
You can lift the car now and axle stand it and work on it or leave it on the deck till its ready, can’t remember which way round I done mine but were start with it on the deck and removing the bits not needed.
Right first off, chock the rear wheels, leave hand brake on, disconnect the battery, now if some of the jubilee clips look a bit dry or a bit rusty, give them a shot of WD40 and leave them.
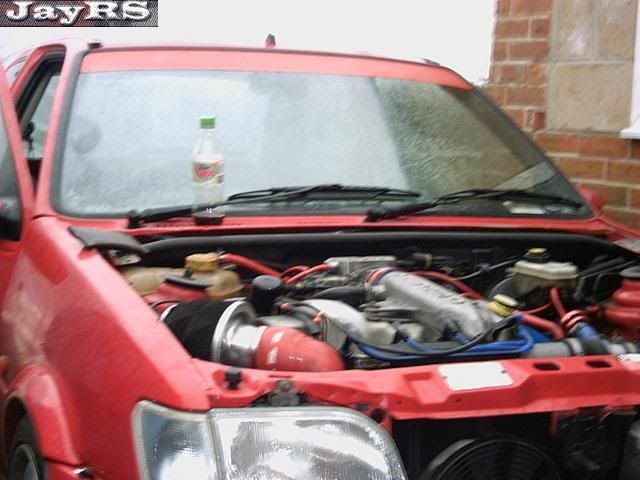
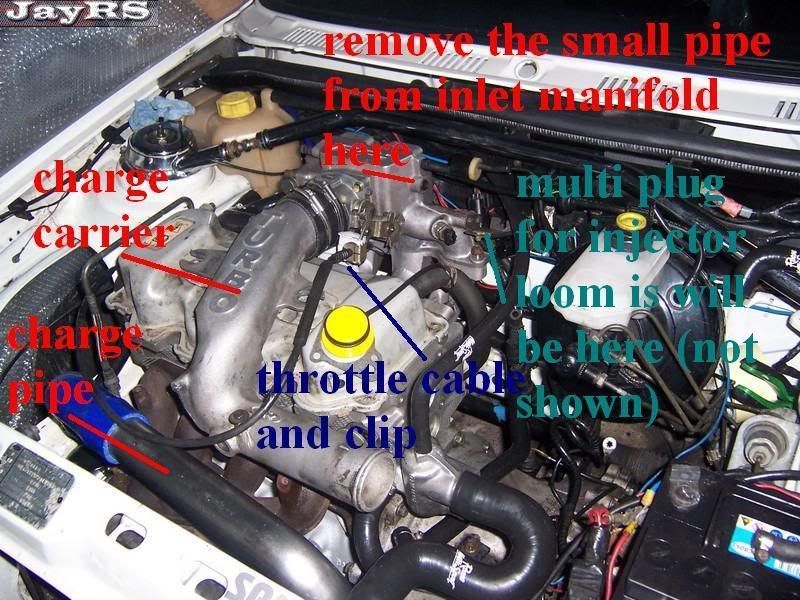
Start by removing the bits that are gunna get in the way, it doesn’t have to be in this order but its how I would do it, first, bonnet, lol then remove top boost hose by taking off the 2 jubilee clips holding it on, then remove the charge carrier buy removing the intake pipe to the ISCV, and also the jubilee clip holding it to the throttle body of the EFI unit, also remove the 2 torx screws holding the HT lead holder and (if not snapped off, lol) the lugs for the charge pipe, (unplug and remove if needed, the HT leads) then remove the 2, 6mm (10mm head)bolts holding it to the rocker cover and remove.
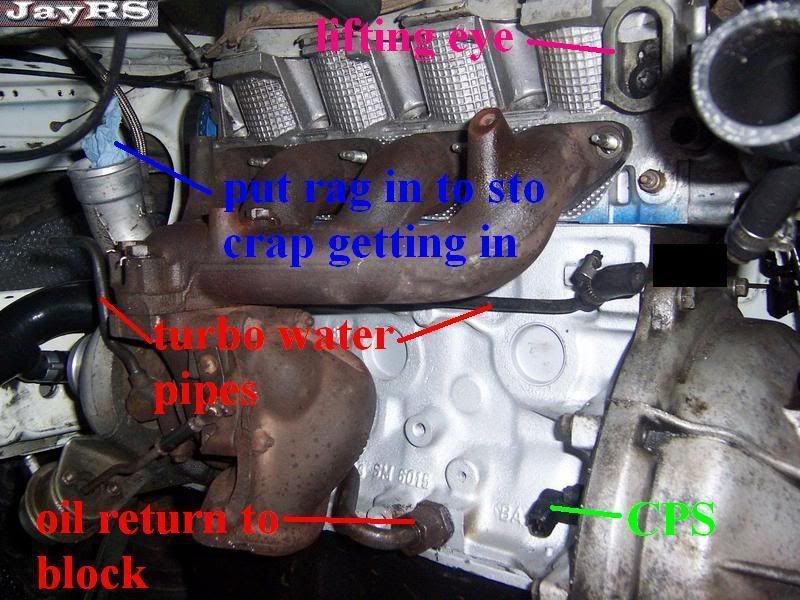
Then remove the “charge” pipe, which is the stainless steel one from the turbo to the bottom of the intercooler, at this point stuff some rag into the top hole of the turbo and to holes in the intercooler to stop cr@p getting into them.
Now you got a bit more room remove the air intake pipe from the turbo, if this is connected to a induction kit/filter leave that on, on the other end, if it’s connected to the standard air box, remove the big jubilee
The standard air box can stay in place if you want, if you want to remove it see TIPS
At this point I would remove the rad and intercooler, they are screwed together and prob best left that way.
Remove the front bumper but undoing the screws in the arches, then it is 4 nuts, 2 a side under the headlights on the front panel, see TIPS for removing head lights as it’s the same on both sides.,
With the bumper coming off, you will see plugs for the bumper lights, unplug them and that’s the bumper off.
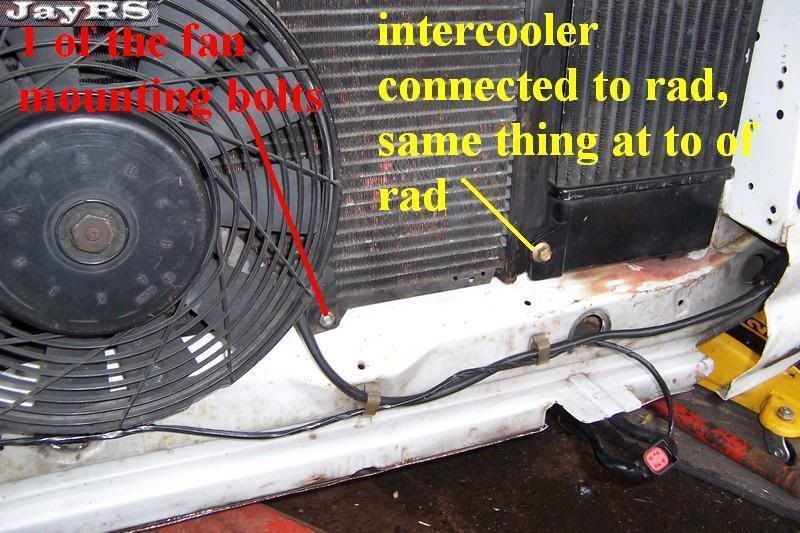
With the bumper off you can remove the fan, UN plug it and un bolt it from thread and car, be prepared for rusty heads to round off though. But if all goes well it can be un clipped from the rad, although the top part of the rad will probably have to be released from the front panel to do so.
Removing the rad and intercooler is easy, they do come apart but it might be worth leaving it but that’s your call.
Take the top and bottom water hoses off the rad, as well as the small one to the turbo, now the small one might be easier disconnected from the turbo water pipe rather than the rad, again, depends on the car etc.
May as well take the top hose off the thermostat hosing at this point too, remember to disconnect from turbo water pipe before yanking it out.
Remove the rad and intercooler by undoing the bolts on the front panel, the bottom of the rad just sits in a couple of slots so when realised it will lift out, take care not to smack it onto the turbo/manifold as the fins of the rad wont thank you for it, if need be slide a bit of thin hard board down between to protect the rad.
Remember, if any wires/plugs are in your way disconnect them first to save damage, I.E rad fan temp switch and temp gauge sender.
With the rad out of the way you can now remove the turbo, some will say you don’t have to, and TBH you don’t really need to, but I will explain how to for those who want to.
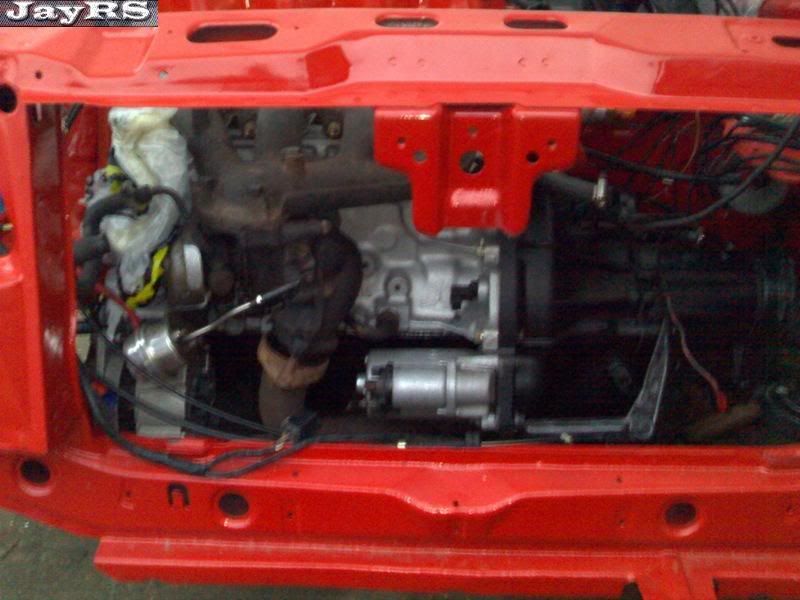
Turbo removal
Remove the nuts holding the down pipe to the turbo from underneath, these are norm 19mm but ive come across 18mm ones,
Disconnect the vac pipes on the turbo, if you have removed air box already you should have done this already
To remove the turbo charger, there are 2 ways to do this, first off with the manifold disconnected, undo the 3, 15mm bolts holding the turbo to the manifold, these will be very tight and will need blasting with WD40 all along the way, be careful not to snap them, there not cheap (£18 for the 3) and cause more problems if they snap (see tips) once out your home and dry, don’t worry if you don’t find a gasket, there isn’t one, now you will need to remove the manifold, undo all the 13mm nuts and remove it, don’t worry to much if the studs come out the head, just remember where they go or fit new ones.
To remove turbo with it connected to manifold, just undo the manifold nuts, take note of the lines above though.
**Right before you remove all the bolts holding it to the manifold/manifold to head, you have to decide how you want to disconnect the oil feed and return? To do the return you have the main nut on the block, or the 2 small 13mm bolts underneath?? I say the main nut on the block, far easier if it will undo, of course if it wont, you will need a long extension on a 3/8 drive ratchet and a UJ joint and 13mm socket, oh and enough room under the car to get at it, either way once the oil return has been disconnected the turbos ready to come out
now the oil feed is easier by far to get at with the turbo off the manifold, however some people disconnect it from the back of the block and pull the whole lot out, or break into the line at 1 of the joints, I don’t recommend that though, ive always taken the turbo off the manifold but if you want to disconnect from the back of the block you may have to wait till your under the car or the inlet manifold is off before you can get to it properly.
Remember, you don’t really have to remove the turbo.
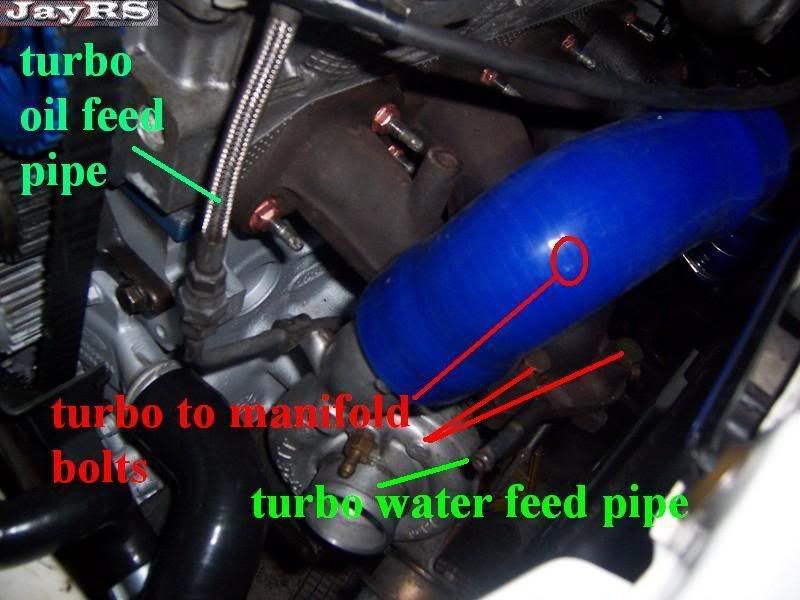
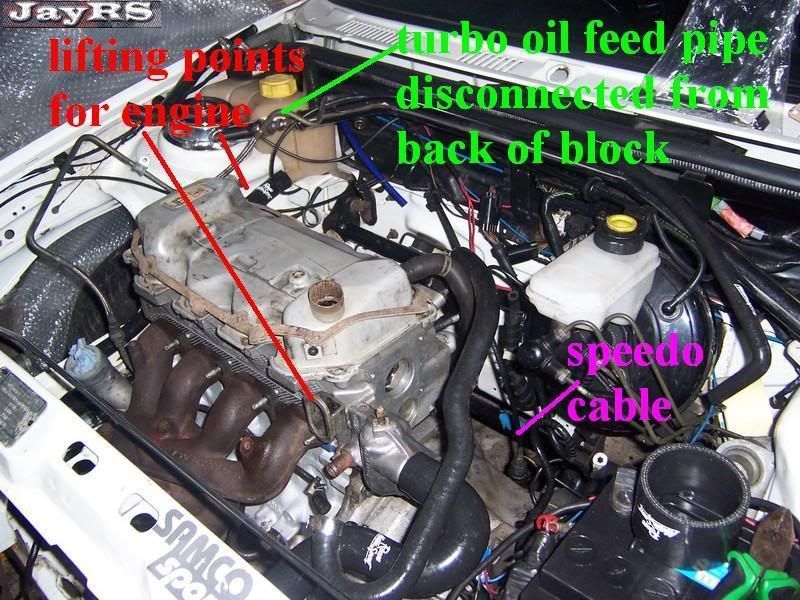
Inlet manifold removal
Like the turbo, this doesn’t have to be removed, but as I done it I will write it, mind you I fully rebuilt my engine so it had to come off anyway, lol
Disconnect all plugs and wiring to it, this can be done with the main multiplug to the right of the inlet as you look at it.
Pop the little clip off the side of the throttle cable, open the throttle and remove the cable from that then unclip the cable from the throttle bracket.
The vac pipe to the brake servo is held in place but the clip in the EFI unit, remove this pipe by pushing the whole pipe into the EFI housing, hold back the outer ring to the EFI housing and pull the big vac pipe out (refitting is just pushing it back in)
Slide the breather pipe off the rocker cover or pull it out from that pipe, take care not to bend the hard plastic piping going towards the inlet manifold, it will prob snap otherwise, but remove breather pot now or leave it on inlet and remove with inlet.
Fuel pipe removal, undo the feed pipe from the end of the fuel rail, and undo the 2 bolts holding the FPR, this will leak a fair bit of fuel so a rag will be good, also at this point put it in a bag or something to keep it clean, and stuff a bit of rag in the fuel rail, dirt and grit will block/kill your injectors.
Once all that’s done remove the inlet but unbolting it from the head, there all 13’s and some are hard to get at, if you want to take the top part off to make it easier you can, just disconnect the plugs to the ISCV the TPS and ACT sensor and undo the 13mm nuts holding it together, but if your hands are nimble you wont need to do this.
Anyhow once its unbolted from the head it can be removed BUT there is a water pipe from the oil cooler connected to it, and that cant really be got at very well until its un bolted, but make life easier, and disconnect from the oil cooler is your best bet.
So by now you have the inlet manifold and exhaust manifold Inc turbo off.
You need to go round the engine and disconnect all wiring, there won’t be a great deal left though, but at same time remove/disconnect water pipes.
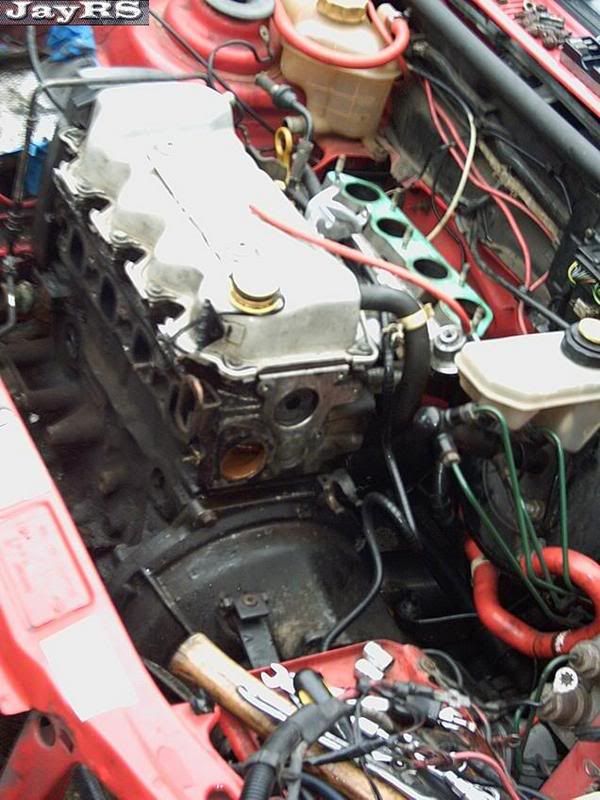
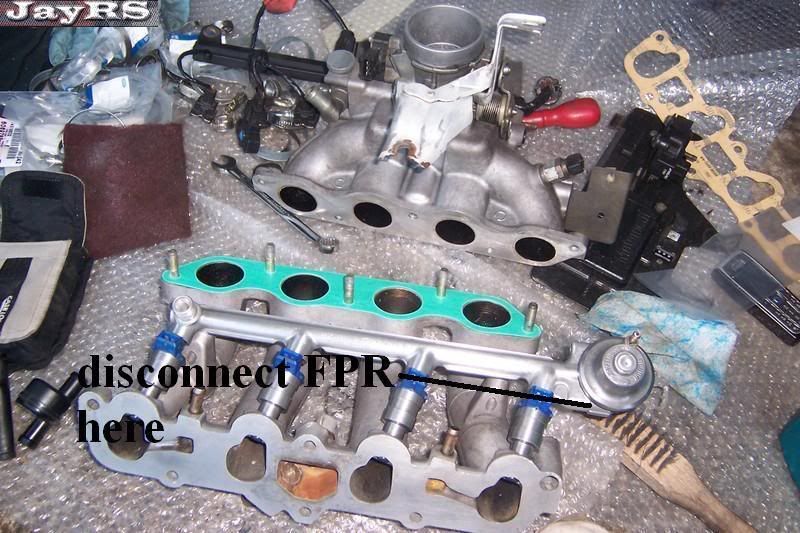
Water pipes
The remaining water pipes don’t really need to be removed from the car just disconnected from the engine, these points are:
Water pump, above the alternator on driver’s side
Oil cooler round the back of block
Front and top of thermostat housing
If you’re not removing rad and turbo, disconnect the turbo from rad and top pipe
Once there done move them out the way
Wiring left
Wiring left will be the CPS above the starter motor
The reverse light switch on front of gear box
Wiring bolted to starter motor
Wiring plugged into/bolted to the alternator
Earth strap on gearbox near clutch cable
Earth strap on head near header tank
Wire to oil pressure switch at back of block
Plug to fan temp switch on thermostat
Wire to temp gauge sensor next to exhaust manifold passenger side
Unplug the speed sensor in the gearbox
Unbolt the earth with to the bolt holding starter motor on
Plug to coil pack
Now disconnect the clutch cable from the clutch fork, I have found a easy way to do this if there is someone to help is to get them to put there foot on the clutch, you wedge something in there to stop the folk moving forward again, when the foots off the pedal unhook the cable with some long nose pliers or such like, and generally remove the obstruction on the fork, if your on your own pull the cable out of the fork with pliers, it wont be easy and your prob end up levering the fork back anyway.
Once that’s fully disconnected from gearbox, undo the Speedo cable on top of the speed censor on the gearbox; take care here as the thread on the speed senor is plastic so it shouldn’t be that tight.
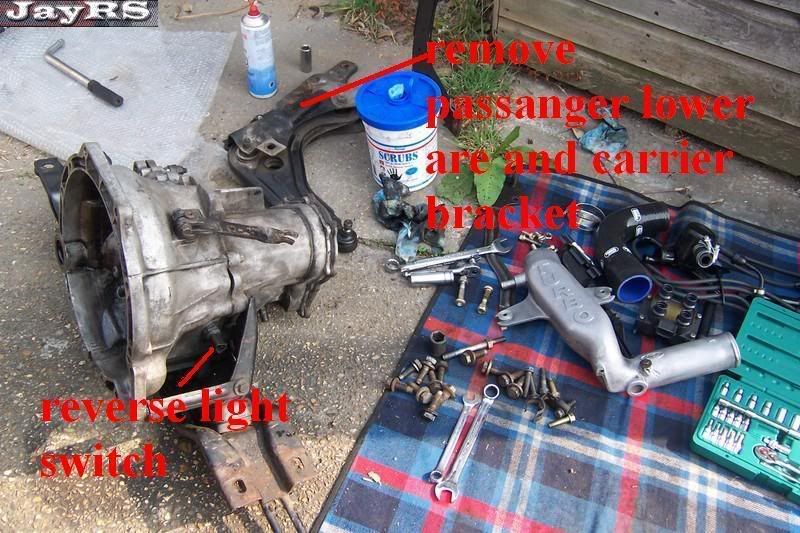
Now you got to think if you want to drop the lot with the drive shafts still in the gearbox or not, depending on what it is your planning to do will prob decide for you, anyhow ill do it with them removed.
You should now be at a point to be ready to raise the car, making sure you have left your fags on the scuttle out of reach and a tea cup where it can fall, lol.
Before it goes on the axle stands you much “crack” the hub nuts, I always dink the ends over a lot so it needs the wheel removed to un dink them, what this means is on the end of the CV joint there is a cut out, you tighten the hub nut then dink the flange of the nut into that groove so it doesn’t undo, and because the hub nut will go back on in the same sort of position it doesn’t really allow you to reuse them, but for the sake of a few quid each its not worth reusing them.
Tack the car up and remove the wheel, use a chisel or punch to “un dink” the hub nut (do the same for other side) now if the car is put on axle stand you can get someone to stomp on the brakes to stop it turn while you undo it, but its focking tight hence why you may need the breaker bar/pole for ratchet, or put the wheel back on, lower car and do it through the hole in the wheel, taking car the socket doesn’t slip off and damage the edge of the nuts, once there cracked (both sides) jack the car as high as you can (use the crane to lift it higher if need be see TIPS) and put it on axle stands, make sure the car is high enough and safe (rear wheels should be chocked and hand brake on) now she’s on the stands you can start underneath .
Brake/hub removal
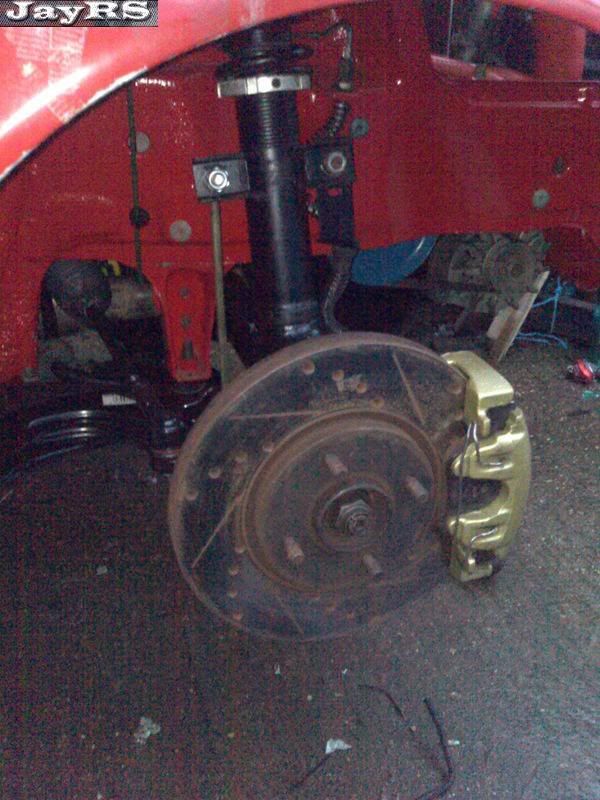
Now the hub nuts have been cracked, undo and remove them, don’t lose the big washer behind though.
Undo the calliper via the 2 17mm bolts that hold it to the hub housing, you can separate it from the carrier and then remove the carrier but what’s the point, you may need a screw driver to prise it off the disc depending on the groove in the disc, take care not to damage the pads, before you fully remove them or before you start, tie some strong string to the spring of the strut, this is to hold the calliper up when off, straining the brake lines by letting them hang isn’t a good idea so tie them up.
Remove the disc, the impact driver will prob be needed to remove the stupid waste of spare disc retaining screws, be ready for them to be drilled out as there focking useless, anyhow once there out remove the disc.
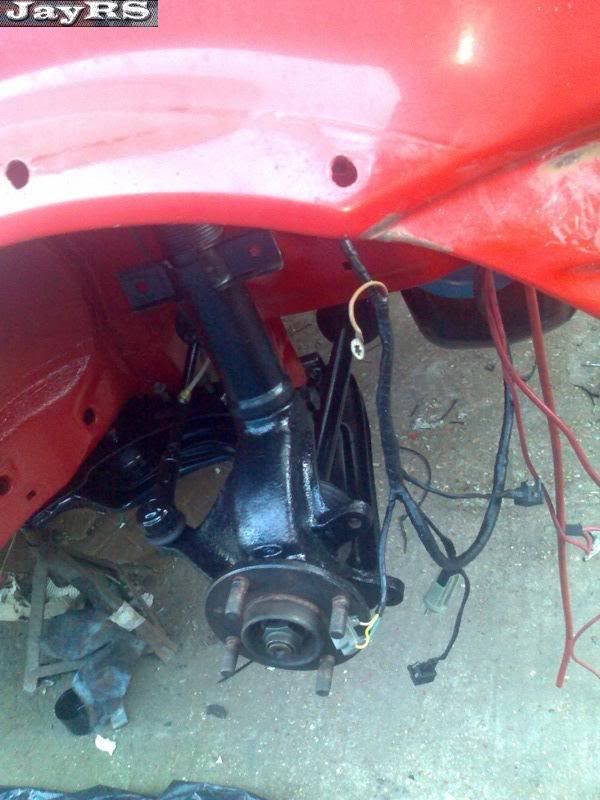
Remove the 19mm bolt on the pinch point of the hub housing holding the shock in, don’t worry it wont fall out, now remove the pinch bolt from the ball joint, you will need a 13mm spanner/socket and a torx bit.
Now remove the nut holding the track rod end to the hub housing, if it has a split pin remove that first.
You can take the bottom arms off if you want by undoing the bolts from underneath but they don’t really have to come off, but it does make thing a little easier, but you will need to remove the lower support brace, but that’s only 4 bolts.
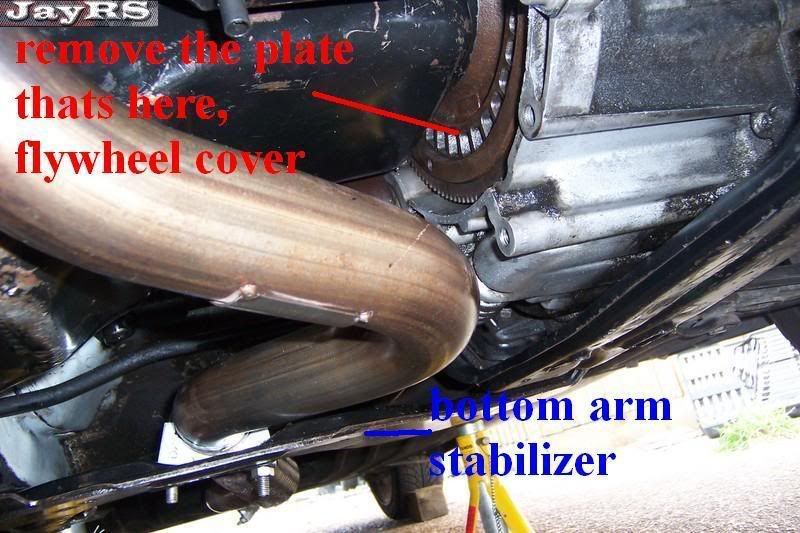
If bottom arm is to be left on, you will need to pop the ball joint out of the hub housing and swing the hub housing to the side, it wont move much but enough, now come the task of removing the hub housing from the shock, at this point it may be worth winding the hub nut back on a few turns and whacking with a hammer just until the cv moves in the hub, it only need to move, don’t whack it to much as it wont come out and you don’t want to damage the thread, do not whack the end without a nut on it of your bugger the end/thread.
Using the copper mallet, hit the hub housing at the top to get it to come away from the shock, you will prob need to WD40 this and allow it to work its was down, but lets say it comes off, hold the drive shaft and slide the hub housing off of the cv joint, don’t allow the drive shaft to hang about, support the end with string etc just so its not at a bad angle.
Repeated for other side (see tips at this point)
I normally remove the drive shafts from the inner cv joints as I have a nice little tool that’s better than circlip pliers and its takes seconds and gets them out the way, but this will be better done when the exhaust is out the way and gear linkage etc, but for know here’s how ya do it, if you want to remove them, snip both tie wraps holding the boot gator on and slide it back, if you have the inner cv with 3 rollers they just pull out and jobs done, if you have the ball bearing inner ones, you need to locate the circlip which can be found in a large gap in the inner race part of the cv joint and it will be close to the drive shaft it self, spread the circlip and pull the driveshaft out, it prob wont happen first time but keep going till it does.
The other way is to pop the CV joints out of the gearbox, now gearbox oil stinks, it never washes out of clothes so don’t even waste your time trying (see tips).
If CV’s are to be popped, use a pry bar or small crowbar or such like to pope them out, they can be very hard at time but will come out, and oil will do every where so have a bowl ready.
Or leave them in but supported until the engine is out the car then remove them.
Something to watch here, the escort rs turbo came with LSD the fiestas didn’t, no fiestas did, if you have a known lsd box skip this part, if you don’t read on.
When both inner cv joints have been removed, you run the risk of the gears dropping in the gearbox, the planet and sun gears in the diff can and do slip out of place, although they can be slide back up ive seen them drop and that’s game over most of the time, gearbox strip down!, so if you have a bit of broom handle or some thick wire like house electrical wire to stuff in to stop them gears dropping your on a winner, as long as it stays in there., my advice, if you can, leave the cv joints in, or just remove the drivers (long) one 1 cv joint left in the box is enough to stop any gears dropping.
Disconnect the down pipe from the exhaust, if you have a stainless with the down pipe in one and it meets under the car, more fool you, but disconnect it from under the car and that’s done, if you have standard set up, remove the down pipe from exhaust, the front section has to be removed from the mid section of the exhaust to allow room to drop the engine, although sometimes it can be left and pushed to one side, your call though.
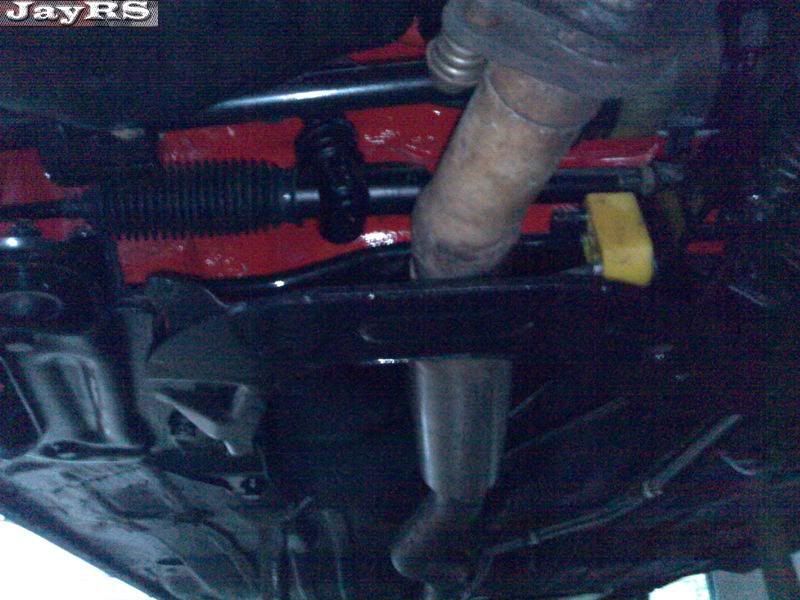
Before removing the gear linkage, put the car in 4th gear (it makes it easy when reconnecting see TIPS) Remove the gear linkage by removing the exhaust hanger on the gear box, then remove that long bolt out of the stabilizer bar, undo the pinch bolt to the selector shaft.
It will get in the way and if it is pushed to the side to much the rubber will split trust me ive done it, lol, so pull the gator up inside the car and undo the 4 nuts holding it to the floor so the linkage comes out, take the gear knob and gator off first though)
**At this point, also remove the small flywheel back cover via the 2 bolts, if you don’t, you won’t disconnect the gearbox from the engine very easy later
If you haven’t decided to already, remove the starter motor and alternator, again although not 100% needed it does give more room.
To remove the starter motor, undo the 3 bolts holding it on, and lift out, to remove the alternator remove the belt cover underneath with flat head screw driver on the plastic twist clips, slacken the adjuster bolt and push alternator towards back, slip belt off, then remove the 2 bolts and the adjuster bolt and lift out.
You should now be left with nothing connected to the engine in any way.
At this point you will notice that you had to remove the lifting eye from the rear of the head driver’s side, re fit it, my advice, pack it down with washers so it’s not floating about.
Rope/chain or strap the engine up, take the slack, remove the long bolt that goes through the driver’s inner wing to the engine mount.
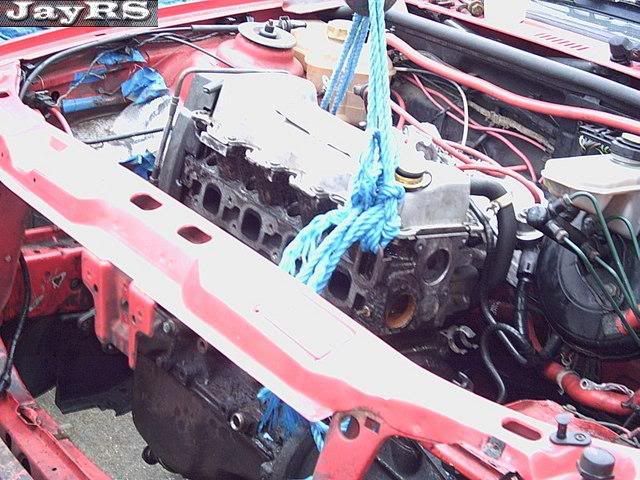
Now remove the gearbox mounts, you can leave the gearbox cradle on at this point, remove the 4 bolts holding the gearbox cradle up, slacken them all before removing any, and don’t be laying directly under it, just in case…
Once there all removed, the only bolt left it the nut on the top of the engine mount on the drivers strut near the heard tank. Undo this, it should drop or very little.
Now that’s down lower the engine to the floor or on something with wheels etc, but nothing to high, you got to get it out yet remember.
You may need to rope the shell up and lift it a bit to get engine out, once it’s out job done.
Gearbox
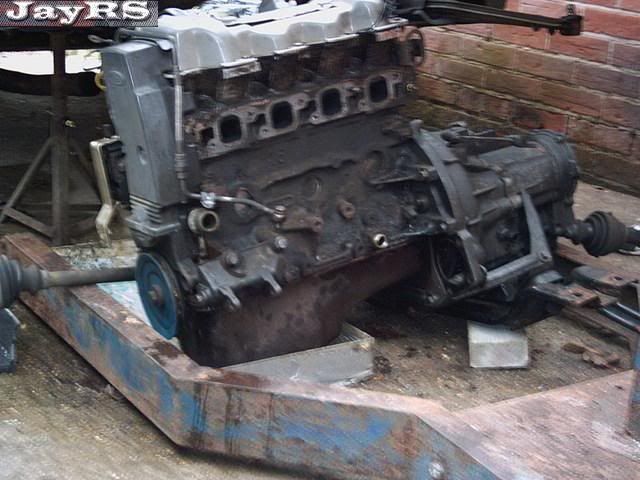
To separate the gearbox from the engine, undo the 6 bolts securing the bell housing to the block, make sure the engine it self is secure and wont topple over, take the weight of the gearbox and pull it off., fit it back on the same way you remove it.
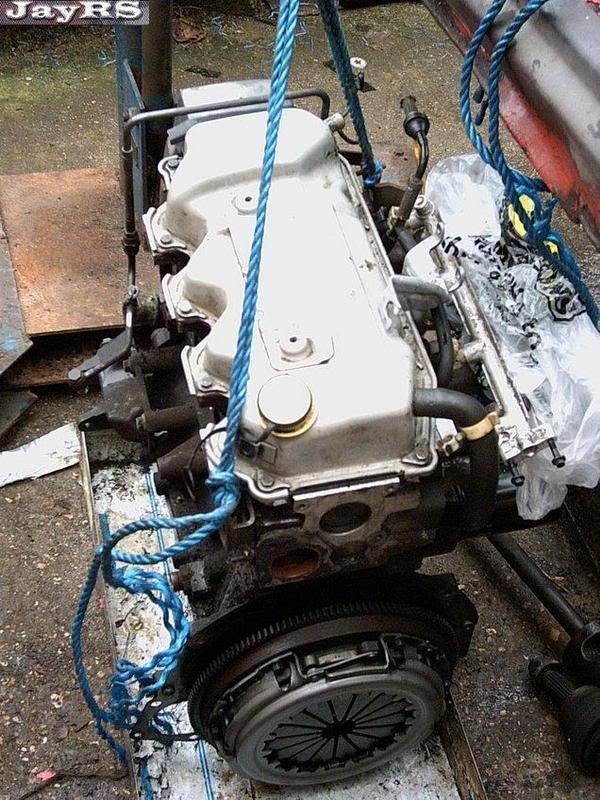
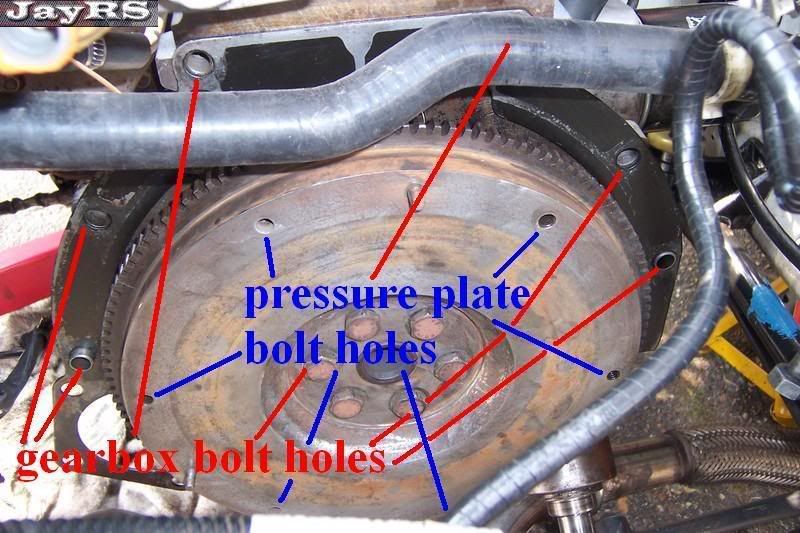
Clutch, to remove clutch slacken all the bolter that hold the pressure plate on, once all bolts are out prise the pressure plate off with a flat headed screw driver.
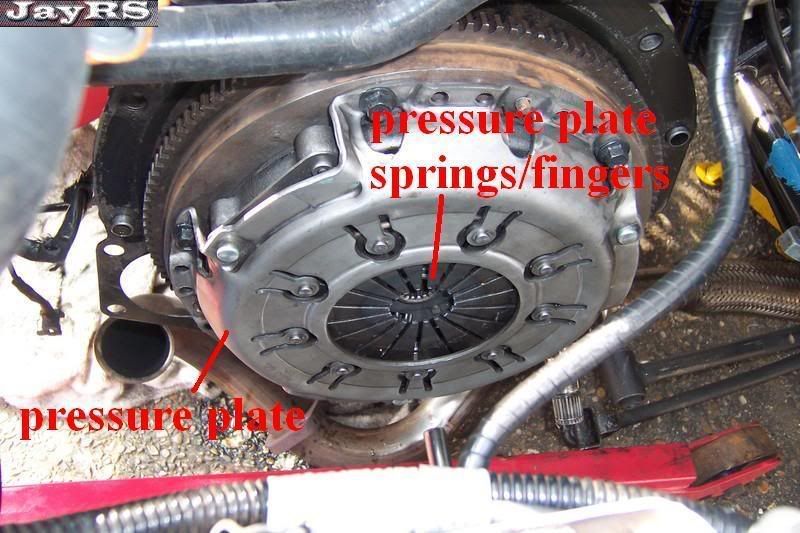
To re fit the clutch or a new one, put the clutch plate on and then the pressure plate, nip the bolts up, you will need to align the clutch plate, if you haven’t got a tool for this you can make one, your need a length of tube or bar, a off cut of 15mm copper pipe will do and im sure a plumbing suppliers will give ya a off cut if you ask, and then stick it through till it lines in the fly wheel, note there the clutch plate comes to on the pipe, remove the pipe and then wrap tap around the pipe until to built up enough to fit nice in the splinned part of the clutch plate, you don’t want it to tight.
When the pipe is central to the fingers on the pressure plate it’s aligned, or as near damn it, this must be done or the input shaft of the gearbox won’t go through so the gearbox won’t go back on.
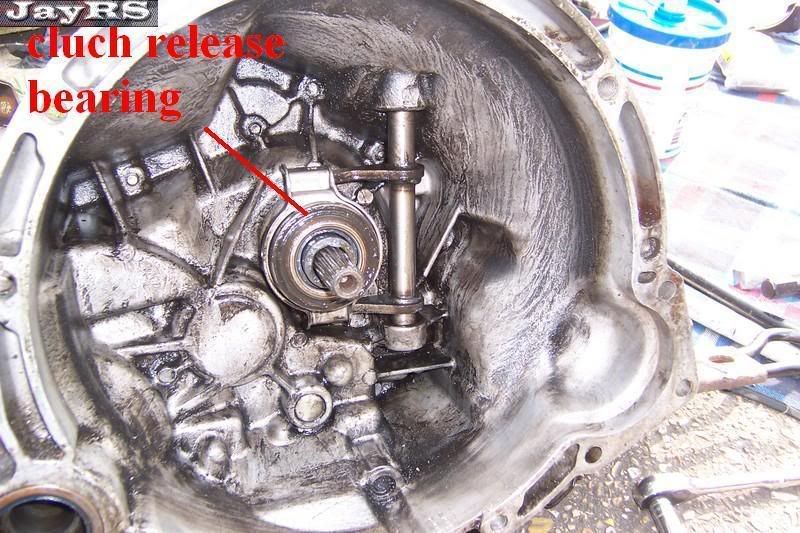
To remove the release bearing you need to slid it forward and unhook it, and refit new one/old one back on in the same way, if your using a Escort rs turbo box of any early boxes, you can unbolt the bearing holder, pull the fork up and remove the bearing on the holder, fit the new bearing and refit it in the bell housing.
Refitting engine
I hate to write this, but Refitting is basically the reverse of removing but take these points into mind.
Replace any bolts that are bad, rounded head, knackered threads etc.
Copper grease the bolts, it make it far easier should you need to remove them again
When clicking the inner cv joint back into gearbox, make sure they fully click into the gearbox; you may need to tap them in, take car not to damage the edge, use a bit of wood over the cv and hit the wood rather than the cv, not to hard though.
If you lose gearbox oil remember to top it up
Don’t skimp, if a gasket is damaged fit a new one
When reconnecting the gearbox linkage, as the gearbox is in 4th, select 4th with the linkage and put it back on where the line is, (you see the line I mean) and test, miner adjustment may be needed but you should have gears if done right.
Once you have rebuilt you engine or what ever re fit it
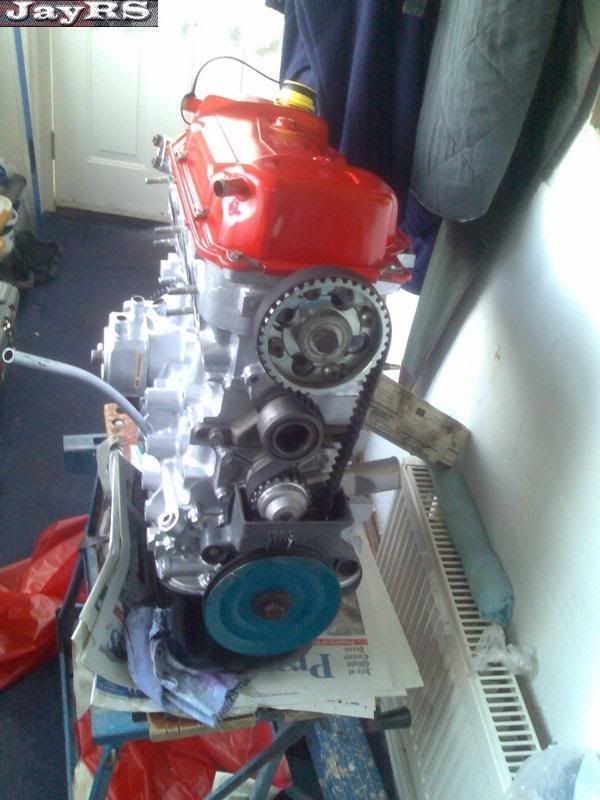
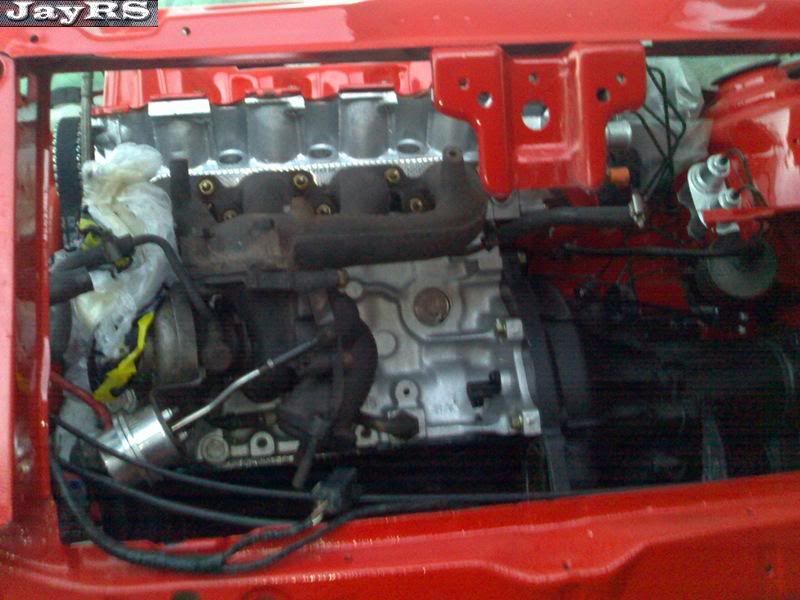
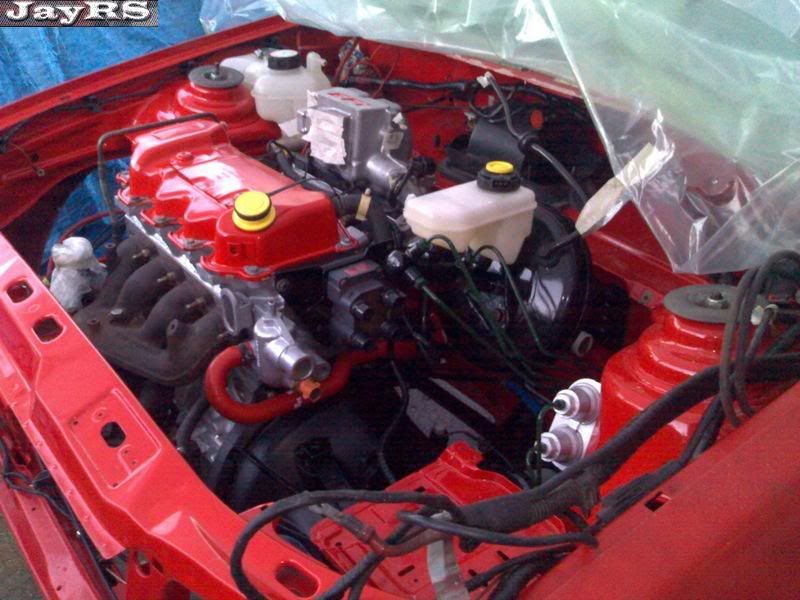
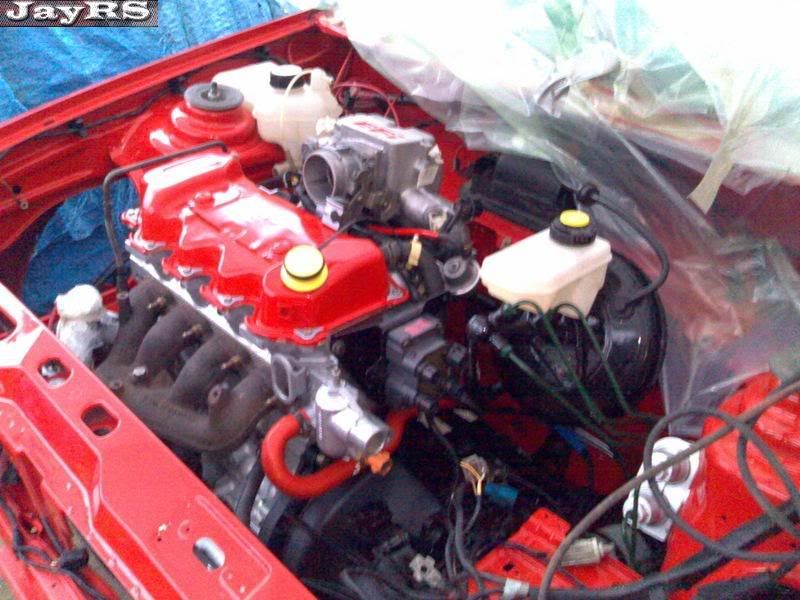
Meanings
ISCV idle speed control valve
EFI electronic fuel injection
FPR fuel pressure regulator
ACT actual charge temp sensor
TPS throttle position sensor
CPS crank position sensor
Tips
Before you start
First off, get the car a few feet or more away than where its gunna be and take off the bottom water hose if you can, this will drain all/most of the water out but not where your gunna be laying
Relieve the fuel pressure, take the fuel cap off, take the fuel pump fuse out and crank the car for a few seconds, this will relive the pressure in the system but you will still get fuel spillage when fuel lines are disconnected, and a lot from the FPR
Removing air box and head lights.
the intake pipe that goes from the air box to next to the rad just pulls off, you might need to remove the head light to do this, to remove head light, release the spring holder holding the indicator in to release indicator, once that’s out undo the 10mm screw holding headlight in, and un clip the light out, to remove air box, there is a nut at the front of if that bolts it to the chassis part near front panel, and it is also bolted to the inner wing, the rubber holders will prob break but you might be lucky, after its un bolted it pulls out of a grommet that’s in the strut housing, don’t forget to remove the breather pipe from the air box or breather also.
You can leave the boost control valve on the air box but remove the vac pipes from the turbo charger, and don’t forget to disconnect the plug for the boost control valve.
Stubborn bolt?
If you have a stubborn bolt/nut and you have and keep WD40ing it, undo it, then do it up a tiny bit then spray again, try doing it up a turn or so then undoing again, may take time, but it takes longer to remove a snapped bolt or stud, so take ya time.
If you need the car higher, rope it (or chain etc) the car to the crane, you can use the engine lifting eyes for this if the mounts are known to be good, if in doubt strap it to the front chassis legs, and lift the front end up as high as you want making sure the axle stands will go high enough.
To make it easier when removing and refitting the engine, remove the passenger (n/s) bottom arm carrier as well as the bottom arm as this gives that little bit more room for the gearbox that can at times be needed, you will need to unbolt and support the front ARB if there’s one fitted, but on unbolt on the passenger side
If you get gearbox oil on your clothes, bin them, don’t waste time washing, it stinks, will never come out, and coats the inside of the washing machine with gearbox oil, and the only way to get that coating off is to put it on a boiled wash empty, maybe even a couple of times, trust me!!
Why not replace the old cv boot gators why the shafts are off, saves a lot of messing about later on if they split
There ya go chaps, hope it helps, no dougt ive missed some minor details somewhere along the way but I think ive covered it all.
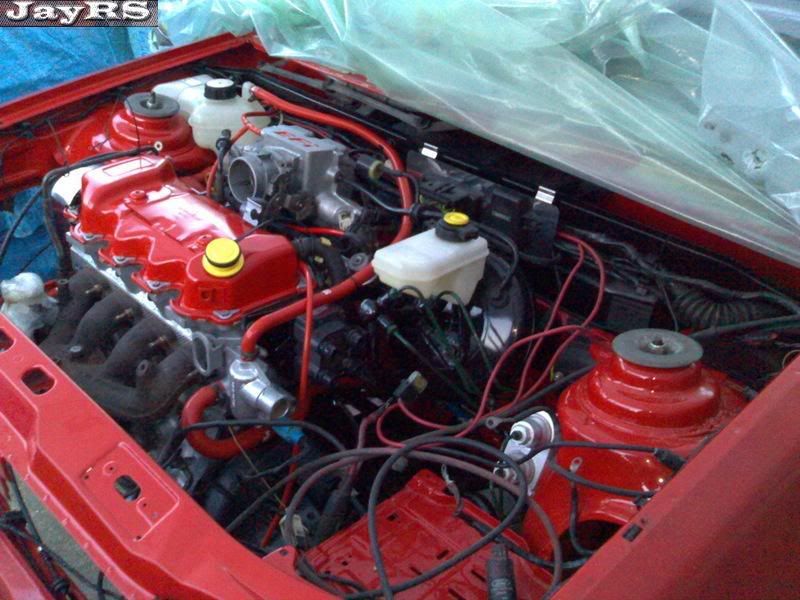
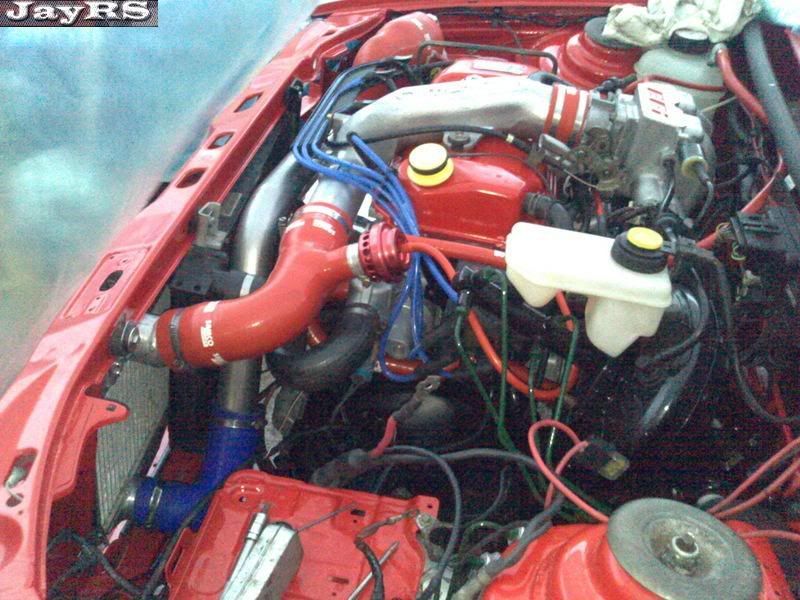
Pics of cars used are mine (red ) or knuckles (white)
Here is a guide to removing/replacing an engine in a mk3 fiesta.
I have based it on a rs turbo engine, as I have a rs turbo and have since done a engine rebuild on it, which I might do a guide for too, but I’ll think about it.
First off, as I didn’t intend to do a guide for this I will not have pictures of locations for certain things so you will have to bear with it, but like all work on cars if you have any doubt about your ability to do it, best off getting help or letting someone else do it, but if you do it your self, have a Haynes manual to hand, although that will tell you how to removing the engine anyway, you can compared it to my guide if ya want,lol
I will do my very best to list all the tools you will need but don’t take it as gospel, 9 times out of 10 you get bad bolts/nut which need other tools to removing them etc
Tools needed
Car jack, bigger the better
Axle stands, 2 will do
Engine hoist/crane
Wheel chocks/bricks etc
Good strong rope, strapping or chains with shackles
Socket set, ½” drive a min really, with extensions etc etc
3/8” drive or ¼” drive stuff comes in handy too
Sockets needed, 7, 8, 10, 13, 15, 17, 18, 19, 30mm you don’t have it, get it!
6mm socket for jubilee clips if ya want too
Breaker bar or pipe for use on ratchet/T bar
Spanners, as above, full range really
Hammer
Copper hide mallet
Chisel/punch
*poss.* impact driver for use on the screws for disc’s
Screw drivers, various sizes both flat and Philips
torx bits (star bits)
Torque wrench (if ya got or can borrow one)
Adjustable spanner, med size
Circlip pliers
New parts you will or might need
New hub nuts x2
Anti freeze
Split pins (if you got them sort if track rod ends)
Bottom ball joint bolts (these can be a c**t at times)
Gearbox oil
Exhaust manifold gasket
Inlet manifold gaskets (might be worth getting a head set, it don’t come with head gasket and bolts, it’s just all small gaskets)
Other stuff you might/will need
Safety glasses (stop the cr@p failing in ya eyes, nothing worse!
WD40, poss. lots off it
Copper grease (recommended!!!!)
Something to lay on, cardboard or something
Latex gloves if that’s your thing, lol
Rag
You can lift the car now and axle stand it and work on it or leave it on the deck till its ready, can’t remember which way round I done mine but were start with it on the deck and removing the bits not needed.
Right first off, chock the rear wheels, leave hand brake on, disconnect the battery, now if some of the jubilee clips look a bit dry or a bit rusty, give them a shot of WD40 and leave them.

Start by removing the bits that are gunna get in the way, it doesn’t have to be in this order but its how I would do it, first, bonnet, lol then remove top boost hose by taking off the 2 jubilee clips holding it on, then remove the charge carrier buy removing the intake pipe to the ISCV, and also the jubilee clip holding it to the throttle body of the EFI unit, also remove the 2 torx screws holding the HT lead holder and (if not snapped off, lol) the lugs for the charge pipe, (unplug and remove if needed, the HT leads) then remove the 2, 6mm (10mm head)bolts holding it to the rocker cover and remove.
Then remove the “charge” pipe, which is the stainless steel one from the turbo to the bottom of the intercooler, at this point stuff some rag into the top hole of the turbo and to holes in the intercooler to stop cr@p getting into them.
Now you got a bit more room remove the air intake pipe from the turbo, if this is connected to a induction kit/filter leave that on, on the other end, if it’s connected to the standard air box, remove the big jubilee
The standard air box can stay in place if you want, if you want to remove it see TIPS

At this point I would remove the rad and intercooler, they are screwed together and prob best left that way.
Remove the front bumper but undoing the screws in the arches, then it is 4 nuts, 2 a side under the headlights on the front panel, see TIPS for removing head lights as it’s the same on both sides.,
With the bumper coming off, you will see plugs for the bumper lights, unplug them and that’s the bumper off.

With the bumper off you can remove the fan, UN plug it and un bolt it from thread and car, be prepared for rusty heads to round off though. But if all goes well it can be un clipped from the rad, although the top part of the rad will probably have to be released from the front panel to do so.
Removing the rad and intercooler is easy, they do come apart but it might be worth leaving it but that’s your call.
Take the top and bottom water hoses off the rad, as well as the small one to the turbo, now the small one might be easier disconnected from the turbo water pipe rather than the rad, again, depends on the car etc.
May as well take the top hose off the thermostat hosing at this point too, remember to disconnect from turbo water pipe before yanking it out.

Remove the rad and intercooler by undoing the bolts on the front panel, the bottom of the rad just sits in a couple of slots so when realised it will lift out, take care not to smack it onto the turbo/manifold as the fins of the rad wont thank you for it, if need be slide a bit of thin hard board down between to protect the rad.
Remember, if any wires/plugs are in your way disconnect them first to save damage, I.E rad fan temp switch and temp gauge sender.
With the rad out of the way you can now remove the turbo, some will say you don’t have to, and TBH you don’t really need to, but I will explain how to for those who want to.

Turbo removal
Remove the nuts holding the down pipe to the turbo from underneath, these are norm 19mm but ive come across 18mm ones,
Disconnect the vac pipes on the turbo, if you have removed air box already you should have done this already
To remove the turbo charger, there are 2 ways to do this, first off with the manifold disconnected, undo the 3, 15mm bolts holding the turbo to the manifold, these will be very tight and will need blasting with WD40 all along the way, be careful not to snap them, there not cheap (£18 for the 3) and cause more problems if they snap (see tips) once out your home and dry, don’t worry if you don’t find a gasket, there isn’t one, now you will need to remove the manifold, undo all the 13mm nuts and remove it, don’t worry to much if the studs come out the head, just remember where they go or fit new ones.
To remove turbo with it connected to manifold, just undo the manifold nuts, take note of the lines above though.
**Right before you remove all the bolts holding it to the manifold/manifold to head, you have to decide how you want to disconnect the oil feed and return? To do the return you have the main nut on the block, or the 2 small 13mm bolts underneath?? I say the main nut on the block, far easier if it will undo, of course if it wont, you will need a long extension on a 3/8 drive ratchet and a UJ joint and 13mm socket, oh and enough room under the car to get at it, either way once the oil return has been disconnected the turbos ready to come out
now the oil feed is easier by far to get at with the turbo off the manifold, however some people disconnect it from the back of the block and pull the whole lot out, or break into the line at 1 of the joints, I don’t recommend that though, ive always taken the turbo off the manifold but if you want to disconnect from the back of the block you may have to wait till your under the car or the inlet manifold is off before you can get to it properly.
Remember, you don’t really have to remove the turbo.


Inlet manifold removal
Like the turbo, this doesn’t have to be removed, but as I done it I will write it, mind you I fully rebuilt my engine so it had to come off anyway, lol
Disconnect all plugs and wiring to it, this can be done with the main multiplug to the right of the inlet as you look at it.
Pop the little clip off the side of the throttle cable, open the throttle and remove the cable from that then unclip the cable from the throttle bracket.
The vac pipe to the brake servo is held in place but the clip in the EFI unit, remove this pipe by pushing the whole pipe into the EFI housing, hold back the outer ring to the EFI housing and pull the big vac pipe out (refitting is just pushing it back in)
Slide the breather pipe off the rocker cover or pull it out from that pipe, take care not to bend the hard plastic piping going towards the inlet manifold, it will prob snap otherwise, but remove breather pot now or leave it on inlet and remove with inlet.
Fuel pipe removal, undo the feed pipe from the end of the fuel rail, and undo the 2 bolts holding the FPR, this will leak a fair bit of fuel so a rag will be good, also at this point put it in a bag or something to keep it clean, and stuff a bit of rag in the fuel rail, dirt and grit will block/kill your injectors.
Once all that’s done remove the inlet but unbolting it from the head, there all 13’s and some are hard to get at, if you want to take the top part off to make it easier you can, just disconnect the plugs to the ISCV the TPS and ACT sensor and undo the 13mm nuts holding it together, but if your hands are nimble you wont need to do this.
Anyhow once its unbolted from the head it can be removed BUT there is a water pipe from the oil cooler connected to it, and that cant really be got at very well until its un bolted, but make life easier, and disconnect from the oil cooler is your best bet.
So by now you have the inlet manifold and exhaust manifold Inc turbo off.
You need to go round the engine and disconnect all wiring, there won’t be a great deal left though, but at same time remove/disconnect water pipes.


Water pipes
The remaining water pipes don’t really need to be removed from the car just disconnected from the engine, these points are:
Water pump, above the alternator on driver’s side
Oil cooler round the back of block
Front and top of thermostat housing
If you’re not removing rad and turbo, disconnect the turbo from rad and top pipe
Once there done move them out the way
Wiring left
Wiring left will be the CPS above the starter motor
The reverse light switch on front of gear box
Wiring bolted to starter motor
Wiring plugged into/bolted to the alternator
Earth strap on gearbox near clutch cable
Earth strap on head near header tank
Wire to oil pressure switch at back of block
Plug to fan temp switch on thermostat
Wire to temp gauge sensor next to exhaust manifold passenger side
Unplug the speed sensor in the gearbox
Unbolt the earth with to the bolt holding starter motor on
Plug to coil pack
Now disconnect the clutch cable from the clutch fork, I have found a easy way to do this if there is someone to help is to get them to put there foot on the clutch, you wedge something in there to stop the folk moving forward again, when the foots off the pedal unhook the cable with some long nose pliers or such like, and generally remove the obstruction on the fork, if your on your own pull the cable out of the fork with pliers, it wont be easy and your prob end up levering the fork back anyway.
Once that’s fully disconnected from gearbox, undo the Speedo cable on top of the speed censor on the gearbox; take care here as the thread on the speed senor is plastic so it shouldn’t be that tight.

Now you got to think if you want to drop the lot with the drive shafts still in the gearbox or not, depending on what it is your planning to do will prob decide for you, anyhow ill do it with them removed.
You should now be at a point to be ready to raise the car, making sure you have left your fags on the scuttle out of reach and a tea cup where it can fall, lol.
Before it goes on the axle stands you much “crack” the hub nuts, I always dink the ends over a lot so it needs the wheel removed to un dink them, what this means is on the end of the CV joint there is a cut out, you tighten the hub nut then dink the flange of the nut into that groove so it doesn’t undo, and because the hub nut will go back on in the same sort of position it doesn’t really allow you to reuse them, but for the sake of a few quid each its not worth reusing them.
Tack the car up and remove the wheel, use a chisel or punch to “un dink” the hub nut (do the same for other side) now if the car is put on axle stand you can get someone to stomp on the brakes to stop it turn while you undo it, but its focking tight hence why you may need the breaker bar/pole for ratchet, or put the wheel back on, lower car and do it through the hole in the wheel, taking car the socket doesn’t slip off and damage the edge of the nuts, once there cracked (both sides) jack the car as high as you can (use the crane to lift it higher if need be see TIPS) and put it on axle stands, make sure the car is high enough and safe (rear wheels should be chocked and hand brake on) now she’s on the stands you can start underneath .
Brake/hub removal

Now the hub nuts have been cracked, undo and remove them, don’t lose the big washer behind though.
Undo the calliper via the 2 17mm bolts that hold it to the hub housing, you can separate it from the carrier and then remove the carrier but what’s the point, you may need a screw driver to prise it off the disc depending on the groove in the disc, take care not to damage the pads, before you fully remove them or before you start, tie some strong string to the spring of the strut, this is to hold the calliper up when off, straining the brake lines by letting them hang isn’t a good idea so tie them up.
Remove the disc, the impact driver will prob be needed to remove the stupid waste of spare disc retaining screws, be ready for them to be drilled out as there focking useless, anyhow once there out remove the disc.

Remove the 19mm bolt on the pinch point of the hub housing holding the shock in, don’t worry it wont fall out, now remove the pinch bolt from the ball joint, you will need a 13mm spanner/socket and a torx bit.
Now remove the nut holding the track rod end to the hub housing, if it has a split pin remove that first.
You can take the bottom arms off if you want by undoing the bolts from underneath but they don’t really have to come off, but it does make thing a little easier, but you will need to remove the lower support brace, but that’s only 4 bolts.

If bottom arm is to be left on, you will need to pop the ball joint out of the hub housing and swing the hub housing to the side, it wont move much but enough, now come the task of removing the hub housing from the shock, at this point it may be worth winding the hub nut back on a few turns and whacking with a hammer just until the cv moves in the hub, it only need to move, don’t whack it to much as it wont come out and you don’t want to damage the thread, do not whack the end without a nut on it of your bugger the end/thread.
Using the copper mallet, hit the hub housing at the top to get it to come away from the shock, you will prob need to WD40 this and allow it to work its was down, but lets say it comes off, hold the drive shaft and slide the hub housing off of the cv joint, don’t allow the drive shaft to hang about, support the end with string etc just so its not at a bad angle.
Repeated for other side (see tips at this point)
I normally remove the drive shafts from the inner cv joints as I have a nice little tool that’s better than circlip pliers and its takes seconds and gets them out the way, but this will be better done when the exhaust is out the way and gear linkage etc, but for know here’s how ya do it, if you want to remove them, snip both tie wraps holding the boot gator on and slide it back, if you have the inner cv with 3 rollers they just pull out and jobs done, if you have the ball bearing inner ones, you need to locate the circlip which can be found in a large gap in the inner race part of the cv joint and it will be close to the drive shaft it self, spread the circlip and pull the driveshaft out, it prob wont happen first time but keep going till it does.
The other way is to pop the CV joints out of the gearbox, now gearbox oil stinks, it never washes out of clothes so don’t even waste your time trying (see tips).
If CV’s are to be popped, use a pry bar or small crowbar or such like to pope them out, they can be very hard at time but will come out, and oil will do every where so have a bowl ready.
Or leave them in but supported until the engine is out the car then remove them.
Something to watch here, the escort rs turbo came with LSD the fiestas didn’t, no fiestas did, if you have a known lsd box skip this part, if you don’t read on.
When both inner cv joints have been removed, you run the risk of the gears dropping in the gearbox, the planet and sun gears in the diff can and do slip out of place, although they can be slide back up ive seen them drop and that’s game over most of the time, gearbox strip down!, so if you have a bit of broom handle or some thick wire like house electrical wire to stuff in to stop them gears dropping your on a winner, as long as it stays in there., my advice, if you can, leave the cv joints in, or just remove the drivers (long) one 1 cv joint left in the box is enough to stop any gears dropping.
Disconnect the down pipe from the exhaust, if you have a stainless with the down pipe in one and it meets under the car, more fool you, but disconnect it from under the car and that’s done, if you have standard set up, remove the down pipe from exhaust, the front section has to be removed from the mid section of the exhaust to allow room to drop the engine, although sometimes it can be left and pushed to one side, your call though.

Before removing the gear linkage, put the car in 4th gear (it makes it easy when reconnecting see TIPS) Remove the gear linkage by removing the exhaust hanger on the gear box, then remove that long bolt out of the stabilizer bar, undo the pinch bolt to the selector shaft.
It will get in the way and if it is pushed to the side to much the rubber will split trust me ive done it, lol, so pull the gator up inside the car and undo the 4 nuts holding it to the floor so the linkage comes out, take the gear knob and gator off first though)
**At this point, also remove the small flywheel back cover via the 2 bolts, if you don’t, you won’t disconnect the gearbox from the engine very easy later
If you haven’t decided to already, remove the starter motor and alternator, again although not 100% needed it does give more room.
To remove the starter motor, undo the 3 bolts holding it on, and lift out, to remove the alternator remove the belt cover underneath with flat head screw driver on the plastic twist clips, slacken the adjuster bolt and push alternator towards back, slip belt off, then remove the 2 bolts and the adjuster bolt and lift out.
You should now be left with nothing connected to the engine in any way.
At this point you will notice that you had to remove the lifting eye from the rear of the head driver’s side, re fit it, my advice, pack it down with washers so it’s not floating about.
Rope/chain or strap the engine up, take the slack, remove the long bolt that goes through the driver’s inner wing to the engine mount.

Now remove the gearbox mounts, you can leave the gearbox cradle on at this point, remove the 4 bolts holding the gearbox cradle up, slacken them all before removing any, and don’t be laying directly under it, just in case…
Once there all removed, the only bolt left it the nut on the top of the engine mount on the drivers strut near the heard tank. Undo this, it should drop or very little.
Now that’s down lower the engine to the floor or on something with wheels etc, but nothing to high, you got to get it out yet remember.
You may need to rope the shell up and lift it a bit to get engine out, once it’s out job done.

Gearbox
To separate the gearbox from the engine, undo the 6 bolts securing the bell housing to the block, make sure the engine it self is secure and wont topple over, take the weight of the gearbox and pull it off., fit it back on the same way you remove it.


Clutch, to remove clutch slacken all the bolter that hold the pressure plate on, once all bolts are out prise the pressure plate off with a flat headed screw driver.

To re fit the clutch or a new one, put the clutch plate on and then the pressure plate, nip the bolts up, you will need to align the clutch plate, if you haven’t got a tool for this you can make one, your need a length of tube or bar, a off cut of 15mm copper pipe will do and im sure a plumbing suppliers will give ya a off cut if you ask, and then stick it through till it lines in the fly wheel, note there the clutch plate comes to on the pipe, remove the pipe and then wrap tap around the pipe until to built up enough to fit nice in the splinned part of the clutch plate, you don’t want it to tight.
When the pipe is central to the fingers on the pressure plate it’s aligned, or as near damn it, this must be done or the input shaft of the gearbox won’t go through so the gearbox won’t go back on.
To remove the release bearing you need to slid it forward and unhook it, and refit new one/old one back on in the same way, if your using a Escort rs turbo box of any early boxes, you can unbolt the bearing holder, pull the fork up and remove the bearing on the holder, fit the new bearing and refit it in the bell housing.

Refitting engine
I hate to write this, but Refitting is basically the reverse of removing but take these points into mind.
Replace any bolts that are bad, rounded head, knackered threads etc.
Copper grease the bolts, it make it far easier should you need to remove them again
When clicking the inner cv joint back into gearbox, make sure they fully click into the gearbox; you may need to tap them in, take car not to damage the edge, use a bit of wood over the cv and hit the wood rather than the cv, not to hard though.
If you lose gearbox oil remember to top it up
Don’t skimp, if a gasket is damaged fit a new one
When reconnecting the gearbox linkage, as the gearbox is in 4th, select 4th with the linkage and put it back on where the line is, (you see the line I mean) and test, miner adjustment may be needed but you should have gears if done right.
Once you have rebuilt you engine or what ever re fit it


Meanings
ISCV idle speed control valve
EFI electronic fuel injection
FPR fuel pressure regulator
ACT actual charge temp sensor
TPS throttle position sensor
CPS crank position sensor
Tips
Before you start
First off, get the car a few feet or more away than where its gunna be and take off the bottom water hose if you can, this will drain all/most of the water out but not where your gunna be laying
Relieve the fuel pressure, take the fuel cap off, take the fuel pump fuse out and crank the car for a few seconds, this will relive the pressure in the system but you will still get fuel spillage when fuel lines are disconnected, and a lot from the FPR
Removing air box and head lights.
the intake pipe that goes from the air box to next to the rad just pulls off, you might need to remove the head light to do this, to remove head light, release the spring holder holding the indicator in to release indicator, once that’s out undo the 10mm screw holding headlight in, and un clip the light out, to remove air box, there is a nut at the front of if that bolts it to the chassis part near front panel, and it is also bolted to the inner wing, the rubber holders will prob break but you might be lucky, after its un bolted it pulls out of a grommet that’s in the strut housing, don’t forget to remove the breather pipe from the air box or breather also.
You can leave the boost control valve on the air box but remove the vac pipes from the turbo charger, and don’t forget to disconnect the plug for the boost control valve.
Stubborn bolt?
If you have a stubborn bolt/nut and you have and keep WD40ing it, undo it, then do it up a tiny bit then spray again, try doing it up a turn or so then undoing again, may take time, but it takes longer to remove a snapped bolt or stud, so take ya time.
If you need the car higher, rope it (or chain etc) the car to the crane, you can use the engine lifting eyes for this if the mounts are known to be good, if in doubt strap it to the front chassis legs, and lift the front end up as high as you want making sure the axle stands will go high enough.
To make it easier when removing and refitting the engine, remove the passenger (n/s) bottom arm carrier as well as the bottom arm as this gives that little bit more room for the gearbox that can at times be needed, you will need to unbolt and support the front ARB if there’s one fitted, but on unbolt on the passenger side
If you get gearbox oil on your clothes, bin them, don’t waste time washing, it stinks, will never come out, and coats the inside of the washing machine with gearbox oil, and the only way to get that coating off is to put it on a boiled wash empty, maybe even a couple of times, trust me!!
Why not replace the old cv boot gators why the shafts are off, saves a lot of messing about later on if they split
There ya go chaps, hope it helps, no dougt ive missed some minor details somewhere along the way but I think ive covered it all.
Pics of cars used are mine (red ) or knuckles (white)
Last edited by jayrs on Fri Jul 13, 2007 12:01 pm, edited 5 times in total.
- jayrs
- Elite Post Master


- Posts: 31520
- Joined: Mon Apr 19, 2004 10:32 pm
- Location: I.O.W
- Your car: FRST, XR2, ST170, ST225
Car: 1991 Ford Fiesta RS Turbo
Very nice guide Jay 
Could of done with this around January but never mind
I left the drive shafts in the hubs and just removed them from the gearbox, was a lot more simple. Just undo the lower arm to give you the movement on the hub.
Just remember to put a bowl under the gearbox to catch the oil, yes it does stink of cats piss
Will have a proper read of it later on - for now i need some sleep


~nomad~ :Good god I love Clark.
- knuckles
- Elite Post Master


- Posts: 6841
- Joined: Thu May 19, 2005 2:40 pm
- Location: Hertfordshire
- Your car: Fiesta Rs turbo
- jayrs
- Elite Post Master


- Posts: 31520
- Joined: Mon Apr 19, 2004 10:32 pm
- Location: I.O.W
- Your car: FRST, XR2, ST170, ST225
Car: 1991 Ford Fiesta RS Turbo
- jayrs
- Elite Post Master


- Posts: 31520
- Joined: Mon Apr 19, 2004 10:32 pm
- Location: I.O.W
- Your car: FRST, XR2, ST170, ST225
Car: 1991 Ford Fiesta RS Turbo
6 posts • Page 1 of 1


Twitter
The second 20th Anniversary article, a dive into the history of how the site came about is available here: https://t.co/kbCfZ4sf0R
17:44, 4th December 2021 Twitter Web App
To celebrate https://t.co/wXVkvJipaS being 20 years old this year, I've written a series of articles detailing the… https://t.co/B0vE0Y3KvP
17:42, 4th December 2021 Twitter Web App
Follow fiestaturbo.com on Twitter:
http://twitter.com/fiestaturbo/
Facebook
New article! fiestaturbo.com is 20 years old this year and I'm writing a series delving into the history of it. …
Saturday, 4th December 2021 12:49
Some awesome Escorts from the Fair - FORD FAIR 2021: ESCORT EXHIBITION - …
Sunday, 31st October 2021 17:05
All the best Focuses from Ford Fair - FORD FAIR 2021: FOCUS PEEKING - Which was your …
Thursday, 7th October 2021 22:21
Become a fan:
http://www.facebook.com/fiestaturbo/
RSS Feeds
Subscribe to the RSS feed
What is RSS?
RSS is a technology that lets you use special applications or modern browsers to notify you you when a site is updated. You can then read the updated content in that application or your browser.
To subscribe to these RSS feeds you need to copy the links above. For instructions on how to add it to the feeds you keep track of, consult the documentation of your RSS reader.