Fitting Camber Adjustable Lower Arms *Guide, sort of*
22 posts • Page 1 of 1
Fitting Camber Adjustable Lower Arms *Guide, sort of*
Well, I had an hour with nothing to do, so thought I'd get cracking on the lower arms. My right hand wheel has appeared to be sitting about an inch too far back, which I can only assume is since I came off at a roundabout quite badly three years ago. I changed the very bent left hand lower arm, but the right hand arm seemed ok. When I re-assembled the car after the conversion, I noticed a grazing sound, which, it turns out, was the nose of the ARB torsion bar lightly grazing the driveshaft 
 When I got the tracking done it juuuust about went away, but every now and then in certain attitudes (usually right hand corners going over a crest) it will sometimes brush past it lightly. I didn't want to grind the torsion bar nose down, so I hoped changing the arm would cure it.
Since it's three years since I replaced the left arm (driver's arm has been on the car for at least four years) I decided to do both. Then, thought "what the hell" and bought StreetDragster's camber adjustable lower arms, as sold by Fiesta Frenzy's Ian Howell (http://www.area-six.co.uk). The Fiesta doesn't have the option of camber adjustment as standard, and as those who have lowered their cars substantially will know, you can encounter copious amounts of negative camber in doing so. With higher power levels, torque steer becomes an issue, and uneven cambers are a contributor. So being able to adjust (and therefore equalise) camber should nigh on eliminate torque steer. Additionally, it allows for fine tuning so as not to take too much contact patch away from the tyre, which will be most notable in drag/0-60 sprints.
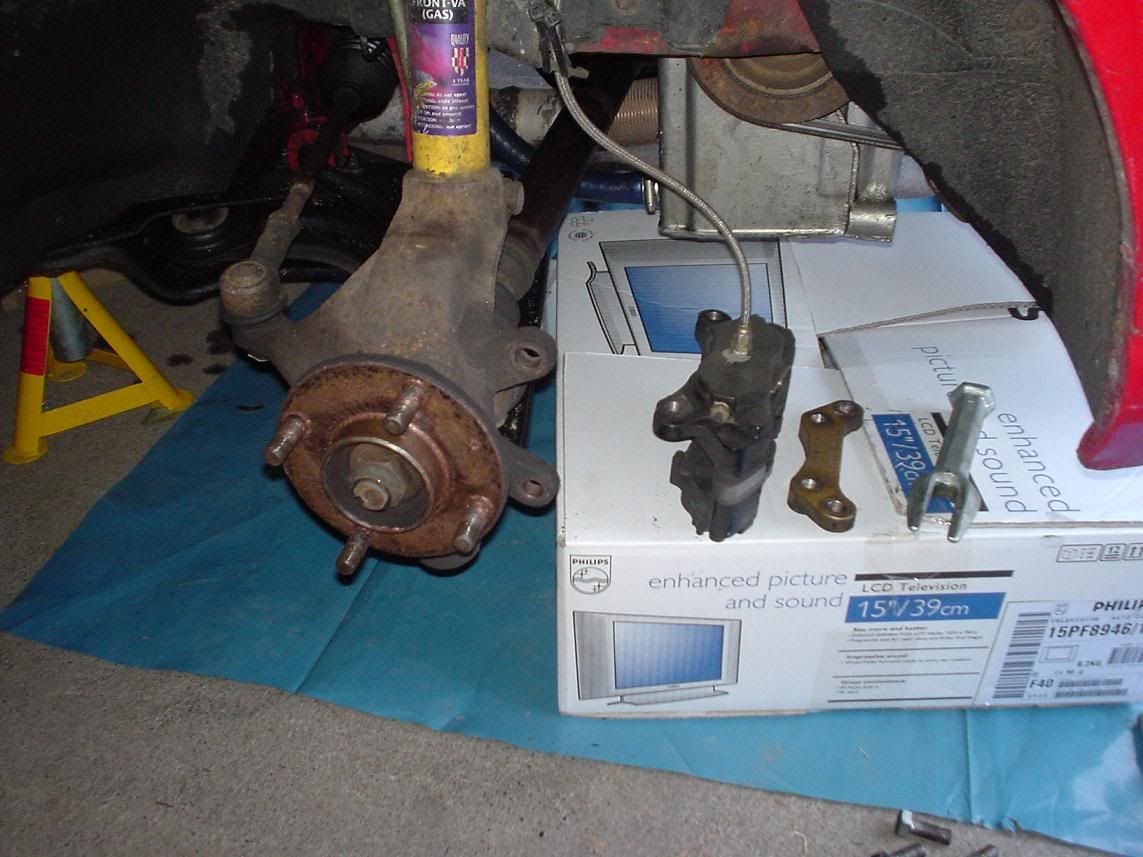
Step 1 is to remove your original lower arms. For this, do the usual jacking up of the car, handbrake on, chock the rear wheels and remove the wheels as per the Haynes guide. I'm not sure about the standard brakes, but I had to remove my caliper and caliper mounting bracket to get to the pinch bolt which secures the lower arm to the hub carrier. The pic below shows the hub carrier, with the wheel, disc, caliper and bracket removed, with the ball joint separator on the right:
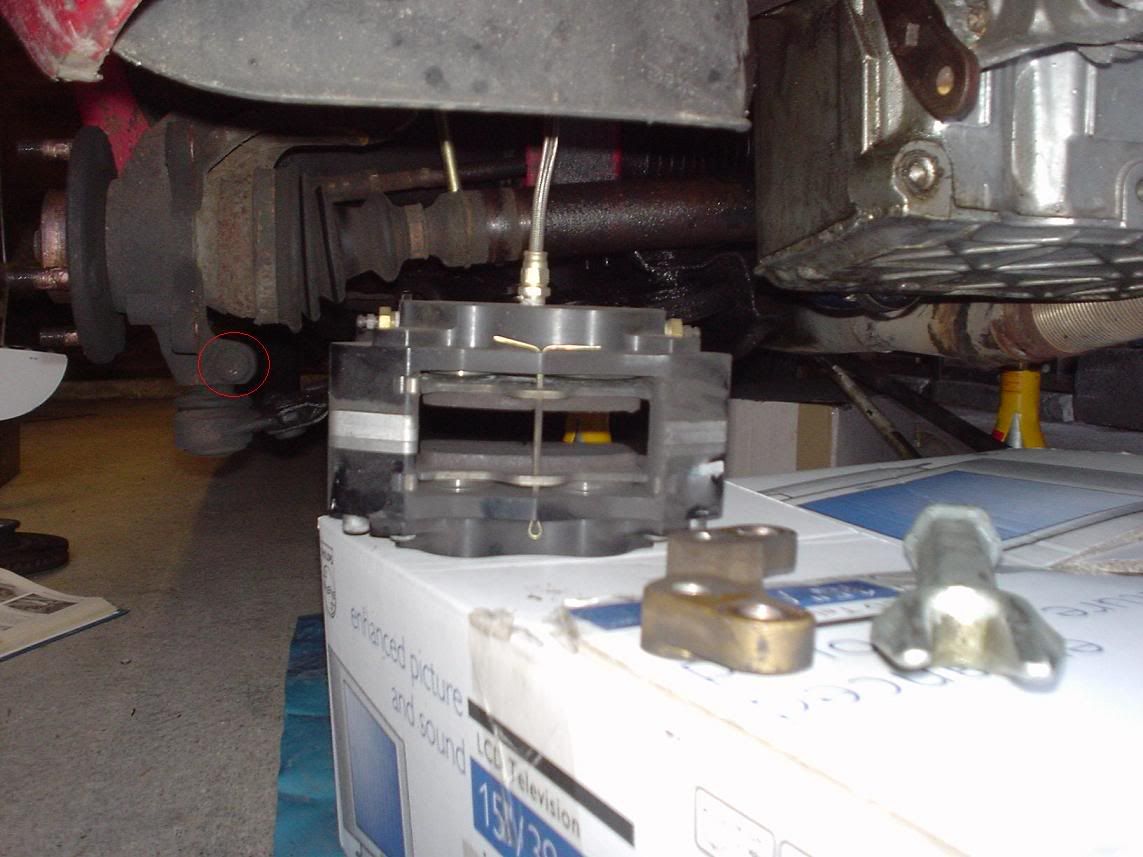
The pinch bolt requires a Torx T50 bit to undo it. Once undone, it can be removed. This pic shows the Torx pinch bolt:
Next, you need to separate the ball joint from the hub carrier. You can buy special tools for this (as in the pic below) which make it much easier. A few knocks with a lump hammer and a wiggle, then a knock on the other end of the tool to remove it, should see the joint separate with ease:

Next, there is one 18mm nut (nearest to you) and one 15mm bolt that secure the lower arm to the lower arm carrier bracket. These bolts pass through the bushes in the lower arm, and once undone must be withdrawn, one upwards, one downwards (they may need a tap with a hammer and a drift). I prefer to loosen off all the bolts securing the lower arm carrier to the car about 5mm, just for free play. Then you can wiggle the lower arm out of the bracket. The pic below shows the just-removed standard lower arm next to the new adjustable lower arm on the left:
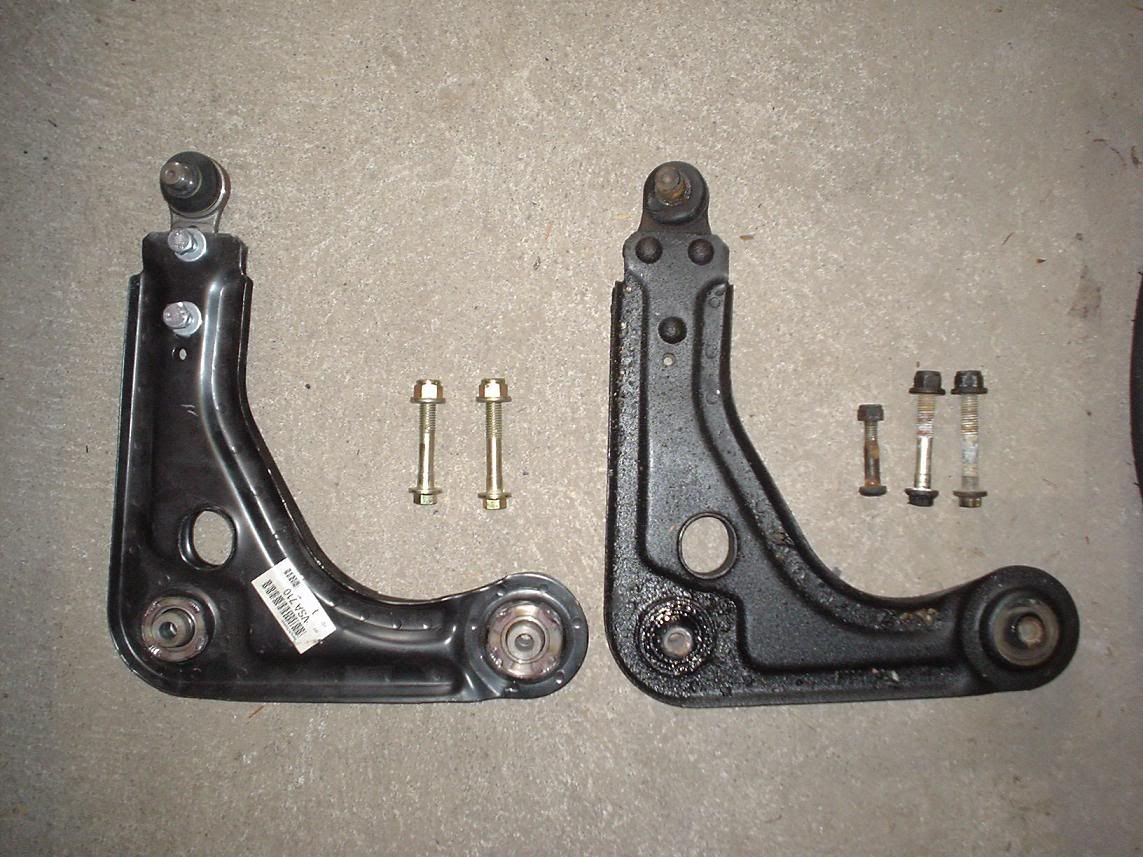
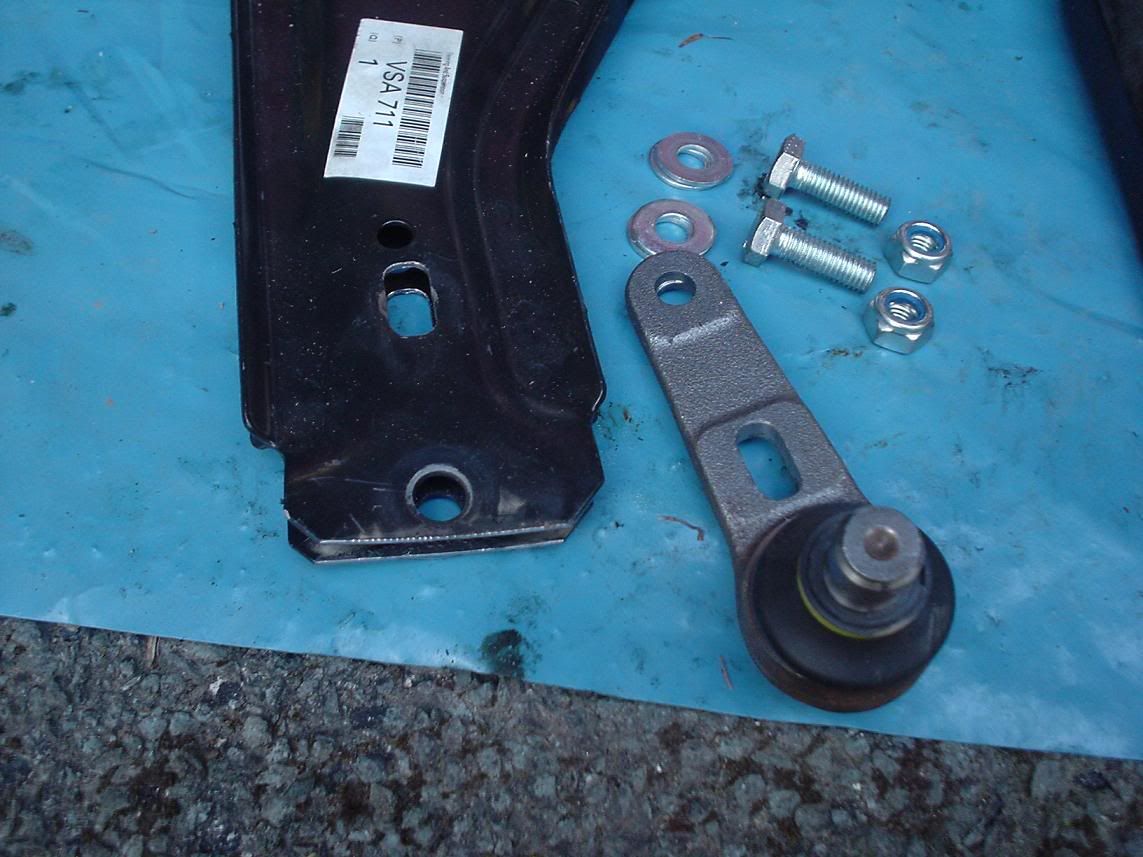
The left bolt of the three on the right is the pinch bolt. Note the two silver bolts at the top of the adjustable arm on the left. These clamp/release the slideable ball joint carrier, which is what adjusts the camber. Note also the rose joints in the new lower arm, compared to the rubber bushes on the OE lower arm on the right. These will go one step further to tightening up (completely removing) the free movement in the lower arm....another possible contributor to torque steer.
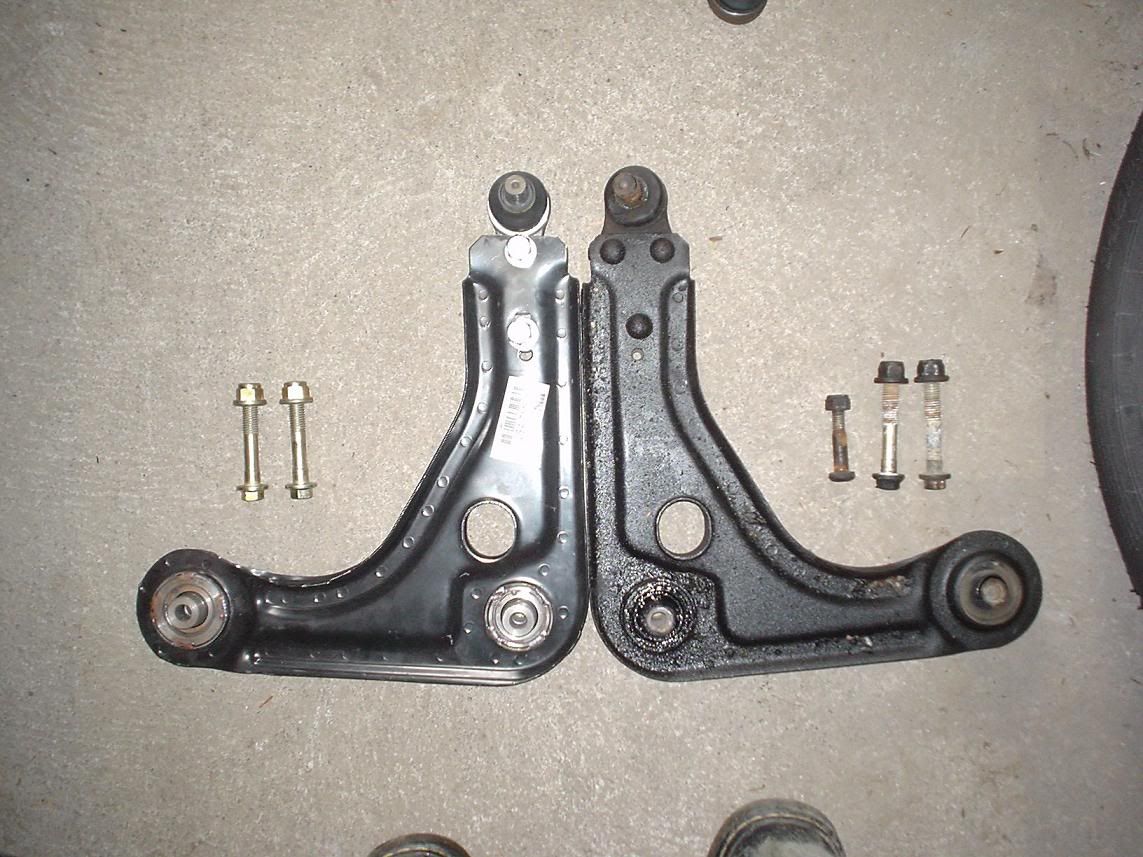
Here is another photo showing the right hand OE arm with the left hand adjustable arm for closer comparison of the ball joints:
The bolts supplied with the arm (that clamp the ball joint carrier) were a touch too long:
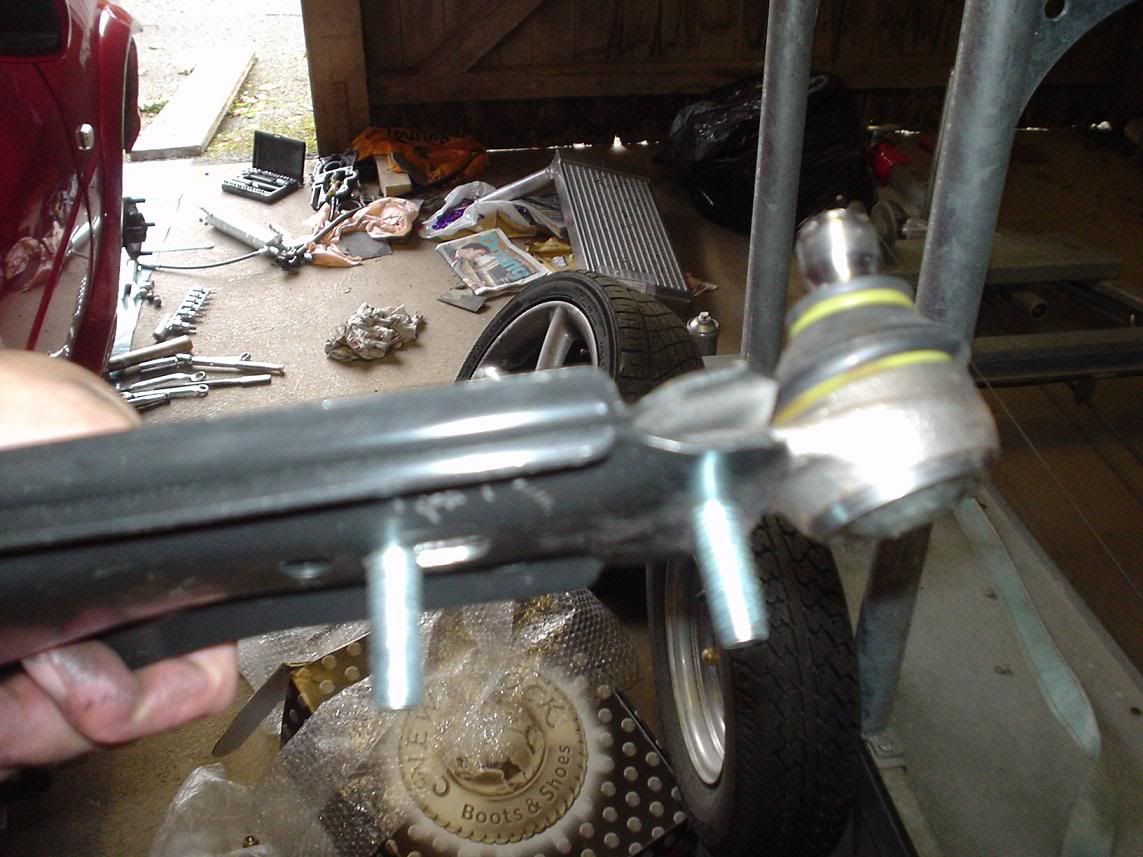
So I've cut six threads off each and loosely tightened them for now:

The next job will be to fully tighten these two clamp bolts once I have measured up the distances involved to make sure the ball joint is either in the same position as on the OE lower arm, or perhaps 2mm or so closer to the centre of the car. That will be an approximation of the 1-1.5 degrees or so of negative camber I would like. I will be taking the car to the garage to use the camber/tracking gauges to align it all properly and evenly.
That is all for today, fitting the new arm will take about 20 minutes then I'll do the same on the other side. I only just found my locking wheel nut key which is why I left it till so late in the day! Will update with more pics tomorrow
Since it's three years since I replaced the left arm (driver's arm has been on the car for at least four years) I decided to do both. Then, thought "what the hell" and bought StreetDragster's camber adjustable lower arms, as sold by Fiesta Frenzy's Ian Howell (http://www.area-six.co.uk). The Fiesta doesn't have the option of camber adjustment as standard, and as those who have lowered their cars substantially will know, you can encounter copious amounts of negative camber in doing so. With higher power levels, torque steer becomes an issue, and uneven cambers are a contributor. So being able to adjust (and therefore equalise) camber should nigh on eliminate torque steer. Additionally, it allows for fine tuning so as not to take too much contact patch away from the tyre, which will be most notable in drag/0-60 sprints.
Step 1 is to remove your original lower arms. For this, do the usual jacking up of the car, handbrake on, chock the rear wheels and remove the wheels as per the Haynes guide. I'm not sure about the standard brakes, but I had to remove my caliper and caliper mounting bracket to get to the pinch bolt which secures the lower arm to the hub carrier. The pic below shows the hub carrier, with the wheel, disc, caliper and bracket removed, with the ball joint separator on the right:

The pinch bolt requires a Torx T50 bit to undo it. Once undone, it can be removed. This pic shows the Torx pinch bolt:

Next, you need to separate the ball joint from the hub carrier. You can buy special tools for this (as in the pic below) which make it much easier. A few knocks with a lump hammer and a wiggle, then a knock on the other end of the tool to remove it, should see the joint separate with ease:

Next, there is one 18mm nut (nearest to you) and one 15mm bolt that secure the lower arm to the lower arm carrier bracket. These bolts pass through the bushes in the lower arm, and once undone must be withdrawn, one upwards, one downwards (they may need a tap with a hammer and a drift). I prefer to loosen off all the bolts securing the lower arm carrier to the car about 5mm, just for free play. Then you can wiggle the lower arm out of the bracket. The pic below shows the just-removed standard lower arm next to the new adjustable lower arm on the left:

The left bolt of the three on the right is the pinch bolt. Note the two silver bolts at the top of the adjustable arm on the left. These clamp/release the slideable ball joint carrier, which is what adjusts the camber. Note also the rose joints in the new lower arm, compared to the rubber bushes on the OE lower arm on the right. These will go one step further to tightening up (completely removing) the free movement in the lower arm....another possible contributor to torque steer.
Here is another photo showing the right hand OE arm with the left hand adjustable arm for closer comparison of the ball joints:

The bolts supplied with the arm (that clamp the ball joint carrier) were a touch too long:

So I've cut six threads off each and loosely tightened them for now:

The next job will be to fully tighten these two clamp bolts once I have measured up the distances involved to make sure the ball joint is either in the same position as on the OE lower arm, or perhaps 2mm or so closer to the centre of the car. That will be an approximation of the 1-1.5 degrees or so of negative camber I would like. I will be taking the car to the garage to use the camber/tracking gauges to align it all properly and evenly.
That is all for today, fitting the new arm will take about 20 minutes then I'll do the same on the other side. I only just found my locking wheel nut key which is why I left it till so late in the day!
Last edited by heeman10 on Mon Aug 29, 2005 6:26 pm, edited 1 time in total.
- heeman10
- Elite Post Master


- Posts: 28746
- Joined: Fri Nov 08, 2002 5:32 pm
- Location: Somerset
- Your car: Audi TT TDI Quattro S line
i recently just changed my lower arms, was looking into those ones heeman, but decided to spend the extra money on other things for now,
interesting thing is tho, my car being lowered 35/40mm on 17's
when having my tracking/wheel alignment done, its turns out my camber is spot on, but any lower and i will need adjustable lower arms,
good guide james, why did you take the caliper off tho?
interesting thing is tho, my car being lowered 35/40mm on 17's
when having my tracking/wheel alignment done, its turns out my camber is spot on, but any lower and i will need adjustable lower arms,
good guide james, why did you take the caliper off tho?
- RS rob
- Elite Post Master

- Posts: 4176
- Joined: Tue Feb 18, 2003 1:16 am
- Location: south wales
B.E.B - I took the caliper off because the mounting bracket was blocking the pinch bolt off. Does that mean you don't need to with the standard Ford brakes then? I have mentioned that, so hopefully people won't go taking their brakes off if they don't need to 
- heeman10
- Elite Post Master


- Posts: 28746
- Joined: Fri Nov 08, 2002 5:32 pm
- Location: Somerset
- Your car: Audi TT TDI Quattro S line
- RS rob
- Elite Post Master

- Posts: 4176
- Joined: Tue Feb 18, 2003 1:16 am
- Location: south wales
Pinch bolt is a T45 IIRC, standard brakes dont need removing to get to it. They are a bugger sometimes if they are rounded off.
Always a good idea to put a new locking nut (17mm) on the back. If you havent had a ball joint splitter, a few cracks with the hammer and a bar to lever the wishbone down is normally enough.
I'm not sure what you mean by the bolts are withdrawn one up and down? Nuts should both be on the top and the nuts should be withdrawn from the bottom!
Good guide though Jimbo!
- PaulC
- Elite Post Master

- Posts: 4573
- Joined: Sat Jan 12, 2002 12:00 am
- Location: Manchester, Lancashire
pair of new rock boots heeman?? didnt realise that was ure style!
MotorcyclesFish :The thing is if I caught Brian fudgekin a bloke, I wouldn't think 'oh Brian's a gay', I'd think 'Brian that fudgekin weird haired mongoloid is raping a gay to see if anyone finds it funny'
- Rhinopower
- Elite Post Master

- Posts: 6466
- Joined: Wed Oct 08, 2003 9:41 am
- Your car: Volvo FH330
Car: 1983 Ford Escort
B.E.B - Wasn't taken as a dig dude! 
PaulCock - I have big ass fat 19mm (M12) bolts in my brakes so there's no danger of them rounding
Hitch1.8d - 280 pounds IIRC.
Rhinopower - Nope, just my trusty Doc Martins! It was a cold day today (amazing how the memories of the cold winter when the project began came flooding back when I stepped out into the cold and rain in my overalls and boots! Had me reeling for about thirty seconds...the bare engine bay, the feelings of despair....thank god that's all over!) so I wore my boots to keep some vital degrees inside!
PaulCock - I have big ass fat 19mm (M12) bolts in my brakes so there's no danger of them rounding
Hitch1.8d - 280 pounds IIRC.
Rhinopower - Nope, just my trusty Doc Martins!
- heeman10
- Elite Post Master


- Posts: 28746
- Joined: Fri Nov 08, 2002 5:32 pm
- Location: Somerset
- Your car: Audi TT TDI Quattro S line
Taxi for one  That's the box StreetDragster sent the arms in...then wrapped it in christmas wrapping paper
  Forgot to thank him for that thoughtful addition on the packaging side of things!

- heeman10
- Elite Post Master


- Posts: 28746
- Joined: Fri Nov 08, 2002 5:32 pm
- Location: Somerset
- Your car: Audi TT TDI Quattro S line
heeman10 :PaulCock - I have big ass fat 19mm (M12) bolts in my brakes so there's no danger of them rounding
- PaulC
- Elite Post Master

- Posts: 4573
- Joined: Sat Jan 12, 2002 12:00 am
- Location: Manchester, Lancashire
Oh I see! No it's fine, no rounding of any sort  Haven't got much time to work on it tomorrow, taking the Polo for a nice long drive down to a mate's in Shrewsbury. We've got a bouncy castle hired for the weekend to go with the BBQ
  :D:D
:D:D
- heeman10
- Elite Post Master


- Posts: 28746
- Joined: Fri Nov 08, 2002 5:32 pm
- Location: Somerset
- Your car: Audi TT TDI Quattro S line
Happy Christmas! 
The box is traveling round the world slowly, thats the box my brother got sent a power drill in from the States
Thanks
Matt
The box is traveling round the world slowly, thats the box my brother got sent a power drill in from the States
Thanks
Matt
- StreetDragster
- Elite Post Master

- Posts: 1420
- Joined: Mon Aug 11, 2003 9:51 am
- Location: Blackpool
Quality, I'll make sure it gets sent on to another glamorous location next time someone buys something Rock Boot sized off me  Where's this bloody Dax at Olver?
- heeman10
- Elite Post Master


- Posts: 28746
- Joined: Fri Nov 08, 2002 5:32 pm
- Location: Somerset
- Your car: Audi TT TDI Quattro S line
Still in London 
Collecting on the 5th
Got my trickle charger, jerry cans, trackday booking, insurance, side screen door hinges and alarm proximity sensors all sorted out, just need a car!
Thanks
Matt
Collecting on the 5th
Got my trickle charger, jerry cans, trackday booking, insurance, side screen door hinges and alarm proximity sensors all sorted out, just need a car!
Thanks
Matt
- StreetDragster
- Elite Post Master

- Posts: 1420
- Joined: Mon Aug 11, 2003 9:51 am
- Location: Blackpool
That's only 10 days away!  Trackday where?? I'll definitely come to watch if it's not too far for me matey, get some vids!
- heeman10
- Elite Post Master


- Posts: 28746
- Joined: Fri Nov 08, 2002 5:32 pm
- Location: Somerset
- Your car: Audi TT TDI Quattro S line
Just finished off the job this afternoon. I'd been putting it off, but don't have the spare time to put it off any longer. So I fitted the right arm, removed the left arm and fitted the new left arm too, so here are some pics:
The original Ford arms I've removed...both quite different in design:
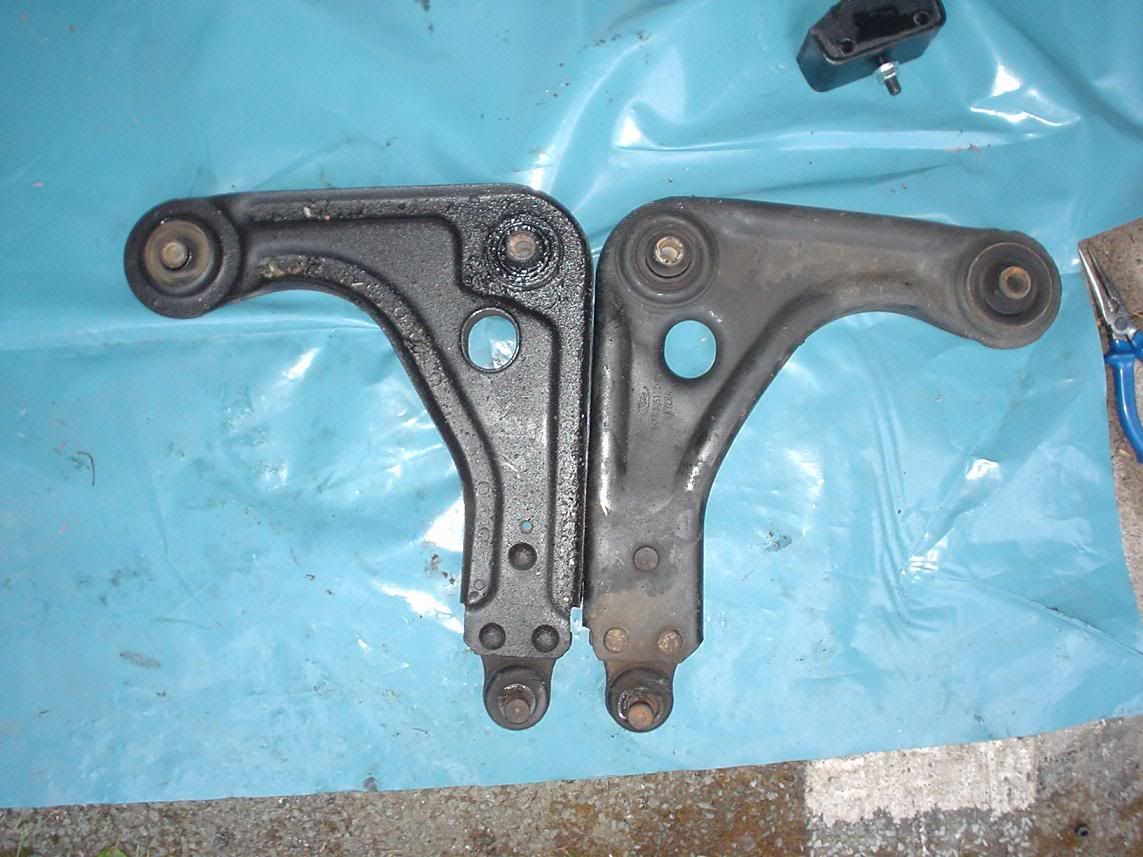
Left Fiesta Frenzy arm with left OE arm:

A closer shot of the adjustable ball joint carrier arrangement:
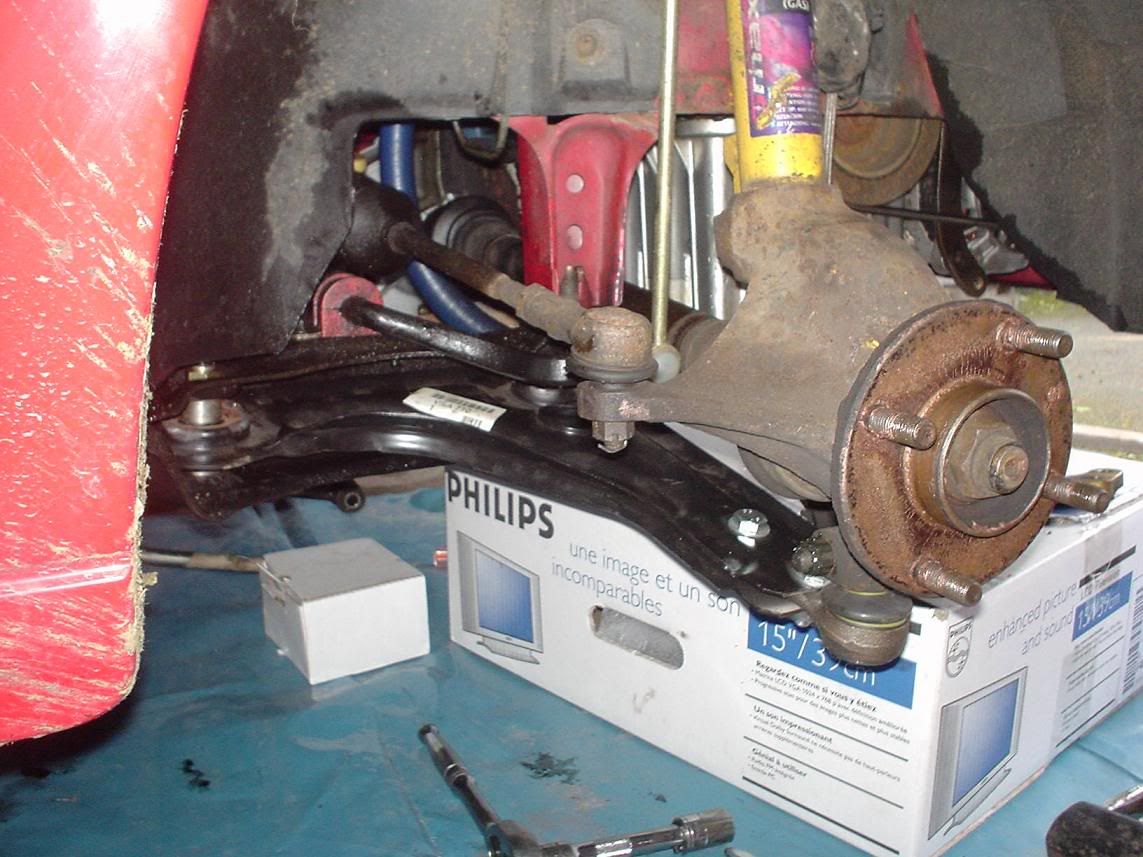
And a shot of the right hand arm back on the car:
Now I'm just waiting for the gearbox cradle and I can put everything back together and set the tracking and camber up in time for a short drag or two at Trax
The original Ford arms I've removed...both quite different in design:

Left Fiesta Frenzy arm with left OE arm:

A closer shot of the adjustable ball joint carrier arrangement:

And a shot of the right hand arm back on the car:

Now I'm just waiting for the gearbox cradle and I can put everything back together and set the tracking and camber up in time for a short drag or two at Trax
- heeman10
- Elite Post Master


- Posts: 28746
- Joined: Fri Nov 08, 2002 5:32 pm
- Location: Somerset
- Your car: Audi TT TDI Quattro S line
22 posts • Page 1 of 1


Twitter
The second 20th Anniversary article, a dive into the history of how the site came about is available here: https://t.co/kbCfZ4sf0R
17:44, 4th December 2021 Twitter Web App
To celebrate https://t.co/wXVkvJipaS being 20 years old this year, I've written a series of articles detailing the… https://t.co/B0vE0Y3KvP
17:42, 4th December 2021 Twitter Web App
Follow fiestaturbo.com on Twitter:
http://twitter.com/fiestaturbo/
Facebook
New article! fiestaturbo.com is 20 years old this year and I'm writing a series delving into the history of it. …
Saturday, 4th December 2021 12:49
Some awesome Escorts from the Fair - FORD FAIR 2021: ESCORT EXHIBITION - …
Sunday, 31st October 2021 17:05
All the best Focuses from Ford Fair - FORD FAIR 2021: FOCUS PEEKING - Which was your …
Thursday, 7th October 2021 22:21
Become a fan:
http://www.facebook.com/fiestaturbo/
RSS Feeds
Subscribe to the RSS feed
What is RSS?
RSS is a technology that lets you use special applications or modern browsers to notify you you when a site is updated. You can then read the updated content in that application or your browser.
To subscribe to these RSS feeds you need to copy the links above. For instructions on how to add it to the feeds you keep track of, consult the documentation of your RSS reader.