[guide] Fitting a Glovebox Light
15 posts • Page 1 of 1
[guide] Fitting a Glovebox Light
Guide for fitting a glove box light
Hers a nice simple luxury guide that was on my previous car as standard that I seamed to miss when I changed to the Fiesta.
The glove box light, lights up the interior of the glove box to enable you to find what you are looking for in the dark.
Its not as hard as it sounds really,
Tools you need
A Stanley knife or scalpel
Files
Soldering equipment
Parts you need:
Vauxhall Nova glove box light switch and plug
Ford Fiesta boot light
Firstly empty your clove box (May take a while!)
Get the switch from a Vauxhall Nova(Yes I know I should talk about the enemy) but this is the only switch that fits that is flush.
Measure the switch with a pair of callipers and make a template in word to the correct size. Open your boot and measure the opening on the parcel shelf support where the boot light lives, as this will be the same size that you require for the hole in the glove box.


Seeing, as I am a nice person, below are the templates in a word document ready for you to print off and use.
http://www.fiestaguides.co.uk/images/gl ... ovebox.zip
Below are the templates and their respective parts.

Cut out the template for the switch and stick it to the lip on the edge of the glove box opening about 1cm down and 5mm away from the lip on the outer edge but not in the place where the rubber bump stops rest when the door closes.


Using a scalpel or knife, cut/score around the template then remove the paper template so you can see what you are doing. Keep going over the scored lines until you have cut through the plastic (Its soft so wont take long). (Yes I did slip with the knife L)


Test fit the switch then make any adjustments with the knife to the dash plastic if needed.

Now move onto the light itself.
Decide a position that you want the light to be within the glove box, I put mine on the right hand side to reduce the amount of wiring needed.
Stick the template on, score it and cut it again like above.
Also like above test fit the light, and it should be a nice snug fit.


Now the wiring
Remove the centre air vent and the time clock from the top of the dash to allow access to the switch and light backs.
Get the bulb holder and solder the brown wire from it to one of the brown wires from the switch. Run the other brown from the switch to the hole where the clock sits in the dash.
Extend the red wire from the bulb holder to the same opening in the dash. Insulate all joins with heat shrink or insulation tape. Then wrap both wires together with insulation tape to make them neat.


Identify the red and brown wires from behind the clock then strip the insulation in a small section to reveal the bare copper. DO NOT let the two exposed pieces touch as it will short out the electric system.
Strip the ends of the red and brown from the glove box light and twist them around the exposed wires, brown-to-brown and red-to-red. If the switch is connected then the bulb will light up, if the switch isn’t connected, push it onto the plug and the bulb should light, if so, you can remove the switch and solder the wires in place on the clock wiring.
Once done and cooled, insulate the joins and tape up any loose wires, connect the switch then replace the clock and vents.


Something I noticed when I did this, was that there is very minimal clearance between the bulb holder and the curved plastic stay that is attached to the glove box door, so be warned, make sure the stay has clearance from the bulb.


Close the glove box and the light will go out, open it and it will come on,
To check if it’s going out, simply look under the dash.
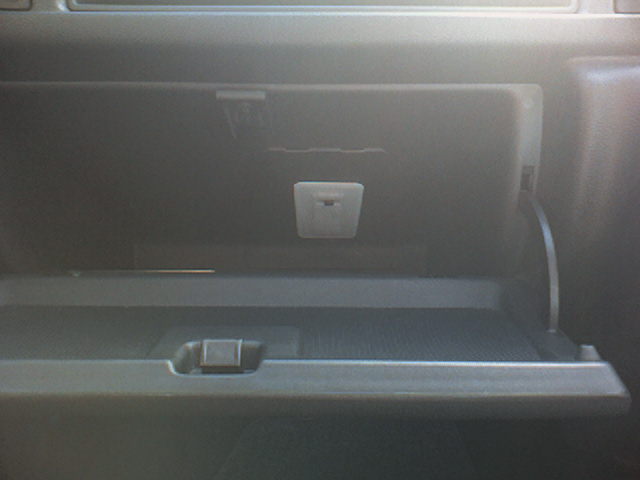
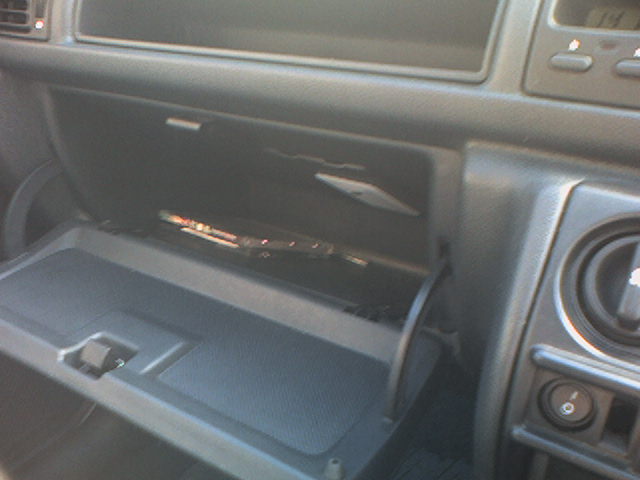
Below is a picture of the light in the day and night


Then that’s that, job done, like I said it was easy.
Now just sort out what’s to go back in the glove box and your away.
Hope this guide helps some of you.
Guide written by Andrew Whiteman (AW3K) 12/03/06
As always comments suggestions welcome
Thanks
Andy
Hers a nice simple luxury guide that was on my previous car as standard that I seamed to miss when I changed to the Fiesta.
The glove box light, lights up the interior of the glove box to enable you to find what you are looking for in the dark.
Its not as hard as it sounds really,
Tools you need
A Stanley knife or scalpel
Files
Soldering equipment
Parts you need:
Vauxhall Nova glove box light switch and plug
Ford Fiesta boot light
Firstly empty your clove box (May take a while!)
Get the switch from a Vauxhall Nova(Yes I know I should talk about the enemy) but this is the only switch that fits that is flush.
Measure the switch with a pair of callipers and make a template in word to the correct size. Open your boot and measure the opening on the parcel shelf support where the boot light lives, as this will be the same size that you require for the hole in the glove box.


Seeing, as I am a nice person, below are the templates in a word document ready for you to print off and use.
http://www.fiestaguides.co.uk/images/gl ... ovebox.zip
Below are the templates and their respective parts.

Cut out the template for the switch and stick it to the lip on the edge of the glove box opening about 1cm down and 5mm away from the lip on the outer edge but not in the place where the rubber bump stops rest when the door closes.


Using a scalpel or knife, cut/score around the template then remove the paper template so you can see what you are doing. Keep going over the scored lines until you have cut through the plastic (Its soft so wont take long). (Yes I did slip with the knife L)


Test fit the switch then make any adjustments with the knife to the dash plastic if needed.

Now move onto the light itself.
Decide a position that you want the light to be within the glove box, I put mine on the right hand side to reduce the amount of wiring needed.
Stick the template on, score it and cut it again like above.
Also like above test fit the light, and it should be a nice snug fit.


Now the wiring
Remove the centre air vent and the time clock from the top of the dash to allow access to the switch and light backs.
Get the bulb holder and solder the brown wire from it to one of the brown wires from the switch. Run the other brown from the switch to the hole where the clock sits in the dash.
Extend the red wire from the bulb holder to the same opening in the dash. Insulate all joins with heat shrink or insulation tape. Then wrap both wires together with insulation tape to make them neat.


Identify the red and brown wires from behind the clock then strip the insulation in a small section to reveal the bare copper. DO NOT let the two exposed pieces touch as it will short out the electric system.
Strip the ends of the red and brown from the glove box light and twist them around the exposed wires, brown-to-brown and red-to-red. If the switch is connected then the bulb will light up, if the switch isn’t connected, push it onto the plug and the bulb should light, if so, you can remove the switch and solder the wires in place on the clock wiring.
Once done and cooled, insulate the joins and tape up any loose wires, connect the switch then replace the clock and vents.


Something I noticed when I did this, was that there is very minimal clearance between the bulb holder and the curved plastic stay that is attached to the glove box door, so be warned, make sure the stay has clearance from the bulb.


Close the glove box and the light will go out, open it and it will come on,
To check if it’s going out, simply look under the dash.
Below is a picture of the light in the day and night


Then that’s that, job done, like I said it was easy.
Now just sort out what’s to go back in the glove box and your away.
Hope this guide helps some of you.
Guide written by Andrew Whiteman (AW3K) 12/03/06
As always comments suggestions welcome
Thanks
Andy
- AW3K
- Elite Post Master

- Posts: 2923
- Joined: Sun Apr 29, 2001 1:00 am
- Location: Wakefield, West Yorkshire Guide Master
Very nice mate 
Lower than a snakes bollox
Each day I break my own personal record for the number of consecutive days I've stayed alive
Each day I break my own personal record for the number of consecutive days I've stayed alive
- Big Walker
- Elite Post Master

- Posts: 3874
- Joined: Mon Oct 17, 2005 1:28 am
- Location: N. Ireland Drives: Anything :p
- Your car: Seat Ibiza
- j7aoc
- Elite Post Master


- Posts: 6194
- Joined: Mon Feb 28, 2005 6:52 pm
- Location: southampton
Car: 1991 Ford Fiesta RS Turbo
- XRMike
- Elite Post Master

- Posts: 2488
- Joined: Thu Jun 09, 2005 6:05 pm
- Location: North Wales Party's: All the time
Car: 1991 Ford Fiesta RS Turbo
mikecvh :another great guide,cant fault your guides mate. are you going to do the one i asked you about?
cheers people
do you mean the customised switches and the cenreal locking?
Andy
- AW3K
- Elite Post Master

- Posts: 2923
- Joined: Sun Apr 29, 2001 1:00 am
- Location: Wakefield, West Yorkshire Guide Master
i was on about fitting a secondry boot strut to the earlier models ,so you can use heeman10's idea with the 2x mk3 struts and an electronic boot release which allows the bootlid to automaticly open at the touch of a button 

- XRMike
- Elite Post Master

- Posts: 2488
- Joined: Thu Jun 09, 2005 6:05 pm
- Location: North Wales Party's: All the time
Car: 1991 Ford Fiesta RS Turbo
mikecvh :i was on about fitting a secondry boot strut to the earlier models ,so you can use heeman10's idea with the 2x mk3 struts and an electronic boot release which allows the bootlid to automaticly open at the touch of a button
watch this space lol
got plenty of spares so ill have a go.
Andy
- AW3K
- Elite Post Master

- Posts: 2923
- Joined: Sun Apr 29, 2001 1:00 am
- Location: Wakefield, West Yorkshire Guide Master
AW3K :mikecvh :i was on about fitting a secondry boot strut to the earlier models ,so you can use heeman10's idea with the 2x mk3 struts and an electronic boot release which allows the bootlid to automaticly open at the touch of a button
watch this space lol
got plenty of spares so ill have a go.
Andy
yey!! i tried this with an old si in work and was having fun for ages

- XRMike
- Elite Post Master

- Posts: 2488
- Joined: Thu Jun 09, 2005 6:05 pm
- Location: North Wales Party's: All the time
Car: 1991 Ford Fiesta RS Turbo
i saw this ages go and thought it was a great idea as my passengers like to roll my ...ciggys... and use the glove box as a tray so my carpet dosent get dirty.
anyway, the way i went about it was.
tools
1.knife
2.standard fiesta interior light.
1. Open glove box and remove the pannel at the top.
2. After you have done your mk4 interior light, get you old light Cut a hole into the pannel making sure when the light will sit in it wont catch anything.
3. Wire up and there you go. i prefer where mine sits as i havent had to cut my dash, rarther a removable panel which can be replaced if all goes funlumps up.
will get some pics up tomorrow, feel free to use them on your site mate.
would love to see the boot release thing done.
Beep
- Tilston
- Senior Poster

- Posts: 369
- Joined: Thu Jun 24, 2004 11:25 pm
- Location: Wolverhampton
Tilston :i saw this ages go and thought it was a great idea as my passengers like to roll my ...ciggys... and use the glove box as a tray so my carpet dosent get dirty.
anyway, the way i went about it was.
tools
1.knife
2.standard fiesta interior light.
1. Open glove box and remove the pannel at the top.
2. After you have done your mk4 interior light, get you old light Cut a hole into the pannel making sure when the light will sit in it wont catch anything.
3. Wire up and there you go. i prefer where mine sits as i havent had to cut my dash, rarther a removable panel which can be replaced if all goes funlumps up.
will get some pics up tomorrow, feel free to use them on your site mate.
would love to see the boot release thing done.
Your idea is a good way of doing it, but on the older dash grey and black, the removable piece isn't there, as it comeon dashes that had the airbag wheelas the airbag controls are behind the flap.
I dont know when i'll be able to do the boot guide due to time restrictions.
Andy
- AW3K
- Elite Post Master

- Posts: 2923
- Joined: Sun Apr 29, 2001 1:00 am
- Location: Wakefield, West Yorkshire Guide Master
i have now done this tonight and it is easy well enjoyed myself and the effect is great i put too small lights in i will put pics up soon i wired it to the back of the clock hehe
- mattfiesta1987
- Senior Poster

- Posts: 239
- Joined: Wed May 03, 2006 11:21 pm
15 posts • Page 1 of 1


Twitter
The second 20th Anniversary article, a dive into the history of how the site came about is available here: https://t.co/kbCfZ4sf0R
17:44, 4th December 2021 Twitter Web App
To celebrate https://t.co/wXVkvJipaS being 20 years old this year, I've written a series of articles detailing the… https://t.co/B0vE0Y3KvP
17:42, 4th December 2021 Twitter Web App
Follow fiestaturbo.com on Twitter:
http://twitter.com/fiestaturbo/
Facebook
New article! fiestaturbo.com is 20 years old this year and I'm writing a series delving into the history of it. …
Saturday, 4th December 2021 12:49
Some awesome Escorts from the Fair - FORD FAIR 2021: ESCORT EXHIBITION - …
Sunday, 31st October 2021 17:05
All the best Focuses from Ford Fair - FORD FAIR 2021: FOCUS PEEKING - Which was your …
Thursday, 7th October 2021 22:21
Become a fan:
http://www.facebook.com/fiestaturbo/
RSS Feeds
Subscribe to the RSS feed
What is RSS?
RSS is a technology that lets you use special applications or modern browsers to notify you you when a site is updated. You can then read the updated content in that application or your browser.
To subscribe to these RSS feeds you need to copy the links above. For instructions on how to add it to the feeds you keep track of, consult the documentation of your RSS reader.