My big ZT thread > 15.4.08 25bhp/20lbft extra and track prep
heeman10 :ianFRST :nice rack:Q
Cheers babe
Mm guessing tends not to work too well!
Will write a guide to tracking later on matey
im still waiting..........................................
No longer a FRST owner, or even a Fiesta owner 
- ianFRST
- Elite Post Master

- Posts: 12982
- Joined: Mon Dec 30, 2002 9:32 pm
- Location: Burton on Trent
Dammit! So many things to remember!!
My guide to tracking
Why is it done?
Tracking is carried out to ensure both front road wheels are angled correctly, and angled symmetrically. If they are incorrectly angled, steering feel will be poor an tyre wear will be accelerated. If they are not symmetrical, the car will try to pull to one side. We speak of "toe-out" (when a wheel is pointing outwards from the "straight ahead" position) and "toe-in" (where a wheel is angled in towards the centreline of the car). Tracking is adjusted by winding the track rods on the steering rack into or out of the track rod ends which bolt to the hub carrier. This is done by undoing the locking nut and rotating the track rod on each side of the car, usually using a pair of mole grips. Looking from the outside of the car to the centre of the car (i.e. imagine you're sitting next to your wheel, looking into the wheel arch), turning the track rod clockwise will increase toe-in, and turning it anti-clockwise (i.e. screwing the track rod further into the rod end - remember we're looking at it from the rear of the rod end here) will give more toe-out.
Necessary instructions
The car MUST stay on the level ground at all times. Jacking the car up will alter the suspension heights, camber and tracking. The track rods are accessible on my car, which is lowered approximately 45-50mm, and should still be accessible on cars with a 60mm drop.
The two bars must not be disturbed during the tracking process. If you think you may have knocked one, centralise them again by re-measuring as described in the guide below.
The steering wheel MUST be locked in a central position throughout the process.
Please do not attempt to carry out the tracking process if you are unsure of what to do. If you make a mistake, it could be your last.
Equipment: Bars
Right, to start off with, you need a pair of tracking bars. The ones I was using were two length of angle aluminium, with perhaps 20mm sides. They need to be long enough to protrude at least 100mm or so past the wheels on each side when placed centrally on the car. One bar will be secured to the front of the car, one to the rear.
Equipment: Cord
Two lengths of cord (one for each side) are needed. One length of each cord must me secured to the opposite sides of one bar, and once on the car, the cords must be long enough to be unravelled, pulled taut and secured to the other tracking bar by wrapping it round a few times. Cutting a small V-notch in the ends of the bars will ensure the cord locates properly and doesn't move. To summarise, each length of cord should be about a metre longer than the car, and similar to guy rope cord on tents. For the purposes of this guide, we'll assume the cords are attached to the front bar.
Beginning
First off, centralise the steering wheel and remove the key to apply the steering lock. (If the wheels are a long way of "straight ahead" at this point, the steering wheel may need removing using a 15mm socket, and turning to a position that aligns it better with the wheels.) For the perfectionists (and indeed those who want to make sure they won't have to screw the track rod end too far and risk leaving too few threads in contact) it would be good practise to remove the lower universal joint that joins the steering column to the rack, using two 13mm spanners. Undo the locknuts on the track rods and screw both track rods fully into the rod ends (i.e. maximum "toe out"). At this stage, it would be a good idea first to screw the rods right out of the rod ends, wire brush the threads, and apply copper grease to them for ease of adjustment. Now, turn the wheels by hand until they both point in roughly the same direction, even though they will have a lof of toe-out. The steering rack should now be about central, and provided the steering wheel is still straight ahead, the lower universal joint can be clamped onto the steering rack again.
The handbrake should be left off for this operation.
Fixing the equipment to the car
Secure the bars to the car in such a way that (a) they can be adjust left or right to perfectly centralise them, (b) they can be fastened securely to prevent movement once centralised and (c) at a height which will bring the cords as close to the wheel centres as possible. Once the bars are on the car, roughly in the centre, take the cords back to the rear bar one by one (making sure they travel through the notches you cut on both bars), pull them taut and wrap them around the rear bar enough times to keep the tension. It's important that they're tight enough not to sag at all between the front and the rear, but we don't want them so tight the bars are bending and bumper paint is being damaged.
The next job is to remove your wheel centre caps (if you have them), then measure the distance from the hub nut to the cord on the front and rear pairs of wheels using a ruler or tape measure. [You will find that it's critical that you read the distances in the same way - the easiest way being to make sure that the ruler/tape is at 90 degrees to the wheel, and that you read from directly overhead, rather than at an angle. This part of the process must be consistent throughout the tracking procedure.] For example, start with the rear wheels. Using a ruler or tape measure, determine the distance from the hub to the cord on the left wheel, then on the right wheel. Adjust the position of the bar bit by bit until the distances are the same (within a millimetre for now). Now go to the front wheels and carry out the same process, shifting the bar sideways until both readings are the same. Now check the rears again, as they may have altered when you moved the bar at the front. This time, tweak the bar until the distances are precisely the same, to the nearest 0.5mm. Then check the front again and do the same. Hopefully after this second time, both pairs of wheels will remain equal after such small adjustments.
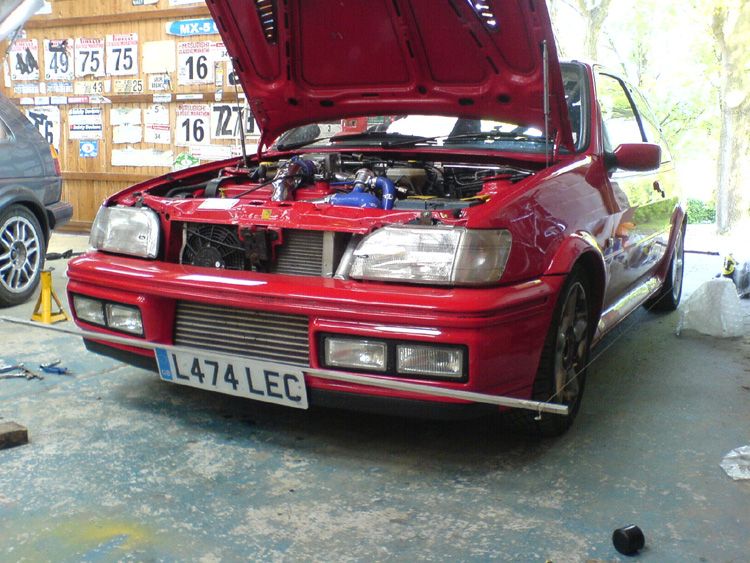
Here is a photo of my car with the tracking bars and cords in position:
The tracking procedure
Now the cords are centralised around the car, the amount of toe-in or toe-out can be measured. This is done by measuring from the rear edge of the wheel rim (i.e. the front face of the wheel, but the side of the rim nearest the rear wheel) to the cord. Next, measure the distance between the front edge of the wheel rim to the cord. These measurements should be taken from as close to the horizontal centreline of the wheel as possible - an easy job if the cord is close to the centre nut.
Here are some example results for these dimensions:
Rear edge of rim to cord = 112mm
Front edge of rim to cord = 107.5mm
This tells us that the front of the wheel is closer to the cord than the rear of the wheel, meaning that the wheel is toeing out, in this case by 4.5mm. It can be easy to mis-interpret these dimensions, so make sure you think them through each time. If the front of the wheel is closer to the cord (i.e. the measurement is smaller than the rear of the wheel) then the wheel is toeing out, and vice versa.
This guide assumes 1mm of toe-in is required. I have yet to experiment with different tracking stances, but this is the degree my car is tracked to. I believe the recommended toe-in can be gained from a tracking station, but it may be given in degrees rather than millimetres. Degrees are a more accurate way of tracking a car, as 1mm toe-in on a 13" wheel gives a greater angle than 1mm toe-in on a 17" wheel.
So with out 4.5mm of toe-out, we must wind the track rod clockwise (looking into the centre of the car) to bring the front of the wheel in. I can't quite remember how many turns are required for 1mm adjustment, but the best thing is to give a few half-turns and re-measure the distances from the front and rear edges to the cord until the desired measurements are reached.
It is crucial that the cord is not disturbed during any of the adjustments, for obvious reasons. The bars must NOT be moved from their centralised position.
Once the desired toe-in is found on that wheel, roll the car backwards and forwards a few times, 10cm or so, to allow the wheels to settle. Make sure the steering wheel is locked centrally. Re-measure the toe-in, and adjust accordinly if it has altered at all.
Follow this process for the opposite wheel.
Once the second wheel has been adjusted, roll the car backwards and forwards a few times (making sure the bars are fully secure), and measure both wheels again. Hopefully both still have the same amount of toe-in, and the job is done.
Remember to tighten the locking nuts onto the rod ends once you have finished.
This completes the tracking process.
I would advise that anyone questioning their abilities continues to take their car to a garage to have the tracking adjusted, as the steering system of a road car is a critical one that can cause fatal accidents if not maintained correctly.
My guide to tracking
Why is it done?
Tracking is carried out to ensure both front road wheels are angled correctly, and angled symmetrically. If they are incorrectly angled, steering feel will be poor an tyre wear will be accelerated. If they are not symmetrical, the car will try to pull to one side. We speak of "toe-out" (when a wheel is pointing outwards from the "straight ahead" position) and "toe-in" (where a wheel is angled in towards the centreline of the car). Tracking is adjusted by winding the track rods on the steering rack into or out of the track rod ends which bolt to the hub carrier. This is done by undoing the locking nut and rotating the track rod on each side of the car, usually using a pair of mole grips. Looking from the outside of the car to the centre of the car (i.e. imagine you're sitting next to your wheel, looking into the wheel arch), turning the track rod clockwise will increase toe-in, and turning it anti-clockwise (i.e. screwing the track rod further into the rod end - remember we're looking at it from the rear of the rod end here) will give more toe-out.
Necessary instructions
The car MUST stay on the level ground at all times. Jacking the car up will alter the suspension heights, camber and tracking. The track rods are accessible on my car, which is lowered approximately 45-50mm, and should still be accessible on cars with a 60mm drop.
The two bars must not be disturbed during the tracking process. If you think you may have knocked one, centralise them again by re-measuring as described in the guide below.
The steering wheel MUST be locked in a central position throughout the process.
Please do not attempt to carry out the tracking process if you are unsure of what to do. If you make a mistake, it could be your last.
Equipment: Bars
Right, to start off with, you need a pair of tracking bars. The ones I was using were two length of angle aluminium, with perhaps 20mm sides. They need to be long enough to protrude at least 100mm or so past the wheels on each side when placed centrally on the car. One bar will be secured to the front of the car, one to the rear.
Equipment: Cord
Two lengths of cord (one for each side) are needed. One length of each cord must me secured to the opposite sides of one bar, and once on the car, the cords must be long enough to be unravelled, pulled taut and secured to the other tracking bar by wrapping it round a few times. Cutting a small V-notch in the ends of the bars will ensure the cord locates properly and doesn't move. To summarise, each length of cord should be about a metre longer than the car, and similar to guy rope cord on tents. For the purposes of this guide, we'll assume the cords are attached to the front bar.
Beginning
First off, centralise the steering wheel and remove the key to apply the steering lock. (If the wheels are a long way of "straight ahead" at this point, the steering wheel may need removing using a 15mm socket, and turning to a position that aligns it better with the wheels.) For the perfectionists (and indeed those who want to make sure they won't have to screw the track rod end too far and risk leaving too few threads in contact) it would be good practise to remove the lower universal joint that joins the steering column to the rack, using two 13mm spanners. Undo the locknuts on the track rods and screw both track rods fully into the rod ends (i.e. maximum "toe out"). At this stage, it would be a good idea first to screw the rods right out of the rod ends, wire brush the threads, and apply copper grease to them for ease of adjustment. Now, turn the wheels by hand until they both point in roughly the same direction, even though they will have a lof of toe-out. The steering rack should now be about central, and provided the steering wheel is still straight ahead, the lower universal joint can be clamped onto the steering rack again.
The handbrake should be left off for this operation.
Fixing the equipment to the car
Secure the bars to the car in such a way that (a) they can be adjust left or right to perfectly centralise them, (b) they can be fastened securely to prevent movement once centralised and (c) at a height which will bring the cords as close to the wheel centres as possible. Once the bars are on the car, roughly in the centre, take the cords back to the rear bar one by one (making sure they travel through the notches you cut on both bars), pull them taut and wrap them around the rear bar enough times to keep the tension. It's important that they're tight enough not to sag at all between the front and the rear, but we don't want them so tight the bars are bending and bumper paint is being damaged.
The next job is to remove your wheel centre caps (if you have them), then measure the distance from the hub nut to the cord on the front and rear pairs of wheels using a ruler or tape measure. [You will find that it's critical that you read the distances in the same way - the easiest way being to make sure that the ruler/tape is at 90 degrees to the wheel, and that you read from directly overhead, rather than at an angle. This part of the process must be consistent throughout the tracking procedure.] For example, start with the rear wheels. Using a ruler or tape measure, determine the distance from the hub to the cord on the left wheel, then on the right wheel. Adjust the position of the bar bit by bit until the distances are the same (within a millimetre for now). Now go to the front wheels and carry out the same process, shifting the bar sideways until both readings are the same. Now check the rears again, as they may have altered when you moved the bar at the front. This time, tweak the bar until the distances are precisely the same, to the nearest 0.5mm. Then check the front again and do the same. Hopefully after this second time, both pairs of wheels will remain equal after such small adjustments.
Here is a photo of my car with the tracking bars and cords in position:

The tracking procedure
Now the cords are centralised around the car, the amount of toe-in or toe-out can be measured. This is done by measuring from the rear edge of the wheel rim (i.e. the front face of the wheel, but the side of the rim nearest the rear wheel) to the cord. Next, measure the distance between the front edge of the wheel rim to the cord. These measurements should be taken from as close to the horizontal centreline of the wheel as possible - an easy job if the cord is close to the centre nut.
Here are some example results for these dimensions:
Rear edge of rim to cord = 112mm
Front edge of rim to cord = 107.5mm
This tells us that the front of the wheel is closer to the cord than the rear of the wheel, meaning that the wheel is toeing out, in this case by 4.5mm. It can be easy to mis-interpret these dimensions, so make sure you think them through each time. If the front of the wheel is closer to the cord (i.e. the measurement is smaller than the rear of the wheel) then the wheel is toeing out, and vice versa.
This guide assumes 1mm of toe-in is required. I have yet to experiment with different tracking stances, but this is the degree my car is tracked to. I believe the recommended toe-in can be gained from a tracking station, but it may be given in degrees rather than millimetres. Degrees are a more accurate way of tracking a car, as 1mm toe-in on a 13" wheel gives a greater angle than 1mm toe-in on a 17" wheel.
So with out 4.5mm of toe-out, we must wind the track rod clockwise (looking into the centre of the car) to bring the front of the wheel in. I can't quite remember how many turns are required for 1mm adjustment, but the best thing is to give a few half-turns and re-measure the distances from the front and rear edges to the cord until the desired measurements are reached.
It is crucial that the cord is not disturbed during any of the adjustments, for obvious reasons. The bars must NOT be moved from their centralised position.
Once the desired toe-in is found on that wheel, roll the car backwards and forwards a few times, 10cm or so, to allow the wheels to settle. Make sure the steering wheel is locked centrally. Re-measure the toe-in, and adjust accordinly if it has altered at all.
Follow this process for the opposite wheel.
Once the second wheel has been adjusted, roll the car backwards and forwards a few times (making sure the bars are fully secure), and measure both wheels again. Hopefully both still have the same amount of toe-in, and the job is done.
Remember to tighten the locking nuts onto the rod ends once you have finished.
This completes the tracking process.
I would advise that anyone questioning their abilities continues to take their car to a garage to have the tracking adjusted, as the steering system of a road car is a critical one that can cause fatal accidents if not maintained correctly.
Last edited by heeman10 on Wed Jun 07, 2006 1:54 pm, edited 1 time in total.
- heeman10
- Elite Post Master


- Posts: 28746
- Joined: Fri Nov 08, 2002 5:32 pm
- Location: Somerset
- Your car: Audi TT TDI Quattro S line
ianFRST :(that reply you just did was the 666th
)
Fook, seriously?!
Hope it goes well
D.J. - Cheers
- heeman10
- Elite Post Master


- Posts: 28746
- Joined: Fri Nov 08, 2002 5:32 pm
- Location: Somerset
- Your car: Audi TT TDI Quattro S line
nick050/BUTRE - That's a common misconception, much like people thinking a digital gauge is more accurate than an analogue gauge. Laser alignment systems are only as accurate as the operator. The good thing about using string etc like I did is that you're tracking the car around a centred square, rather than just off the wheels..whichever direction they may be pointing in! (e.g. the rear wheels may be pointing in funny directions, but since laser alignment requires gauges to be hung off the rear wheels, the toe on the front wheels is always set relative to those, rather than to the car itself.
- heeman10
- Elite Post Master


- Posts: 28746
- Joined: Fri Nov 08, 2002 5:32 pm
- Location: Somerset
- Your car: Audi TT TDI Quattro S line
heeman10 :ianFRST :(that reply you just did was the 666th
)
Fook, seriously?!Obviously it's a day late..but still..
Did you see that programme about The Omen last night? All the weird stuff that went on during and after filming the original in the 70's? Some funny coincidences going on there, this is just one more!!
Hope it goes well
D.J. - CheersThe Puma chassis with a Zetec Turbo would be quality fun I bet!
yeah some scary s**t
and the fact that you had 6/6/06 in the title, then 666 replies
No longer a FRST owner, or even a Fiesta owner 
- ianFRST
- Elite Post Master

- Posts: 12982
- Joined: Mon Dec 30, 2002 9:32 pm
- Location: Burton on Trent
- heeman10
- Elite Post Master


- Posts: 28746
- Joined: Fri Nov 08, 2002 5:32 pm
- Location: Somerset
- Your car: Audi TT TDI Quattro S line
Non-Update :lol:
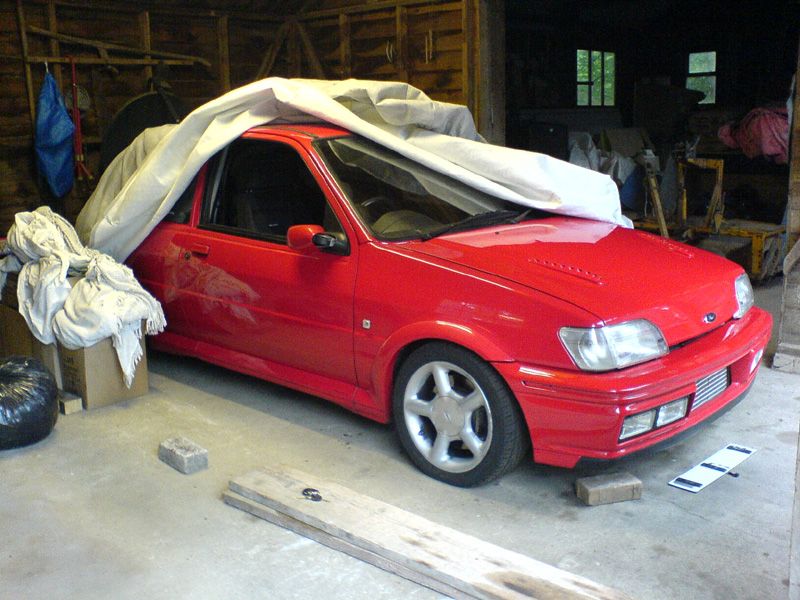
Went home at the weekend and took some photo's of it because there was nothing else to do!! Since I'll be getting a new car soon I've decided to put off the removal of the gearbox (to inspect the release bearing, clutch and flywheel, hunting the cause of my gearshift issue) until I have the new car, otherwise I won't really have any way of getting around. So, the hunt is on!
Anyway, the new stub was welded on the breather pot a couple of weeks ago:
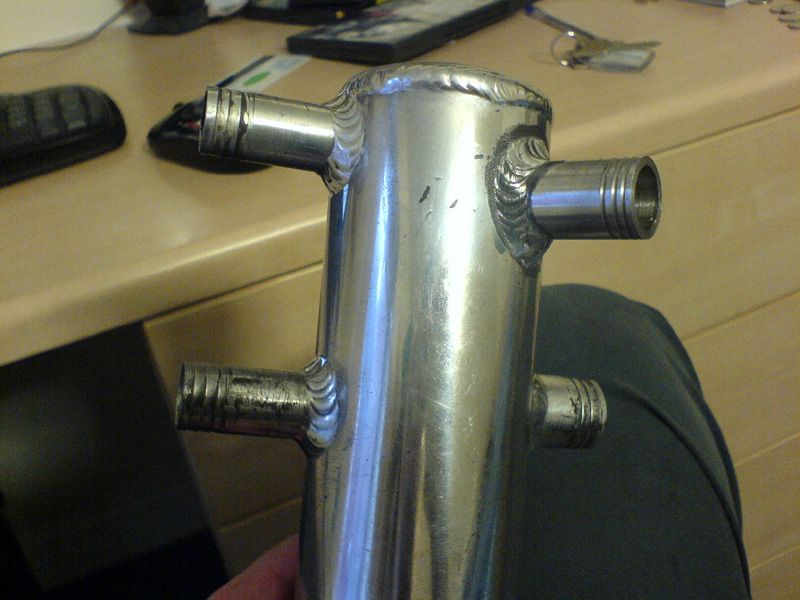
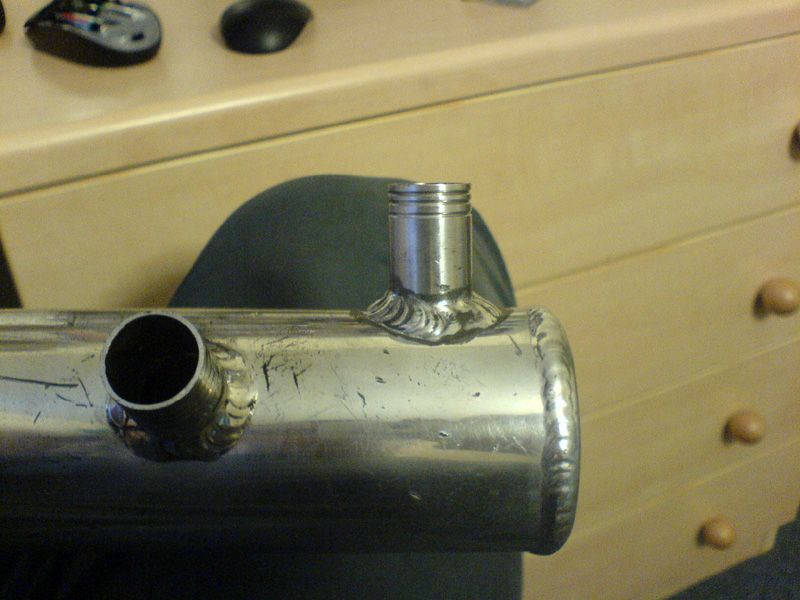
And here are the random photo's I took:
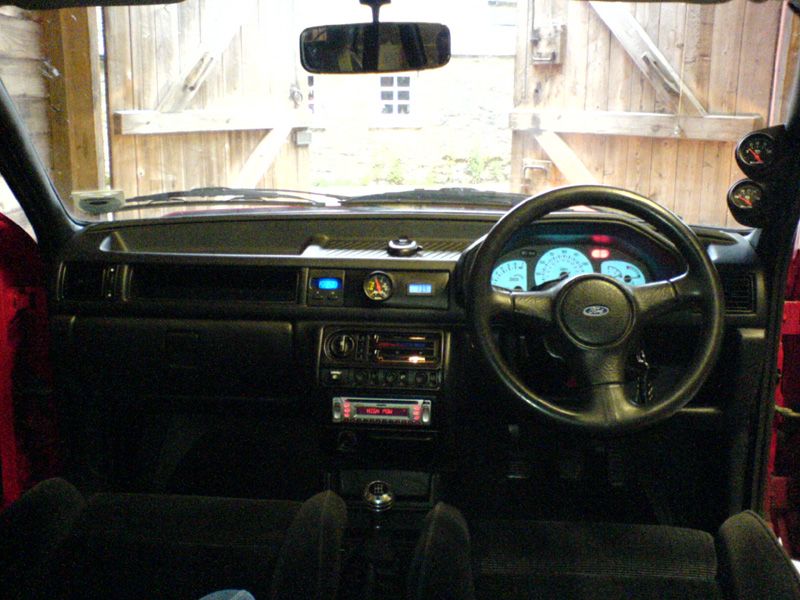
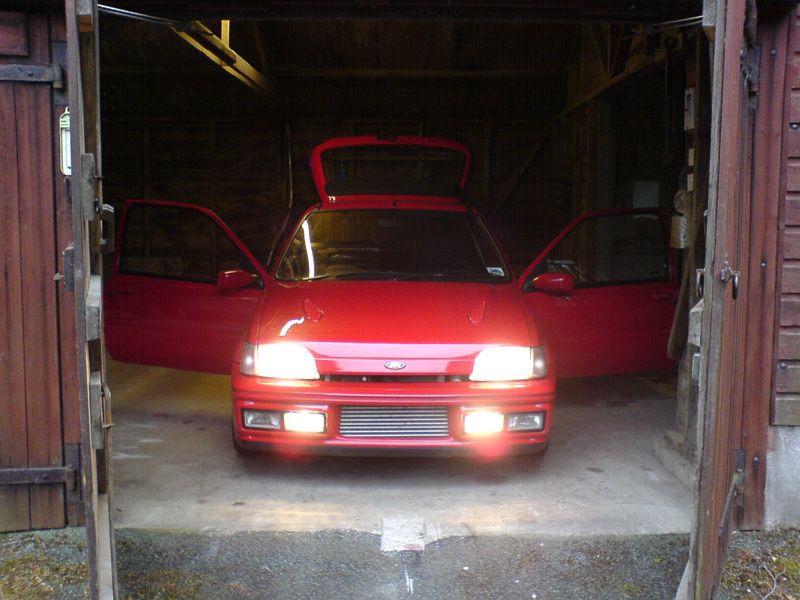
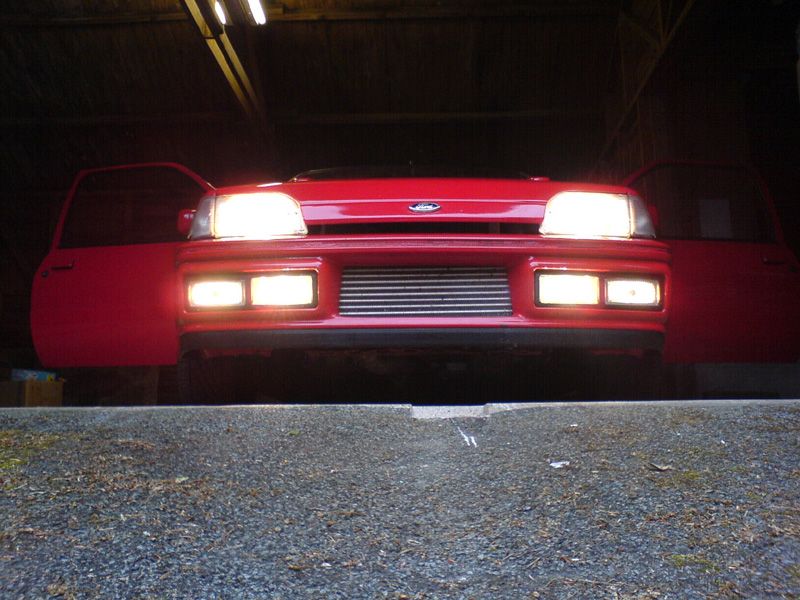
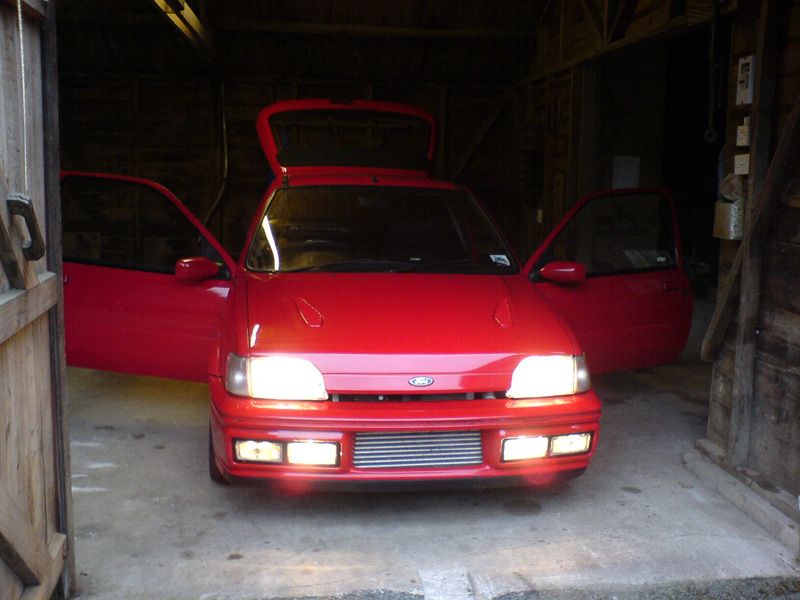
Went home at the weekend and took some photo's of it because there was nothing else to do!! Since I'll be getting a new car soon I've decided to put off the removal of the gearbox (to inspect the release bearing, clutch and flywheel, hunting the cause of my gearshift issue) until I have the new car, otherwise I won't really have any way of getting around. So, the hunt is on!
Anyway, the new stub was welded on the breather pot a couple of weeks ago:


And here are the random photo's I took:


- heeman10
- Elite Post Master


- Posts: 28746
- Joined: Fri Nov 08, 2002 5:32 pm
- Location: Somerset
- Your car: Audi TT TDI Quattro S line
Yeah, cool without the plate.... that's the hard thing with an IC and an XR2i/RS bumper, there's just no good place for a plate! 
I like the ones that take up the Fog&Driving light position, but that's impractical...

I like the ones that take up the Fog&Driving light position, but that's impractical...

- mike_wall15
- Elite Post Master


- Posts: 6475
- Joined: Fri Jul 18, 2003 7:17 pm
- Location: Land of the Stars!
Car: 2002 BMW M3
ure IC is wonky

MotorcyclesFish :The thing is if I caught Brian fudgekin a bloke, I wouldn't think 'oh Brian's a gay', I'd think 'Brian that fudgekin weird haired mongoloid is raping a gay to see if anyone finds it funny'
- Rhinopower
- Elite Post Master

- Posts: 6466
- Joined: Wed Oct 08, 2003 9:41 am
- Your car: Volvo FH330
Car: 1983 Ford Escort
Deffo looks cool without the plate!
Looks like Libs is getting a Mk3 as a runaround matey, watch this space!
Steve
Looks like Libs is getting a Mk3 as a runaround matey, watch this space!
Steve
- Captain Tightpants
- Elite Post Master


- Posts: 3723
- Joined: Fri Feb 20, 2004 8:25 pm
- Location: Somerset
Mike - Yup, no space for a plate where it looks good  I use both my fogs and driving lights, so don't want to disable one side or I run the very real risk of hitting an animal. I'll just have to see what I can do!
Rhino - Go FT!
Stephanie - The Mk3 Fiesta was born to be a runaround! I saw/heard a standard Mondeo ST24 today btw, sounded quality when he gave it some!
  New car on the cards for me tomorrow hopefully too, watch my space also!
Rhino - Go FT!
Stephanie - The Mk3 Fiesta was born to be a runaround!
- heeman10
- Elite Post Master


- Posts: 28746
- Joined: Fri Nov 08, 2002 5:32 pm
- Location: Somerset
- Your car: Audi TT TDI Quattro S line
Update
Since leaving uni last week, I've taken the car out twice! Not much, you may think, but it's nice to save it for the dry, sunny days when it's safe/fun. During this period of boredom/wet weather, I've decided to approach a couple of things I've wanted to for a short while; the braking and front bumper.
Braking
When I fitted the Wilwood brakes up front, the brake pedal travel was increased, and it felt a bit on the spongy side. Also, the car was notably nose-diving, something Kenny at MSD commented on after doing a few high-speed stops. For over a year I've been planning on changing to discs at the back, but for quite a few reasons, it never happened. It didn't seem worth inspecting the rear drums as I've been forever on the verge of bolting discs on the back, but I've had enough now. New shoes will be ordered for the back brakes, and I'll take them apart...not expecting to see much left in there!
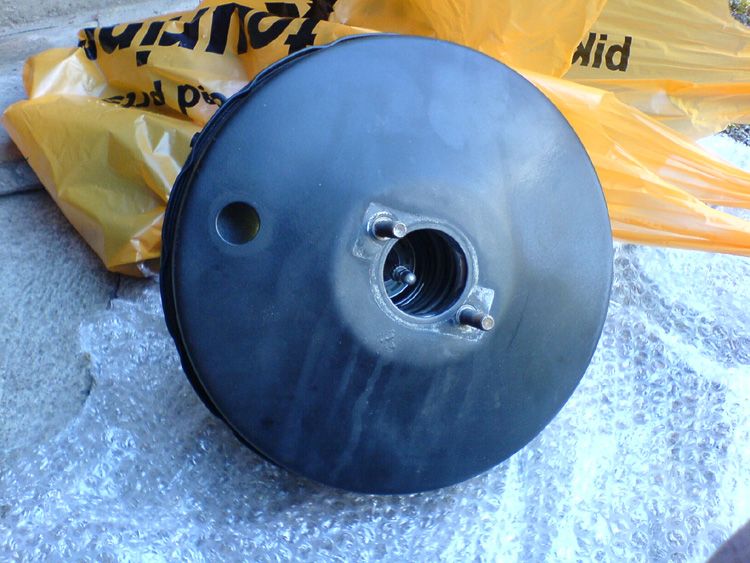
Before then, I'll be fitting the Escort Mk5 master cylinder and servo, recently purchased from Pd, though I already had a brand new Mk5 master cylinder which I've fitted to Pd's servo. The ZT's current servo looks brand new, and often gets commented on. At 13 years old many show-goers presume I've painted it, and so I decided to bring the scratty Escort servo up to scratch.
As I received it:
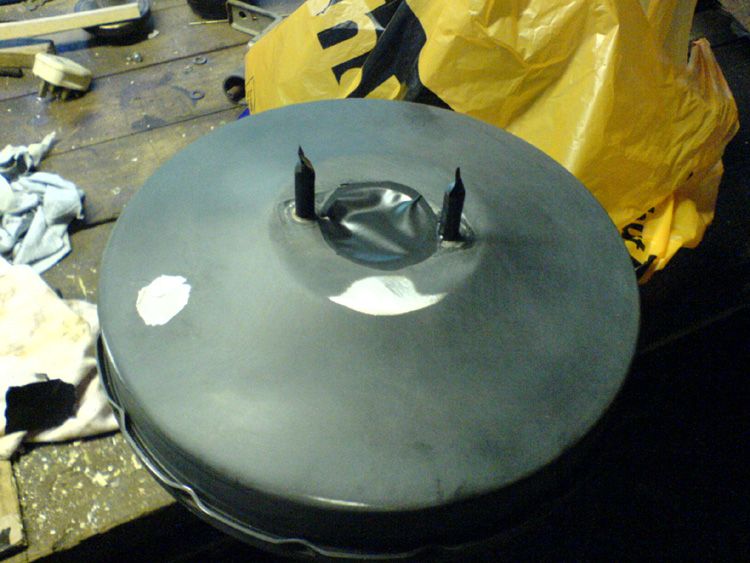
Sanded down, including minor surface corrosion from under the paint:
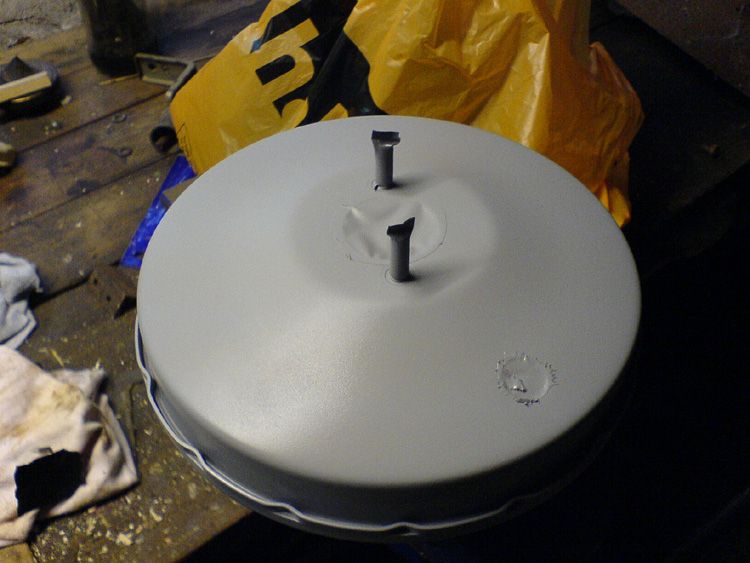
Primed:
A couple of coats of gloss black later:
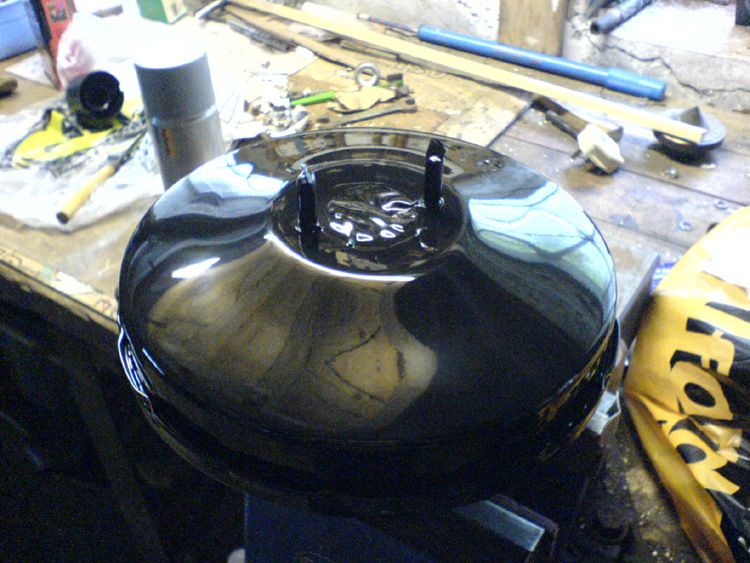
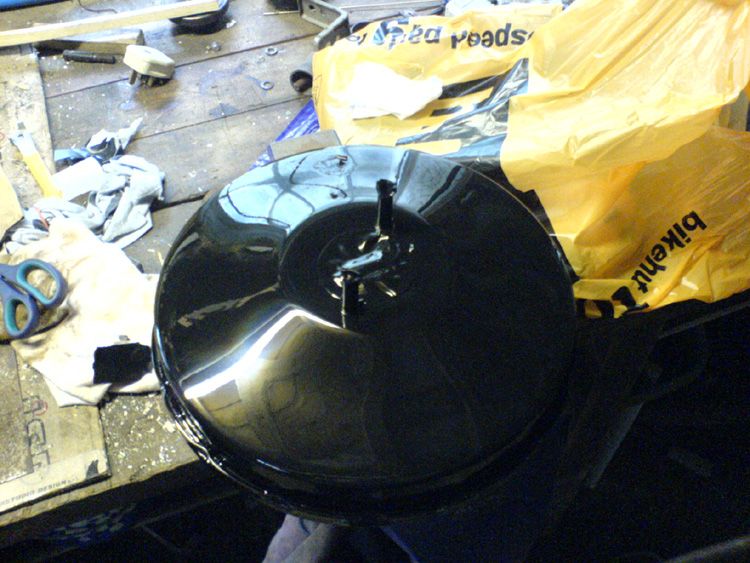
And after a night next to the Aga:
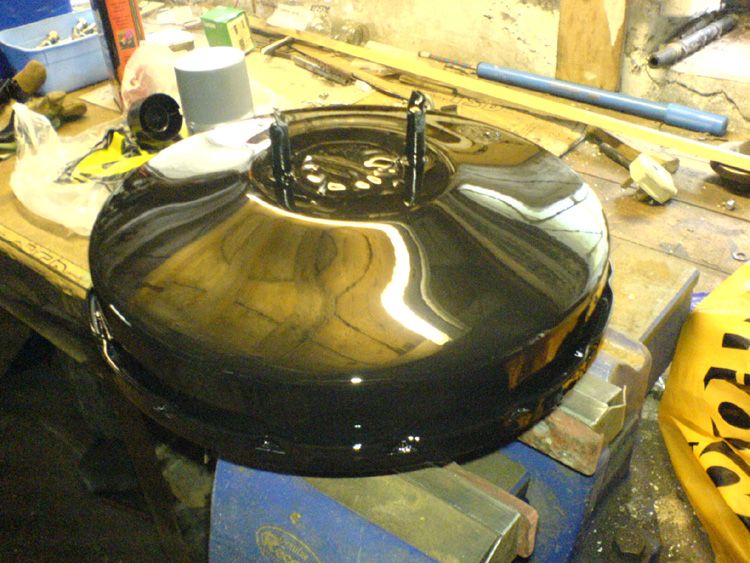
Master cylinder fitted, along with vacuum hose grommet:
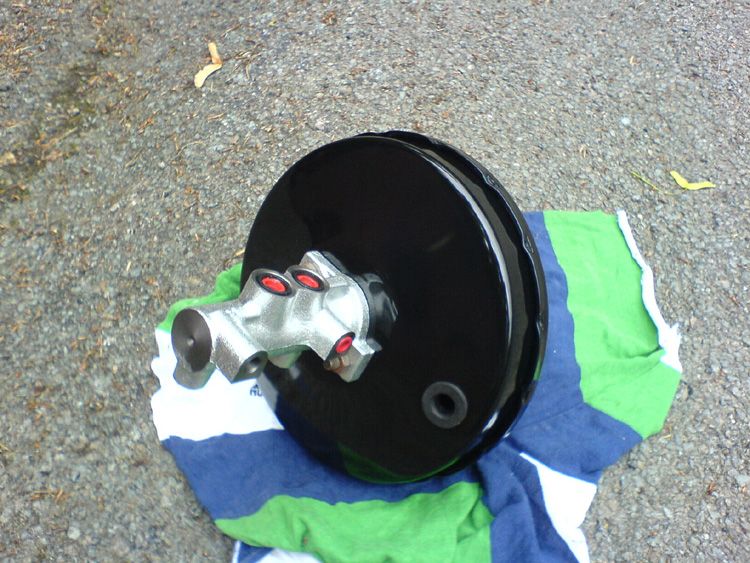
Job done, should look presentable once fitted to the car. Since the human foot/leg regulates pressure applied more accurately than distance travelled, it is desirable to have a short, firm pedal than a longer, softer travel. I see little point in upgrading a braking system if the control of it is lacking in precision!
Bumper
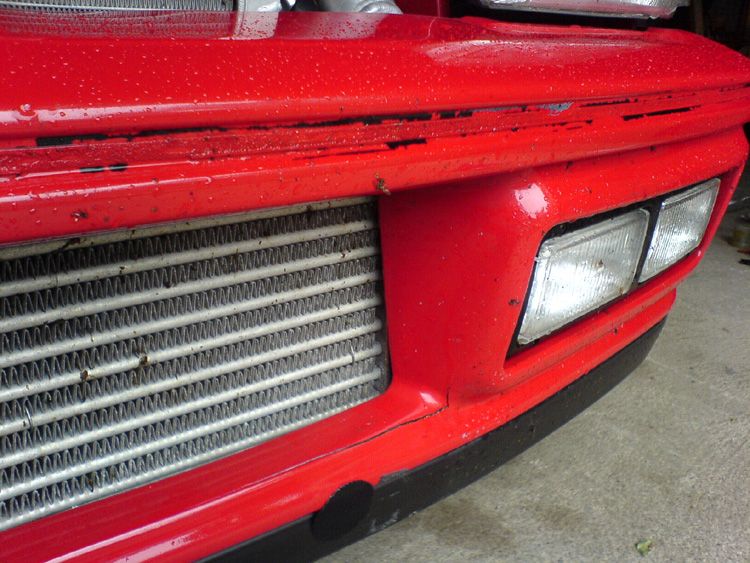
I bought my bumper from a FT.com member almost two years ago, before the ZT was even bought, let alone in the car. He "kindly" offered to spray it for me for an extra £15...though once bolted onto the car, nasty chips appeared after the first drive, and paint was flaking off at an alarming rate. It then started cracking in a lower corner of the enlarged cutout. A certain FT member stuck black tape on it at FITP this year, which pulled even more paint off it (thanks RS_Rawli!!!!!), and I couldn't bear to look at it anymore.
I pulled it off the car on Sunday and attacked it with the intention of repairing/filling the crack, smoothing the bumper strip recess at long last, and painting it properly.
A before shot, showing the condition of it:
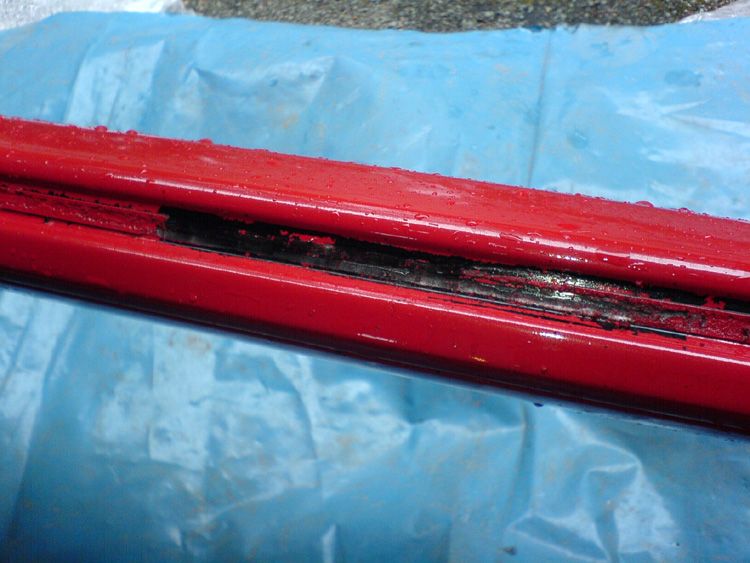
Removing the bumper strip adhesive (no, he didn't even bother doing that before spraying!!):
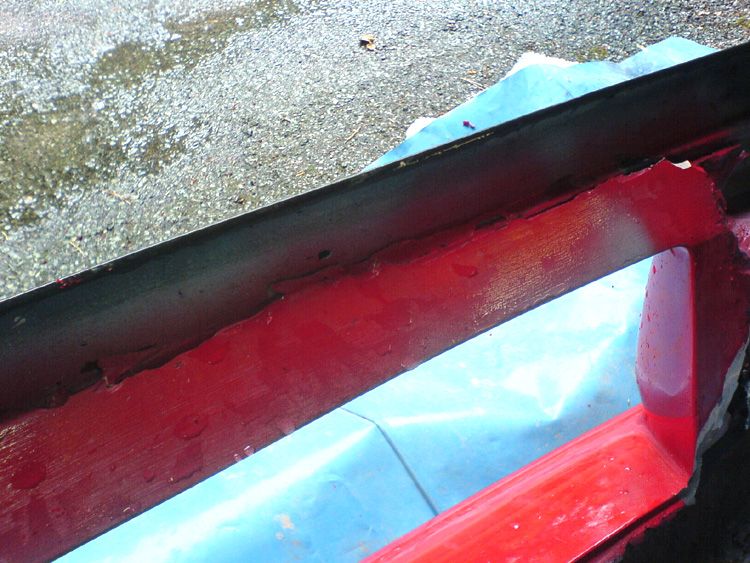
The fool fibreglassed the rubber lip onto it, so that'll have to stay on during this re-work:
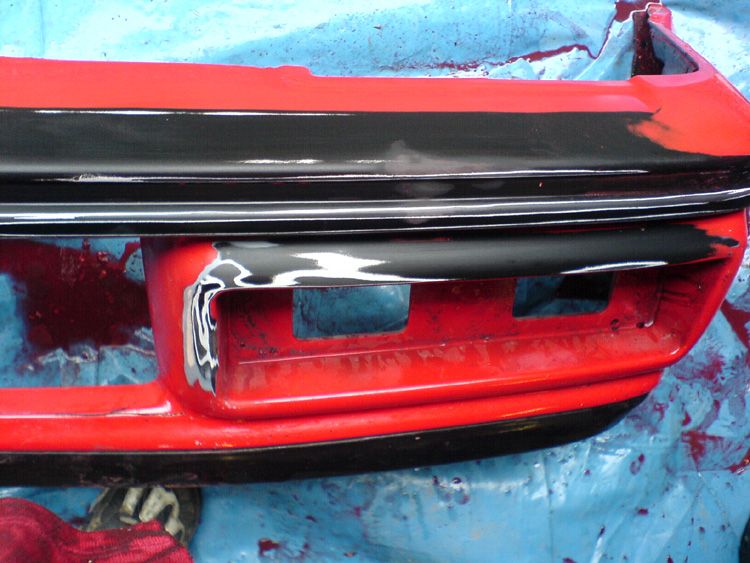
Some prep:
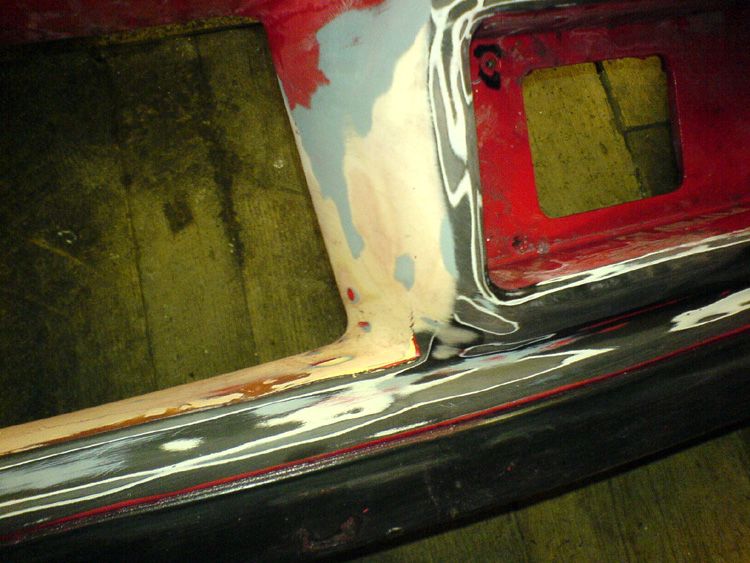
The crack, bottom right:
Largely sanded down, and the top recess which will be filled:
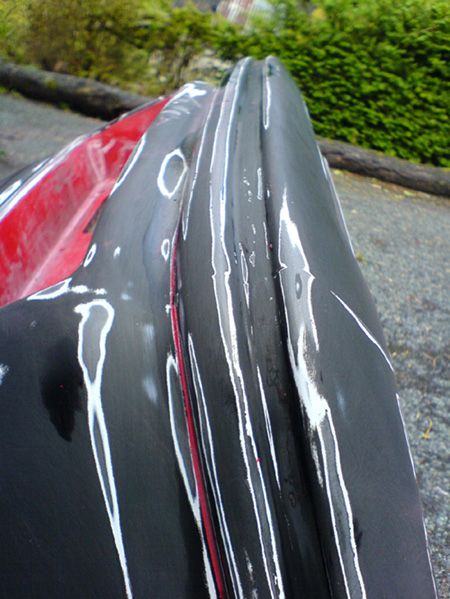
Laying fibreglass in the recess to make up some of the gap:
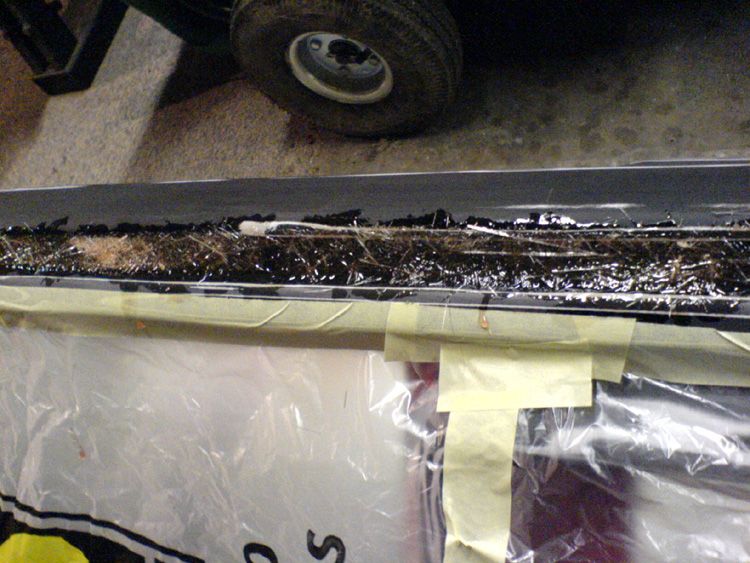
Fibreglass finished and roughed up:
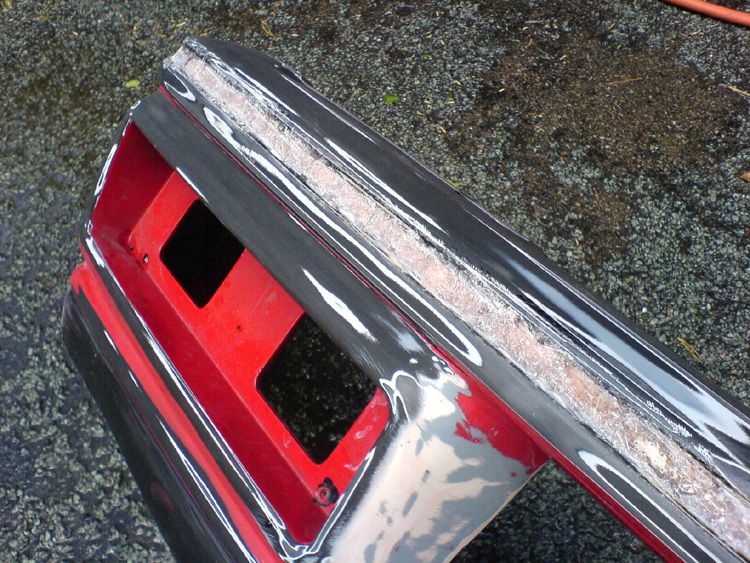
The first skim of filler, one more to come (currently in progress) then time to sand it all down:
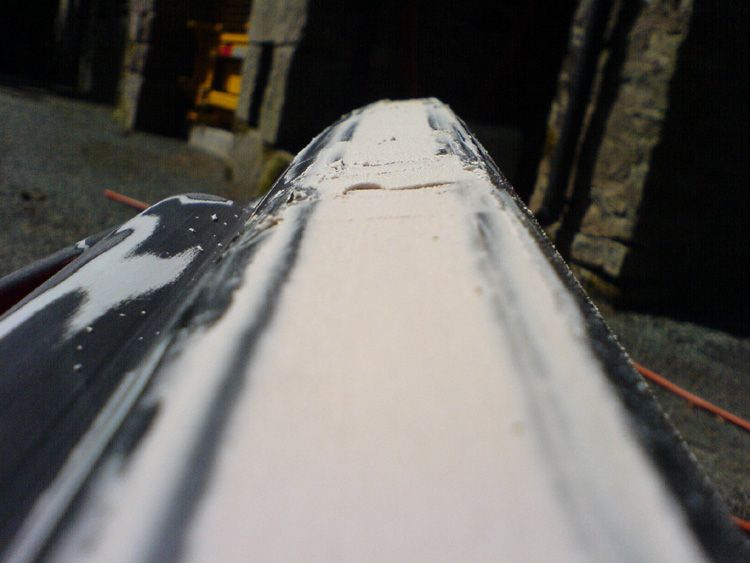
All small scratches/chips have been/will be sanded and/or filled, and I've had some paint mixed up to match the rest of the car, which will go on after a couple of coats of primer. If the colour's a good enough match I may tidy up some other areas of the car that make me cringe while I'm at it - may even have a car worthy of the FT.com stand then!
Since leaving uni last week, I've taken the car out twice! Not much, you may think, but it's nice to save it for the dry, sunny days when it's safe/fun. During this period of boredom/wet weather, I've decided to approach a couple of things I've wanted to for a short while; the braking and front bumper.
Braking
When I fitted the Wilwood brakes up front, the brake pedal travel was increased, and it felt a bit on the spongy side. Also, the car was notably nose-diving, something Kenny at MSD commented on after doing a few high-speed stops. For over a year I've been planning on changing to discs at the back, but for quite a few reasons, it never happened. It didn't seem worth inspecting the rear drums as I've been forever on the verge of bolting discs on the back, but I've had enough now. New shoes will be ordered for the back brakes, and I'll take them apart...not expecting to see much left in there!
Before then, I'll be fitting the Escort Mk5 master cylinder and servo, recently purchased from Pd, though I already had a brand new Mk5 master cylinder which I've fitted to Pd's servo. The ZT's current servo looks brand new, and often gets commented on. At 13 years old many show-goers presume I've painted it, and so I decided to bring the scratty Escort servo up to scratch.
As I received it:

Sanded down, including minor surface corrosion from under the paint:

Primed:

A couple of coats of gloss black later:


And after a night next to the Aga:

Master cylinder fitted, along with vacuum hose grommet:

Job done, should look presentable once fitted to the car. Since the human foot/leg regulates pressure applied more accurately than distance travelled, it is desirable to have a short, firm pedal than a longer, softer travel. I see little point in upgrading a braking system if the control of it is lacking in precision!
Bumper
I bought my bumper from a FT.com member almost two years ago, before the ZT was even bought, let alone in the car. He "kindly" offered to spray it for me for an extra £15...though once bolted onto the car, nasty chips appeared after the first drive, and paint was flaking off at an alarming rate. It then started cracking in a lower corner of the enlarged cutout. A certain FT member stuck black tape on it at FITP this year, which pulled even more paint off it (thanks RS_Rawli!!!!!), and I couldn't bear to look at it anymore.
I pulled it off the car on Sunday and attacked it with the intention of repairing/filling the crack, smoothing the bumper strip recess at long last, and painting it properly.
A before shot, showing the condition of it:

Removing the bumper strip adhesive (no, he didn't even bother doing that before spraying!!):

The fool fibreglassed the rubber lip onto it, so that'll have to stay on during this re-work:

Some prep:

The crack, bottom right:

Largely sanded down, and the top recess which will be filled:

Laying fibreglass in the recess to make up some of the gap:

Fibreglass finished and roughed up:

The first skim of filler, one more to come (currently in progress) then time to sand it all down:

All small scratches/chips have been/will be sanded and/or filled, and I've had some paint mixed up to match the rest of the car, which will go on after a couple of coats of primer. If the colour's a good enough match I may tidy up some other areas of the car that make me cringe while I'm at it - may even have a car worthy of the FT.com stand then!
- heeman10
- Elite Post Master


- Posts: 28746
- Joined: Fri Nov 08, 2002 5:32 pm
- Location: Somerset
- Your car: Audi TT TDI Quattro S line
Glad to see you're busy on the car! Broom broom!!
I shall tell you one thing though, I'm amazed at how every time you return to the car and take pics, your fogs and driving light bulbs are still working! My fiesta never lasted two seconds without a bulb blowing!
Glad that's off my chest, although I feel more bloody full light shots in the months to come!

- mike_wall15
- Elite Post Master


- Posts: 6475
- Joined: Fri Jul 18, 2003 7:17 pm
- Location: Land of the Stars!
Car: 2002 BMW M3
- Mikee_RS
- Elite Post Master


- Posts: 4472
- Joined: Sun Oct 21, 2001 1:00 am
- Location: Reading
Car: 1995 Ford Fiesta
Mike - I replaced the headlight bulbs just over three years ago, and one of my driving light bulbs went a few months back. Other than that, that's it! 
Mikee - Be gentle, it's my first ever time with fibreglass! First major surface I've painted too, so will be interesting to see how it turns out. Either way, it can't be worse than it was before!
Ello Dan Cheers! The bonnet idea could work fairly well, I just dislike anything that stops it looking like a normal road car really though
Mikee - Be gentle, it's my first ever time with fibreglass!
Ello Dan
- heeman10
- Elite Post Master


- Posts: 28746
- Joined: Fri Nov 08, 2002 5:32 pm
- Location: Somerset
- Your car: Audi TT TDI Quattro S line
My ProjectS..

viewtopic.php?t=97195&start=0
FORD SPARES - ENGINES-PANELS-TRIM ESCORT/FIESTA/SIERRA ETC RS/COSWORTH/XR
rich
07834862431

viewtopic.php?t=97195&start=0
FORD SPARES - ENGINES-PANELS-TRIM ESCORT/FIESTA/SIERRA ETC RS/COSWORTH/XR
rich
07834862431
- rich_frst
- Elite Post Master

- Posts: 2792
- Joined: Tue Mar 09, 2004 2:28 pm
- Location: benfleet, Essex
- Your car: mk1 sierra cos, mk2 escort est
looking very good james, take ya time as discussed you'll get it looking spot on again!
very impressed so far
very impressed so far

- garyhurn77
- Post Master

- Posts: 906
- Joined: Tue Jul 26, 2005 9:57 am
- Location: magor, south wales
Update
Have been away for a day or two with graduation and helping finish build my grandad's Honda Blackbird engine Formula 27 since its rebuild, but attacked the master cylinder etc today.
Fiesta diesel master cylinder/servo on the right, Escort items on the left:
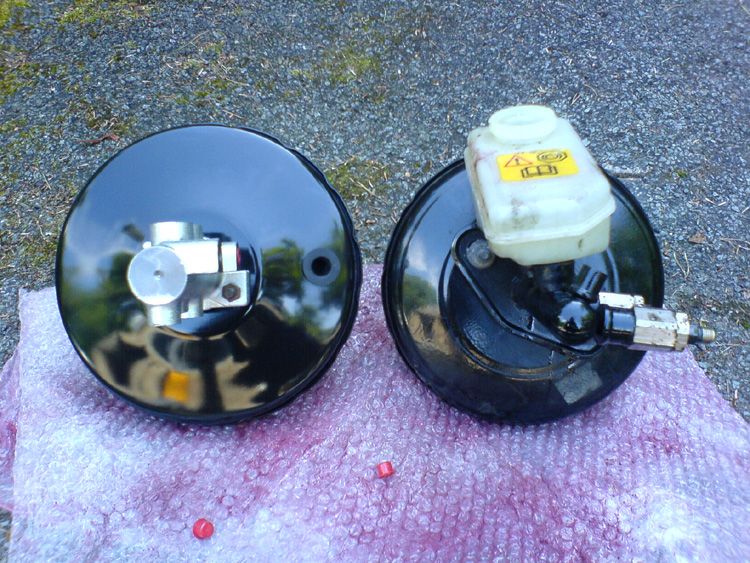
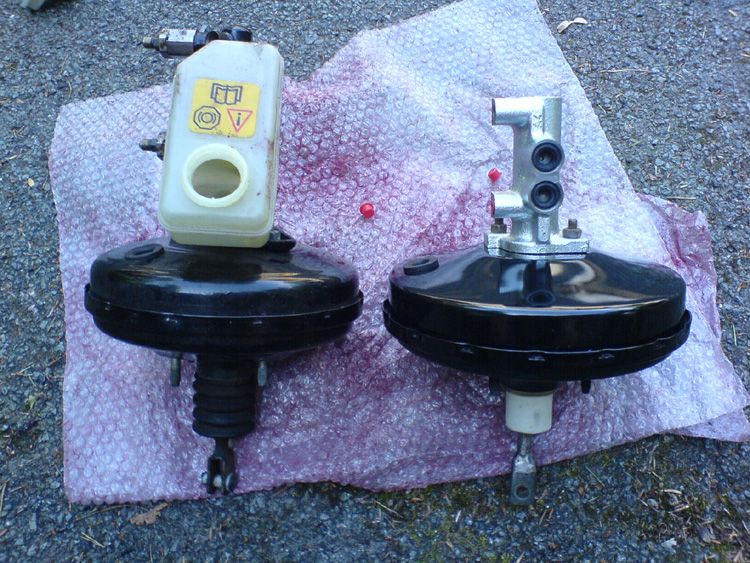
The Escort setup's quite a bit bigger all round.
Old brackets on the right, and a pair I painted up before fitting, on the left:
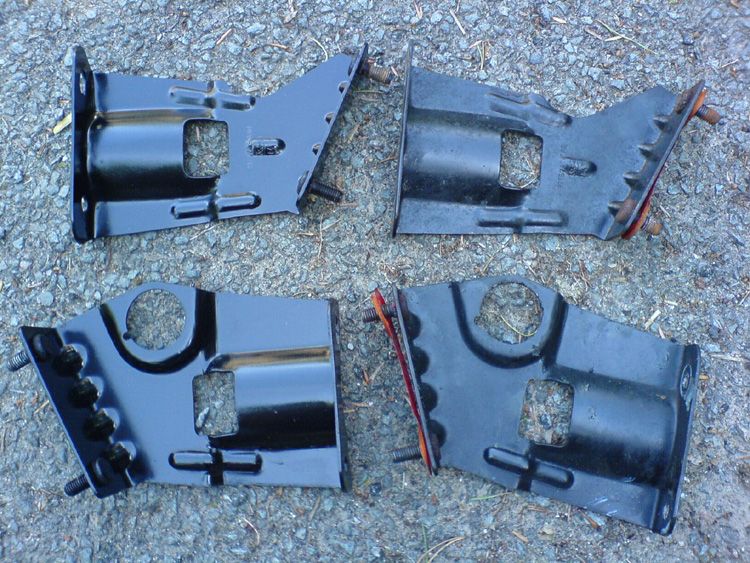
These are the brackets that both support the master cylinder/servo and the brake bar.
As it all stands at the moment:
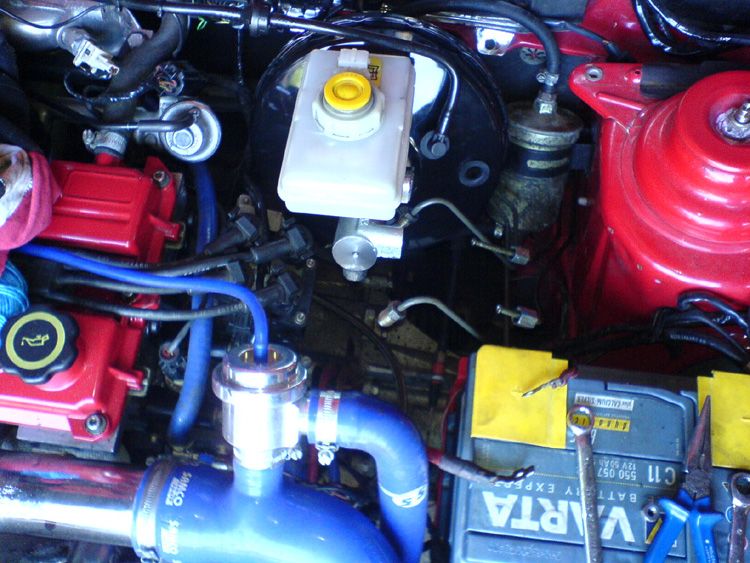
The original brake lines are nowhere near the Escort master cylinder, plus the fittings are all wrong, so I'll cut them off at the inner wing and use braided hose from the cylinder to the hard pipes at the inner wing, joined using female fittings on the hard pipes, butting up against flared ends.
Have been away for a day or two with graduation and helping finish build my grandad's Honda Blackbird engine Formula 27 since its rebuild, but attacked the master cylinder etc today.
Fiesta diesel master cylinder/servo on the right, Escort items on the left:


The Escort setup's quite a bit bigger all round.
Old brackets on the right, and a pair I painted up before fitting, on the left:

These are the brackets that both support the master cylinder/servo and the brake bar.
As it all stands at the moment:

The original brake lines are nowhere near the Escort master cylinder, plus the fittings are all wrong, so I'll cut them off at the inner wing and use braided hose from the cylinder to the hard pipes at the inner wing, joined using female fittings on the hard pipes, butting up against flared ends.
- heeman10
- Elite Post Master


- Posts: 28746
- Joined: Fri Nov 08, 2002 5:32 pm
- Location: Somerset
- Your car: Audi TT TDI Quattro S line
nice one matey...
keen to know what the outcome is like once all plumbed in

keen to know what the outcome is like once all plumbed in
My ProjectS..

viewtopic.php?t=97195&start=0
FORD SPARES - ENGINES-PANELS-TRIM ESCORT/FIESTA/SIERRA ETC RS/COSWORTH/XR
rich
07834862431

viewtopic.php?t=97195&start=0
FORD SPARES - ENGINES-PANELS-TRIM ESCORT/FIESTA/SIERRA ETC RS/COSWORTH/XR
rich
07834862431
- rich_frst
- Elite Post Master

- Posts: 2792
- Joined: Tue Mar 09, 2004 2:28 pm
- Location: benfleet, Essex
- Your car: mk1 sierra cos, mk2 escort est
cool, you going to do a guid for the mods need to fit this?
also let us know what the braking like copmpaired with the old one.
might consider it my self as i have a mk6 escort servo and cylinder sat in shed doing fock all
also let us know what the braking like copmpaired with the old one.
might consider it my self as i have a mk6 escort servo and cylinder sat in shed doing fock all
- jayrs
- Elite Post Master


- Posts: 31520
- Joined: Mon Apr 19, 2004 10:32 pm
- Location: I.O.W
- Your car: FRST, XR2, ST170, ST225
Car: 1991 Ford Fiesta RS Turbo
yeah defo a guide needed i think!!!!! 
My ProjectS..

viewtopic.php?t=97195&start=0
FORD SPARES - ENGINES-PANELS-TRIM ESCORT/FIESTA/SIERRA ETC RS/COSWORTH/XR
rich
07834862431

viewtopic.php?t=97195&start=0
FORD SPARES - ENGINES-PANELS-TRIM ESCORT/FIESTA/SIERRA ETC RS/COSWORTH/XR
rich
07834862431
- rich_frst
- Elite Post Master

- Posts: 2792
- Joined: Tue Mar 09, 2004 2:28 pm
- Location: benfleet, Essex
- Your car: mk1 sierra cos, mk2 escort est
- jayrs
- Elite Post Master


- Posts: 31520
- Joined: Mon Apr 19, 2004 10:32 pm
- Location: I.O.W
- Your car: FRST, XR2, ST170, ST225
Car: 1991 Ford Fiesta RS Turbo
yep!!! 
My ProjectS..

viewtopic.php?t=97195&start=0
FORD SPARES - ENGINES-PANELS-TRIM ESCORT/FIESTA/SIERRA ETC RS/COSWORTH/XR
rich
07834862431

viewtopic.php?t=97195&start=0
FORD SPARES - ENGINES-PANELS-TRIM ESCORT/FIESTA/SIERRA ETC RS/COSWORTH/XR
rich
07834862431
- rich_frst
- Elite Post Master

- Posts: 2792
- Joined: Tue Mar 09, 2004 2:28 pm
- Location: benfleet, Essex
- Your car: mk1 sierra cos, mk2 escort est
Rich - Me too! Will put new shoes on the rear, and have a new set of pads ready to go on the front (burnt them out in 5-6,000 miles, and they're £75 a set!  ). Hopefully with all new pads/shoes and a fatter master cylinder it'll be even sharper under braking. I'm just wondering what springs to order for my coilovers at the moment too, as I'd like something stiffer. Some roads around here caused mild scrubbing when I took a mate out for a blast last week, and I THINK 20% stiffer springs all round would remedy things. Need to drive the car again and see what I think.
mickylee - Not a great deal of progress, other than running out of filler! Half hour drive to Halfords from here, but I'll probably make the trip tomorrow or the day after. I want it all finished and ready to re-fit by the weekend ideally.
jayrs - I bought the servo ready-modified, as I didn't have my car at the time, plus I can't weld yet! *embarassed sulk* The operating rod needs modifying to fit the Fiesta's brake bar. Other than that, it's just a case of getting all the brake lines to line up as far as I can tell so far. Literally spent about 20 minutes playing with it all today, but there didn't appear to be anything else that needed doing. I'll report back about the pedal feel once it's all in and fully bled/tested. A full fluid change will no doubt help it all tighten up as well!
- heeman10
- Elite Post Master


- Posts: 28746
- Joined: Fri Nov 08, 2002 5:32 pm
- Location: Somerset
- Your car: Audi TT TDI Quattro S line


Twitter
The second 20th Anniversary article, a dive into the history of how the site came about is available here: https://t.co/kbCfZ4sf0R
17:44, 4th December 2021 Twitter Web App
To celebrate https://t.co/wXVkvJipaS being 20 years old this year, I've written a series of articles detailing the… https://t.co/B0vE0Y3KvP
17:42, 4th December 2021 Twitter Web App
Follow fiestaturbo.com on Twitter:
http://twitter.com/fiestaturbo/
Facebook
New article! fiestaturbo.com is 20 years old this year and I'm writing a series delving into the history of it. …
Saturday, 4th December 2021 12:49
Some awesome Escorts from the Fair - FORD FAIR 2021: ESCORT EXHIBITION - …
Sunday, 31st October 2021 17:05
All the best Focuses from Ford Fair - FORD FAIR 2021: FOCUS PEEKING - Which was your …
Thursday, 7th October 2021 22:21
Become a fan:
http://www.facebook.com/fiestaturbo/
RSS Feeds
Subscribe to the RSS feed
What is RSS?
RSS is a technology that lets you use special applications or modern browsers to notify you you when a site is updated. You can then read the updated content in that application or your browser.
To subscribe to these RSS feeds you need to copy the links above. For instructions on how to add it to the feeds you keep track of, consult the documentation of your RSS reader.