Popular Plus - 04/02/14 - Page 19 - The End!
Re: Popular Plus - 01/10/10 - Page 12 - Wideband Controller
I'll try and find it tonight, but the idle values may need some adjustment because I made some changes and then never tested them 
That said, I may have a slightly older file that should be fine.
That said, I may have a slightly older file that should be fine.
- Smo
- Elite Post Master


- Posts: 8658
- Joined: Sun Dec 29, 2002 12:33 am
- Location: My indecisive mind, in Thanet, Kent.
Car: 1990 Ford Fiesta Popular Plus
Re: Popular Plus - 01/10/10 - Page 12 - Wideband Controller
Ryan, sent you an email to your Hotmail/MSN account.
- Smo
- Elite Post Master


- Posts: 8658
- Joined: Sun Dec 29, 2002 12:33 am
- Location: My indecisive mind, in Thanet, Kent.
Car: 1990 Ford Fiesta Popular Plus
Re: Popular Plus - 01/10/10 - Page 12 - Wideband Controller
Lovely!! I just need to get a wideband myself, im favoring the LC-1 though
MotorcyclesFish :The thing is if I caught Brian fudgekin a bloke, I wouldn't think 'oh Brian's a gay', I'd think 'Brian that fudgekin weird haired mongoloid is raping a gay to see if anyone finds it funny'
- Rhinopower
- Elite Post Master

- Posts: 6466
- Joined: Wed Oct 08, 2003 9:41 am
- Your car: Volvo FH330
Car: 1983 Ford Escort
Re: Popular Plus - 01/10/10 - Page 12 - Wideband Controller
It's meant to be very good, fast and accurate, but it's just the reports that put me off. Set up right, it's probably spot on, and I could probably have done it no worries, but various people have said they've had issues, and I've read a lot about having to "free-air" calibrate them very regularly... I don't know, but the AEM looks like it'll do me fine.
What I don't like about the AEM is the physical bulkiness of the bezel, and it does look and feel a bit cheap, but if it does the job, I'll be more than happy
With the LC-1, obviously, you can use one of their gauges, or buy something else, as the controller is part of the cabling... It's a shame you sold on your old MS and LC-1
- Smo
- Elite Post Master


- Posts: 8658
- Joined: Sun Dec 29, 2002 12:33 am
- Location: My indecisive mind, in Thanet, Kent.
Car: 1990 Ford Fiesta Popular Plus
Re: Popular Plus - 01/10/10 - Page 12 - Wideband Controller
Yeah, tell me about it! God knows where it ended up, i did ask the guy I sold it to but he's sold it on since. IIRC I remember having to free air calibrate it a couple of times before when I was using it.
So the aem's controller is built into the gauge?
So the aem's controller is built into the gauge?
MotorcyclesFish :The thing is if I caught Brian fudgekin a bloke, I wouldn't think 'oh Brian's a gay', I'd think 'Brian that fudgekin weird haired mongoloid is raping a gay to see if anyone finds it funny'
- Rhinopower
- Elite Post Master

- Posts: 6466
- Joined: Wed Oct 08, 2003 9:41 am
- Your car: Volvo FH330
Car: 1983 Ford Escort
Re: Popular Plus - 01/10/10 - Page 12 - Wideband Controller
Yeah, which I consider a drawback to some extent, but it seemed to be the best of the bunch for all round functionality and reliability! Obviously I can't say what it's like yet, but I don't foresee any problems 
- Smo
- Elite Post Master


- Posts: 8658
- Joined: Sun Dec 29, 2002 12:33 am
- Location: My indecisive mind, in Thanet, Kent.
Car: 1990 Ford Fiesta Popular Plus
Re: Popular Plus - 01/10/10 - Page 12 - Wideband Controller
Rhinopower :Yeah, tell me about it! God knows where it ended up, i did ask the guy I sold it to but he's sold it on since. IIRC I remember having to free air calibrate it a couple of times before when I was using it.
i know where its gone, i bought it 2 1/2 years ago
good work as per usual Si, i'll join in on the race MS race
- onslack
- Post Master

- Posts: 707
- Joined: Sun Feb 27, 2005 6:58 pm
- Location: West Sussex Drives: 2.0 16v Si
- Your car: Si
Re: Popular Plus - 01/10/10 - Page 12 - Wideband Controller
Lol, hope it was a good price! All working ok?
The unit im getting i need to convert to twin coil and fit the idle valve transistor, should have it in the next couple of days.
The unit im getting i need to convert to twin coil and fit the idle valve transistor, should have it in the next couple of days.
MotorcyclesFish :The thing is if I caught Brian fudgekin a bloke, I wouldn't think 'oh Brian's a gay', I'd think 'Brian that fudgekin weird haired mongoloid is raping a gay to see if anyone finds it funny'
- Rhinopower
- Elite Post Master

- Posts: 6466
- Joined: Wed Oct 08, 2003 9:41 am
- Your car: Volvo FH330
Car: 1983 Ford Escort
Re: Popular Plus - 01/10/10 - Page 12 - Wideband Controller
Rhinopower :Lol, hope it was a good price! All working ok?
The unit im getting i need to convert to twin coil and fit the idle valve transistor, should have it in the next couple of days.
yeah i did get it for a fairly good price back then
the LC-1 lives snuggly in my (dead) cossie
not sure not actually had it running on a car yet as i sent it away to be checked over as soon as i got it
yeah i had mine converted to have twin coil drivers and launch control
sorry for hi-jacking your thread Si
- onslack
- Post Master

- Posts: 707
- Joined: Sun Feb 27, 2005 6:58 pm
- Location: West Sussex Drives: 2.0 16v Si
- Your car: Si
Re: Popular Plus - 01/10/10 - Page 12 - Wideband Controller
I might have to look into converting mine to having the drivers so I can scrap the EDIS and get spark cut, but I know it runs fine as it as at the moment so it's not priority 
I thought your Sierra was running again, Terry?
I thought your Sierra was running again, Terry?
- Smo
- Elite Post Master


- Posts: 8658
- Joined: Sun Dec 29, 2002 12:33 am
- Location: My indecisive mind, in Thanet, Kent.
Car: 1990 Ford Fiesta Popular Plus
Re: Popular Plus - 01/10/10 - Page 12 - Wideband Controller
the only reason why mine was converted to twin coil drivers as i had my Si engine loom and i didnt want to swap to an edis loom
nope the saph is now sat in my garage in bits, its been like that since may this year when my big end when
then i got my fez and thats been distracting me just a little bit

nope the saph is now sat in my garage in bits, its been like that since may this year when my big end when
then i got my fez and thats been distracting me just a little bit
- onslack
- Post Master

- Posts: 707
- Joined: Sun Feb 27, 2005 6:58 pm
- Location: West Sussex Drives: 2.0 16v Si
- Your car: Si
Popular Plus - 07/10/10 - Page 13 - AEM Wideband [Video]
Boring video time 
That's the first start up after finally fitting it tonight. It sounds rough at times but my car's running Vibratechnics mounts and everything inside just vibrates anyway It was running very smooth, so I'm assuming it's emulating 0-1v just fine. The video's a bit long because I just bunged it straight on YouTube without editing it, but you don't need to watch much more than about 30 seconds of it
That's the first start up after finally fitting it tonight. It sounds rough at times but my car's running Vibratechnics mounts and everything inside just vibrates anyway
- Smo
- Elite Post Master


- Posts: 8658
- Joined: Sun Dec 29, 2002 12:33 am
- Location: My indecisive mind, in Thanet, Kent.
Car: 1990 Ford Fiesta Popular Plus
Re: Popular Plus - 07/10/10 - Page 13 - AEM Wideband [Video]
nice going si
i love this little beast keep up the good work as usual
russ
i love this little beast
russ
- russ-RST
- Elite Post Master

- Posts: 1438
- Joined: Thu Apr 01, 2010 11:05 am
- Location: margate kent
- Your car: fiesta rs turbo
- hb69
- Elite Post Master


- Posts: 4995
- Joined: Mon Dec 12, 2005 7:56 pm
- Location: Kent
- Your car: Fiesta 1.1 LX
- Smo
- Elite Post Master


- Posts: 8658
- Joined: Sun Dec 29, 2002 12:33 am
- Location: My indecisive mind, in Thanet, Kent.
Car: 1990 Ford Fiesta Popular Plus
Re: Popular Plus - 07/10/10 - Page 13 - AEM Wideband [Video]
For anyone that's interested in seeing the wiring side of things...
Used an old lambda sensor connector for the power and signal wires:
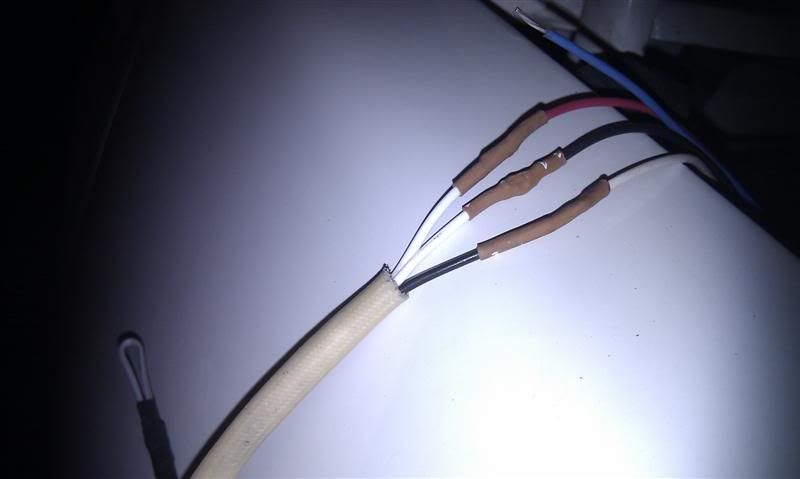
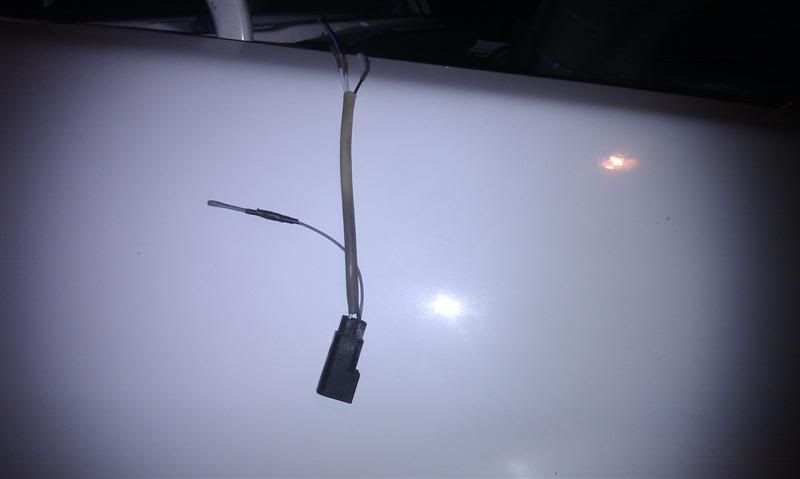
The two whites were originally the power for the heater in the old sensor, so they were ideal for the wideband controller as all the power to the new sensor stems from here also. It's fused (20 amps if I remember rightly), and switched via the fuel pump relay when the ignition is turned on.
The black is the signal wire, so the output from the controller (white wire) will provide the ECU with the voltage, just as the old lambda sensor would have directly.
I then brought the old lambda cabling up from the front panel and back round towards the driver's side of the bulkhead so I could plug the controller into it.
I also ran the main cabling from the controller to the lambda sensor through bulkhead, down the driver's side of the inner wing, and down to the exhaust for the sensor to plug into.
Both lots of cables plugged into the back of the controller:
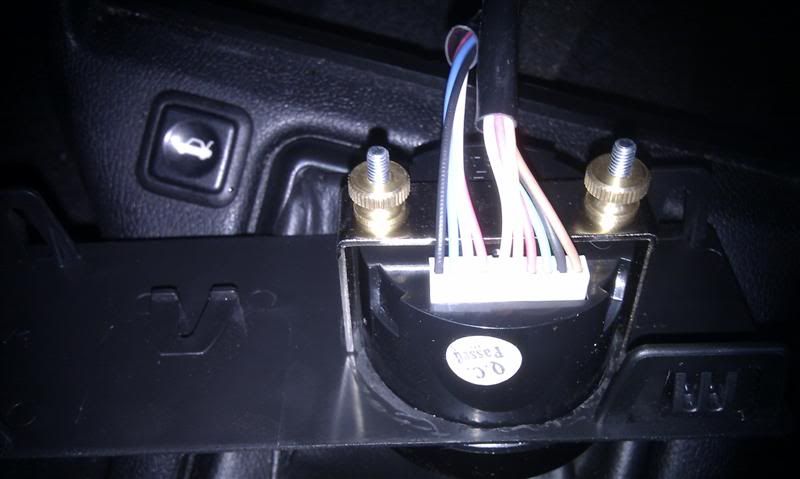
Excuse the overexposure, my camera on my phone can't handle its own flash

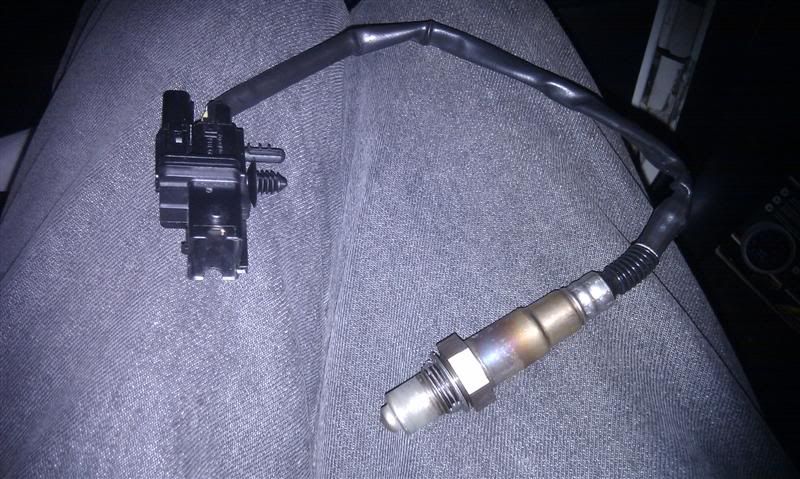
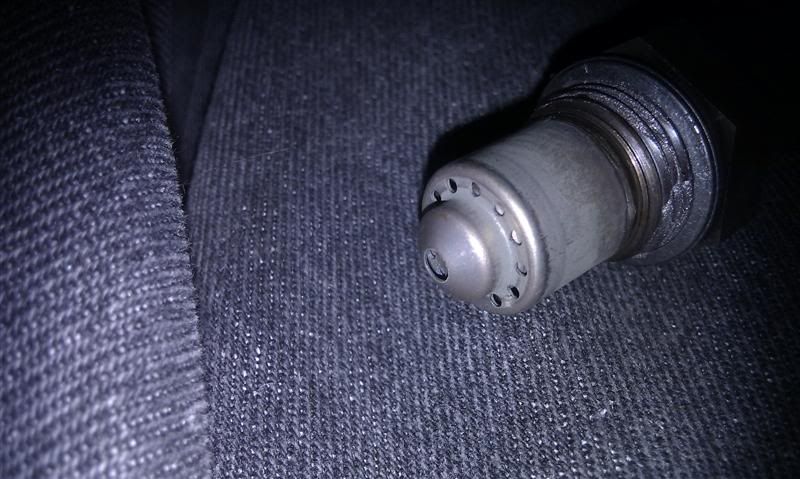
Sensor itself:
Poor photo of it in place:
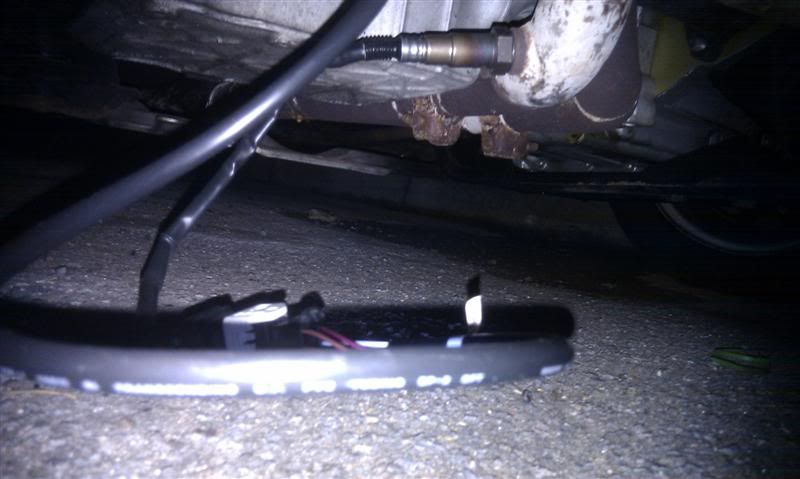
I noticed tonight just what a poor angle my boss is at too, but it'll be getting sorted soon.
Obviously, the cables are all tied up neatly now Although, you'll have to take my word for it
Used an old lambda sensor connector for the power and signal wires:


The two whites were originally the power for the heater in the old sensor, so they were ideal for the wideband controller as all the power to the new sensor stems from here also. It's fused (20 amps if I remember rightly), and switched via the fuel pump relay when the ignition is turned on.
The black is the signal wire, so the output from the controller (white wire) will provide the ECU with the voltage, just as the old lambda sensor would have directly.
I then brought the old lambda cabling up from the front panel and back round towards the driver's side of the bulkhead so I could plug the controller into it.
I also ran the main cabling from the controller to the lambda sensor through bulkhead, down the driver's side of the inner wing, and down to the exhaust for the sensor to plug into.
Both lots of cables plugged into the back of the controller:

Excuse the overexposure, my camera on my phone can't handle its own flash
Sensor itself:


Poor photo of it in place:

I noticed tonight just what a poor angle my boss is at too, but it'll be getting sorted soon.
Obviously, the cables are all tied up neatly now
Last edited by Smo on Thu Oct 07, 2010 11:17 pm, edited 1 time in total.
- Smo
- Elite Post Master


- Posts: 8658
- Joined: Sun Dec 29, 2002 12:33 am
- Location: My indecisive mind, in Thanet, Kent.
Car: 1990 Ford Fiesta Popular Plus
Re: Popular Plus - 07/10/10 - Page 13 - AEM Wideband [Video]
good work simon, cant quite remember what the perferct ratio is for AFR, aint it around 14.4 to 1? 
nice little show it gives you apon ignition
nice little show it gives you apon ignition
1800 Zetec 133bhp 140lbs/ft
mk2 pop 1.4i
- jonyb4
- Elite Post Master

- Posts: 9235
- Joined: Tue Aug 12, 2008 12:05 am
- Location: Port Talbot, South Wales
- Your car: Si 1.8, mk2 950, 2.0 capri
Car: 1995 Ford Fiesta Si 16v
Re: Popular Plus - 07/10/10 - Page 13 - AEM Wideband [Video]
There's no single perfect AFR as it all depends on the conditions 
Under load, high RPMs, etc, a NA engine could be anything between 13.5:1 to 12.5:1, may be richer... A turbo car, depending on what sort of set up it is, may well be as rich as 11:1, may be more!
At cruise, running as lean as 16:1 may be quite possible, but it depends on the engine and conditions.
At idle, an engine may be quite happy around 15 to 16 when warm, but some may only idle smoothly at 14 or so...
Narrowband sensors can only really measure if an engine is running stoich, which kinda does the job for idle and low engine speeds, cruising, etc, but it's not necessarily ideal, and definitely not ideal for high load, high RPMs, especially if you want to make optimal power and torque. It's probably not the best explanation, but it'll do for this time of the night when I should be fast asleep
- Smo
- Elite Post Master


- Posts: 8658
- Joined: Sun Dec 29, 2002 12:33 am
- Location: My indecisive mind, in Thanet, Kent.
Car: 1990 Ford Fiesta Popular Plus
Re: Popular Plus - 07/10/10 - Page 13 - AEM Wideband [Video]
lol get some sleep them mate, im not in tomorrow so i can stay up longer 
i meant under laboratry situ thou, to get a perfectly burned mixure
i meant under laboratry situ thou, to get a perfectly burned mixure

1800 Zetec 133bhp 140lbs/ft
mk2 pop 1.4i
- jonyb4
- Elite Post Master

- Posts: 9235
- Joined: Tue Aug 12, 2008 12:05 am
- Location: Port Talbot, South Wales
- Your car: Si 1.8, mk2 950, 2.0 capri
Car: 1995 Ford Fiesta Si 16v
Re: Popular Plus - 07/10/10 - Page 13 - AEM Wideband [Video]
Ah got you 
And I'm playing taxi tonight, so no sleep for me until gone midnight
And I'm playing taxi tonight, so no sleep for me until gone midnight
- Smo
- Elite Post Master


- Posts: 8658
- Joined: Sun Dec 29, 2002 12:33 am
- Location: My indecisive mind, in Thanet, Kent.
Car: 1990 Ford Fiesta Popular Plus
Re: Popular Plus - 07/10/10 - Page 13 - AEM Wideband [Video]
awww  been there and kept that T-shirt, for good money though haha, taking my bro home from swansea at 3am for £20 ( it is 11miles from me if that ) which isnt bad

1800 Zetec 133bhp 140lbs/ft
mk2 pop 1.4i
- jonyb4
- Elite Post Master

- Posts: 9235
- Joined: Tue Aug 12, 2008 12:05 am
- Location: Port Talbot, South Wales
- Your car: Si 1.8, mk2 950, 2.0 capri
Car: 1995 Ford Fiesta Si 16v
Re: Popular Plus - 07/10/10 - Page 13 - AEM Wideband [Video]
looking good there Si 
that wiring info will come in handy for when mine get wired up, just waiting on my adaptor board now
mines arrived, but ive not looked at it properly yet , i assume it doesnt matter what white wire the back and red are wired up too? any reason why you blue and grey wire you pissing in the wind?
again top work
that wiring info will come in handy for when mine get wired up, just waiting on my adaptor board now
mines arrived, but ive not looked at it properly yet
again top work
- onslack
- Post Master

- Posts: 707
- Joined: Sun Feb 27, 2005 6:58 pm
- Location: West Sussex Drives: 2.0 16v Si
- Your car: Si
Re: Popular Plus - 07/10/10 - Page 13 - AEM Wideband [Video]
It does matter, one is a live and one is a ground lol.
The grey on the old connector was an earth for the sensor and blue is for connecting to a RS232 for datalogging but it's fairly primitive
The grey on the old connector was an earth for the sensor and blue is for connecting to a RS232 for datalogging but it's fairly primitive
- Smo
- Elite Post Master


- Posts: 8658
- Joined: Sun Dec 29, 2002 12:33 am
- Location: My indecisive mind, in Thanet, Kent.
Car: 1990 Ford Fiesta Popular Plus
Re: Popular Plus - 07/10/10 - Page 13 - AEM Wideband [Video]
Stoichiometric
- hb69
- Elite Post Master


- Posts: 4995
- Joined: Mon Dec 12, 2005 7:56 pm
- Location: Kent
- Your car: Fiesta 1.1 LX
Popular Plus - 21/08/11 - Page 13 - Zetec S Gear Linkage
21/08/11 - Zetec S Gear Linkage
Well once again, it's been a while...
I have done a few things, but nothing exciting at the moment. I've put a 2.0 in and an iB5 gearbox from an Escort, so it's now rear starter too. To be honest, I only really fitted the 2.0 because I couldn't be bothered taking an angle grinder to the 1.8 block just to make room for the rear-mounted starter that the iB5 required Yeah, I know, odd excuse really
  But I had it sitting around and I thought I better put it to some use. Oh, after I decided all this and took the 1.8 out, it became apparent that I hadn't stored the 2.0 very well and the bores had gone rusty, so I ended up completely rebuilding the bottom end... Just because I wanted to fit the iB5... On the plus side, it's there if I want a bit more power in the future, as obviously the 2.0 is always going to be the better base for power increases
  Although I do miss the 1.8 slightly as it did just want to keep going all the way to the red, while this does, but not quite so eagerly
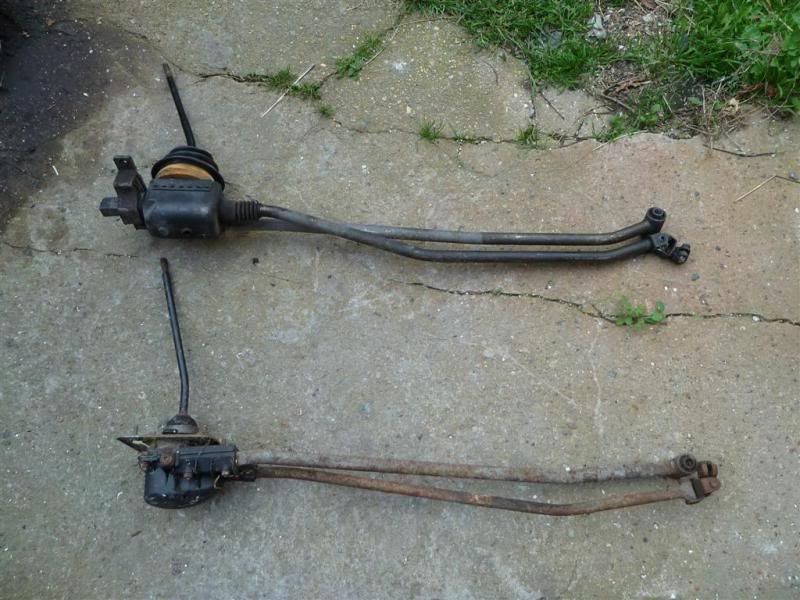
Anyway, having fitted the iB5, I now had a centre return spring in the box as well as the old 5 speed gear linkage, which made for quite heavy side-to-side movement of the gear lever. So after a while of searching for a Puma or Zetec S gear linkage, I managed to find a Zetec S one on here and picked it up from Ford Fair
Ta-da!
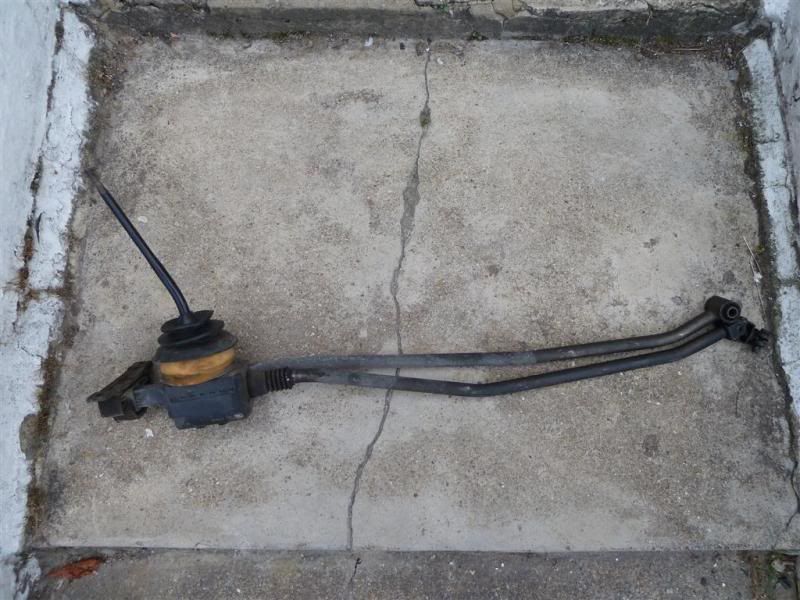
And just to compare to an old MK3 5 speed linkage (not the one that was fitted to my car):
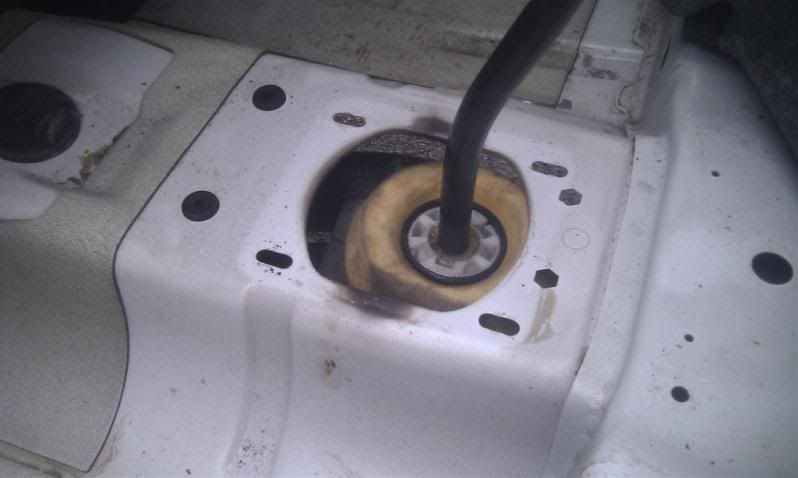
So a few nights ago, I decided I'd make a start on fitting it. I removed the old MK3 linkage, removed the passenger seat and centre console, and lifted up the carpet to make it a bit easier, what with expecting to have to cut the floor pan slightly in order to make it fit and all that (see Excursion's Puma Gear Linkage Conversion page: http://www.mwstewart.co.uk/articles/pumalinkage/). I then bolted up the stabiliser rod so I could get an idea of where I would need to cut to allow the selector to poke through nicely:
This was all looking good, until... DUN DUN DUNNN! There was a problem. In fact, a number of problems.
First problem (this might not be very clear):
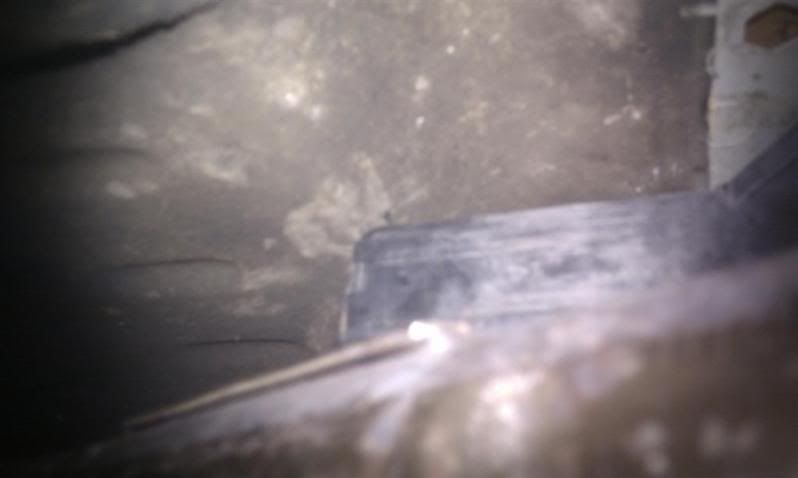
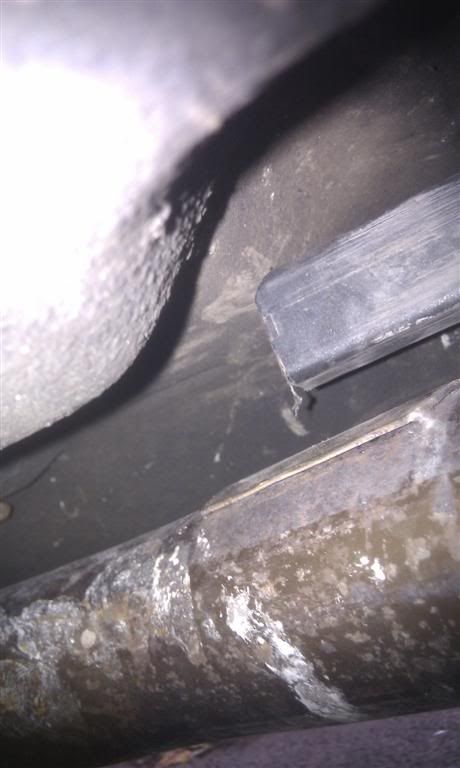
The part of the linkage that slides into the rubber/metal mount (which in turn bolts to the floor), actually fouls the floor pan before I'm even able to raise the selector anywhere near to its correct position within the car.
The second issue is that the rubber/metal mount itself is too wide to sit comfortably (and flat against the underside of the floor) inside that exhaust tunnel. I couldn't get an ideal photo from the underside, but to give you an idea of the difference in width:
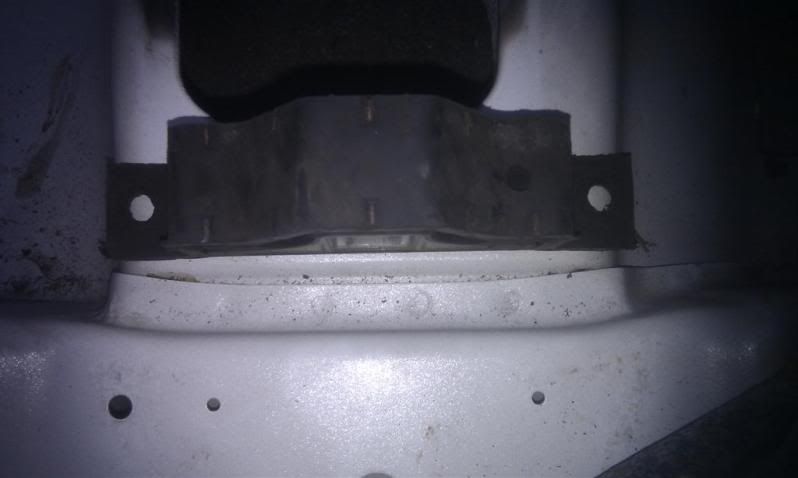
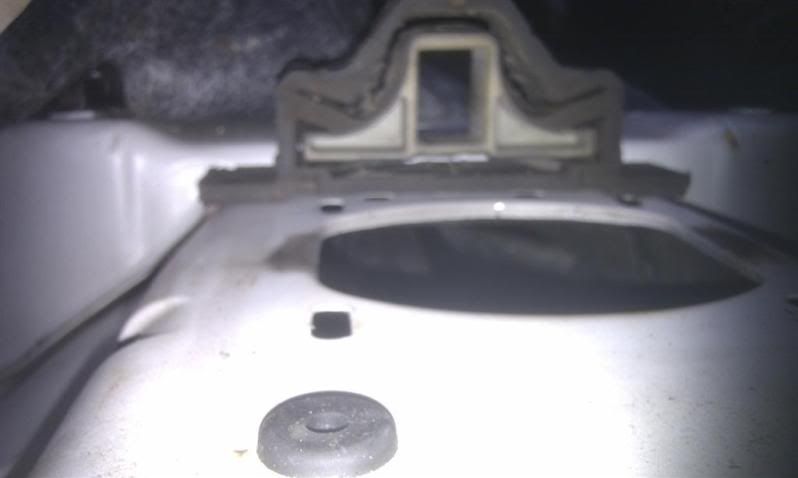
I suddenly remembered that the MK3 floorpan is very different to the MK3.5 floorpan, hence the problems...
I decided that chopping the plastic slide thingy down wasn't going to solve much, because the selector was still going to be too far back to allow me to fit the mount anywhere ideal for me to bolt it to the floor (even if it was an ideal width to fit inside the exhaust tunnel), so I took more drastic action
Seeing as this wasn't going to fit at its current length, I thought I might as well make the selector fit centrally within the existing opening of the floor. To do this, I needed to cut the stabiliser and selector rods down by about 17mm:
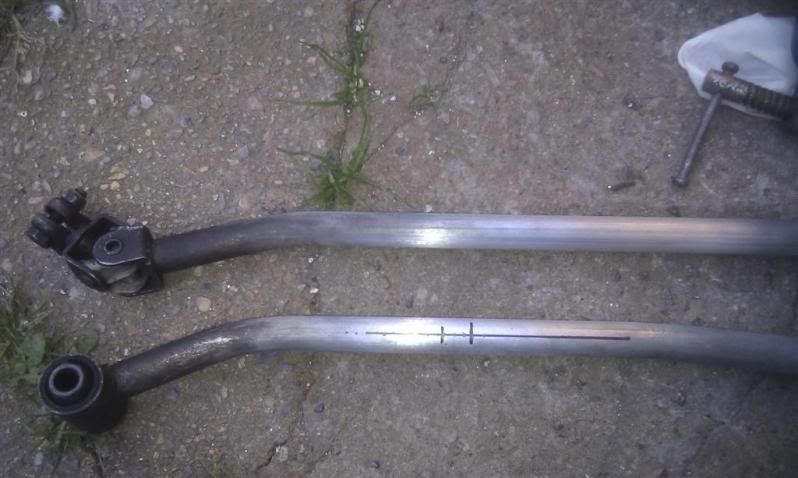
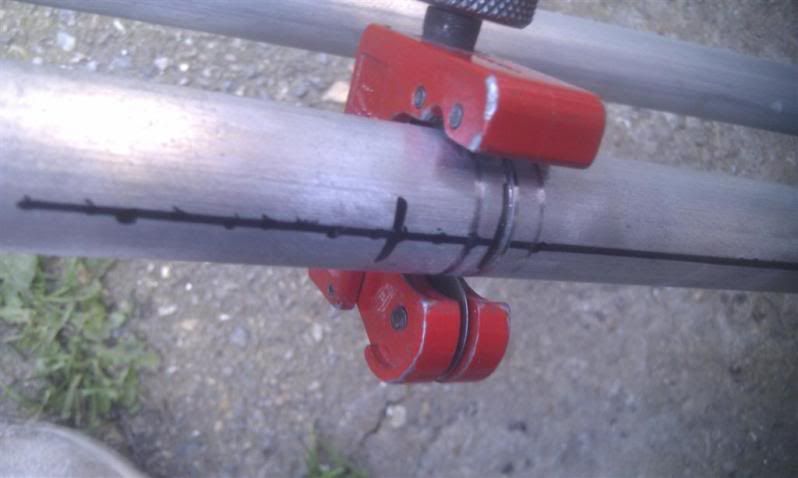
Eek!
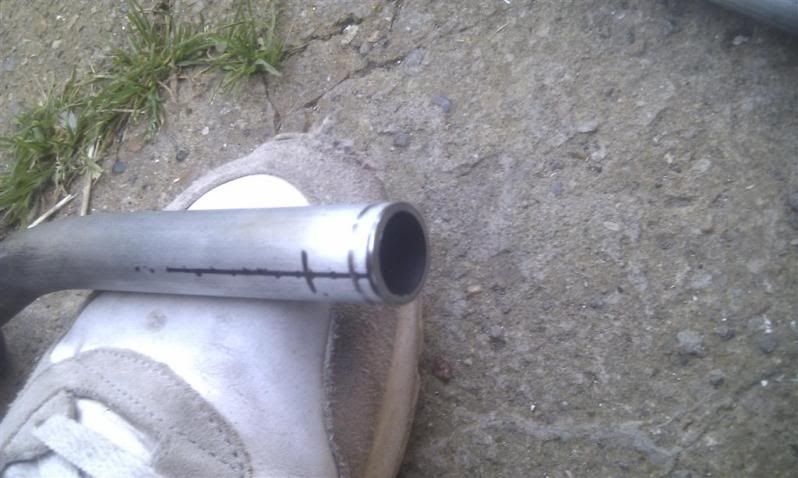
So I eventually ended up with:
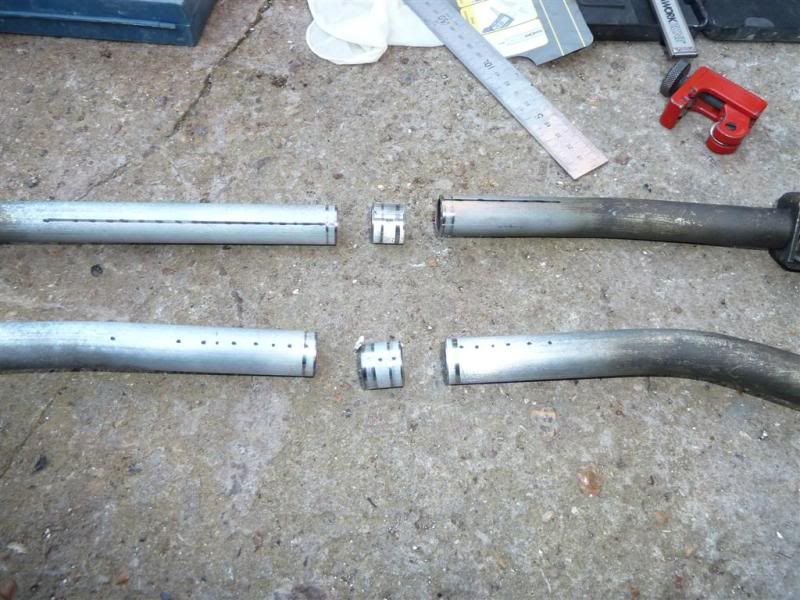
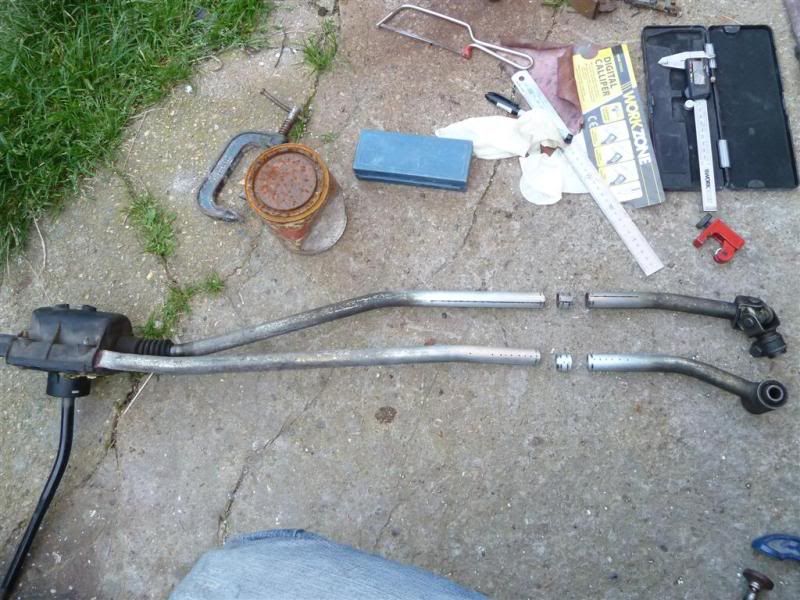
This was the hardest bit, bloody trying to keep the ends aligned to weld it back together!
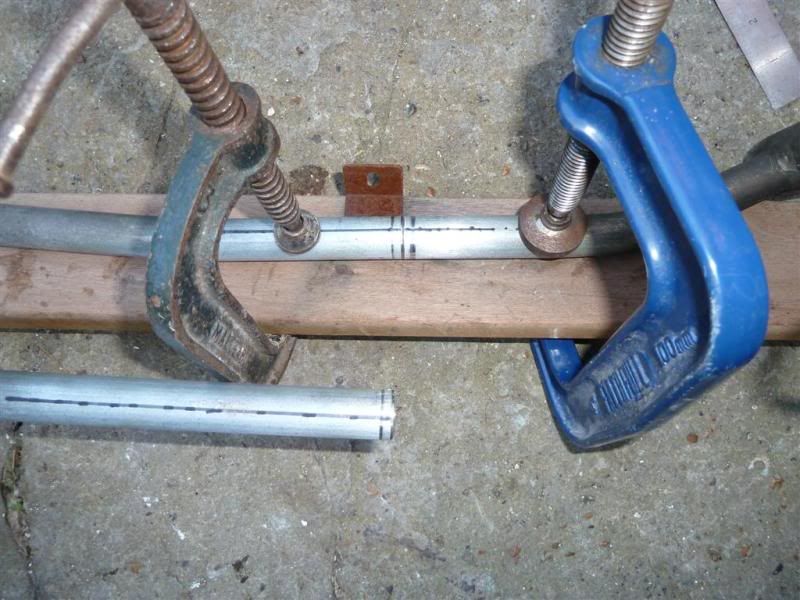
After some dodgy welding, I ended up with:
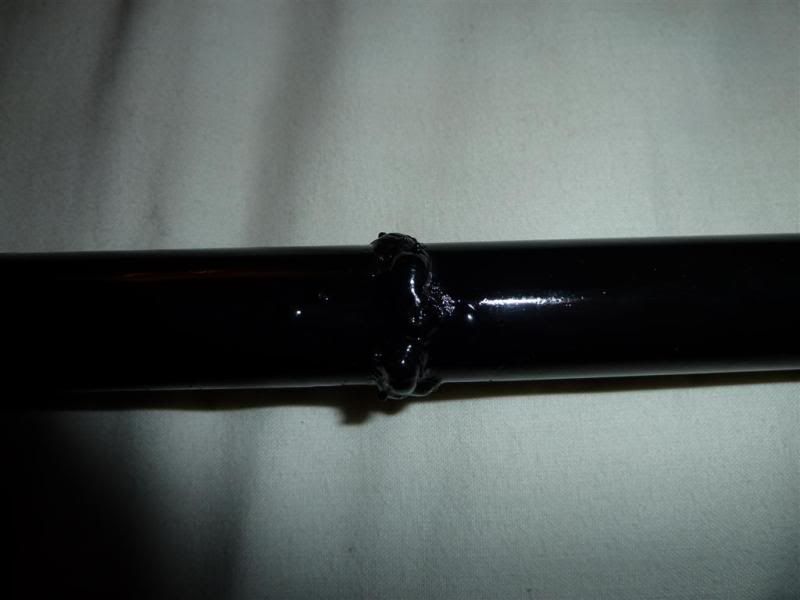
Unfortunately that's all I've got of the welded up stuff...
I was going to put some tubing inside each, or strengthen it on the outside, but a welder I know reckoned it'd be good enough as it was, so it was left as that! I did weld up a couple of bits and couldn't break them, so I think it'll hold OK
The next issue was the mount. Firstly, I trimmed the edges slightly, just to get a rough idea of its location when fitted and also to get it closer to the floor to see just how much more trimming would be required to get it to fit.
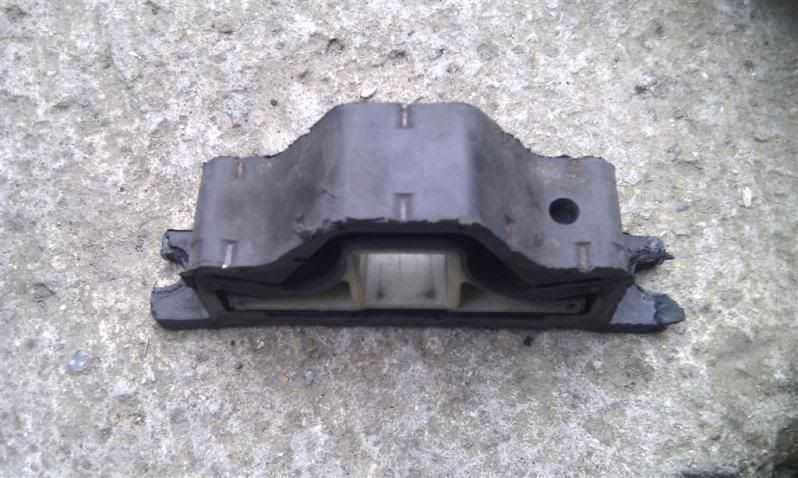
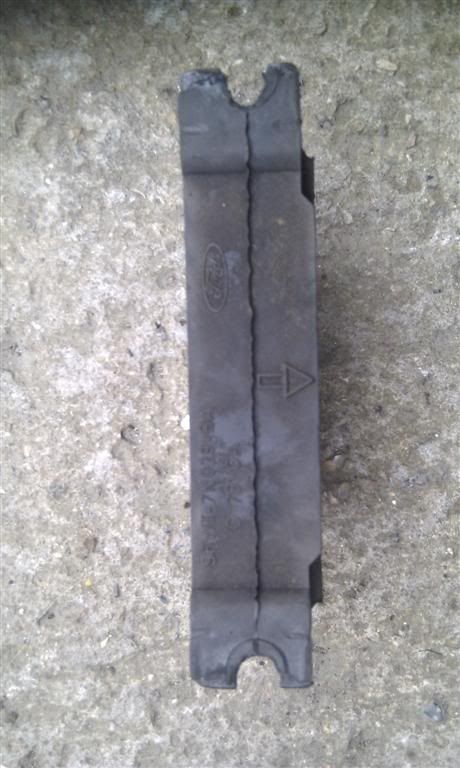
Again, no photo, but in the end I had to trim it slightly more, and then deepen the original bolt holes in order to make it narrow enough to fit flat against the underside of the floor. I originally tried to weld some bolts in the open holes, but was concerned that it would damage the rubber too much, so decided against that idea in the end!
With the mount now the correct size, I fitted it to the linkage to see where I would need to drill the holes to fit it to the floor. Unfortunately, I could not bring the mount far enough forward to drill and bolt it to the same piece of panel as the original linkage bolted to and allow for movement of the selector within the mount at the same time. Fixing it further back where the panels overlap was not an option as the metal isn't completely flat on the underside (it starts to angle downwards), and inside the car would also not give a completely flat surface for a nut and washer to sit nicely.
To allow me to move the mount further forwards, I removed some of the plastic webbing on the rear of the selector...
Bottom three webs:
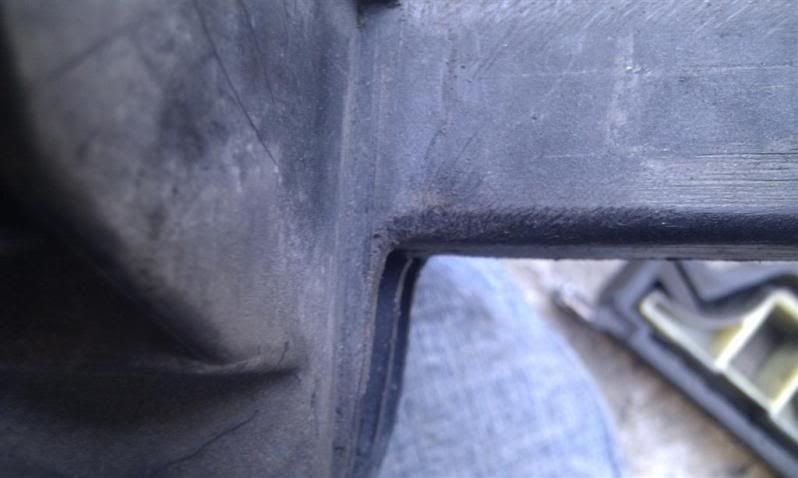
Top two webs:
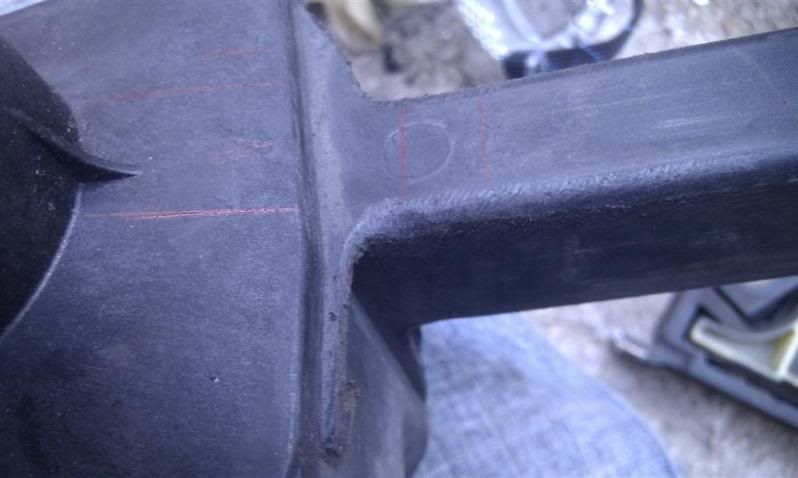
This gave me just over 5mm more room for the selector to slide within the mount while now being able to fix the mount to the more ideal floor panel.
So I made my holes:
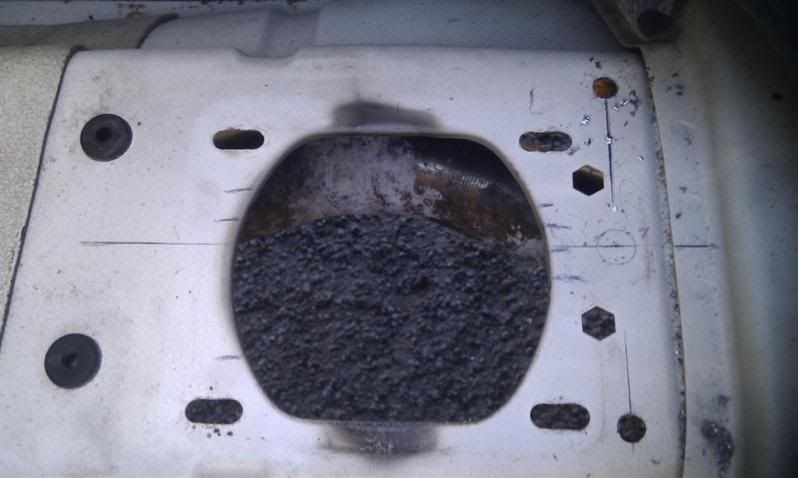
... and bolted it up!:
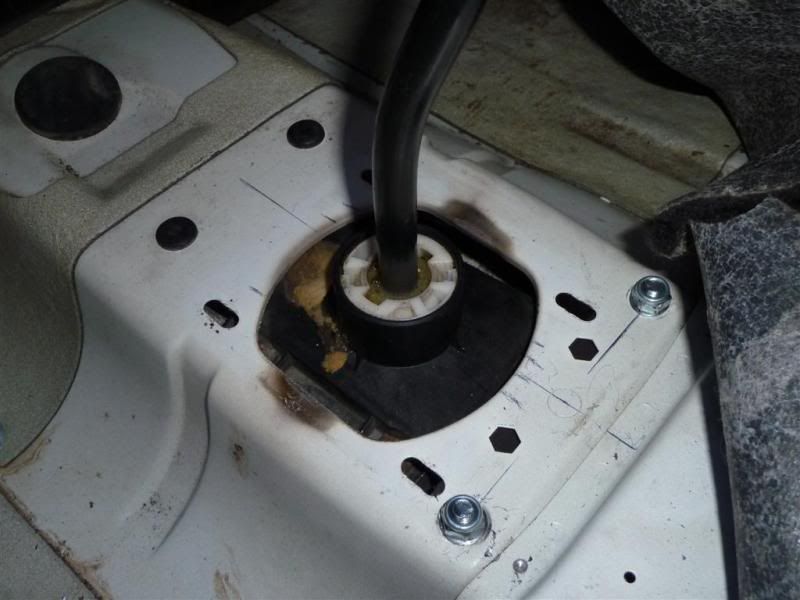
You can see where I considered drilling the panel overlap to bolt the mount!
Happy with that, I used some double-sided foam tape to seal the original plate back over the hole, and make a nice snug fit against the foam doughnut jobby:
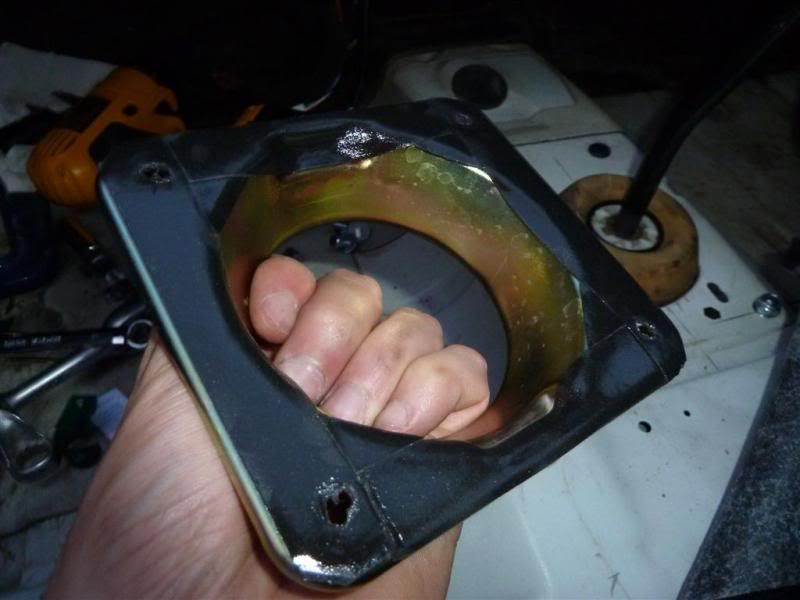
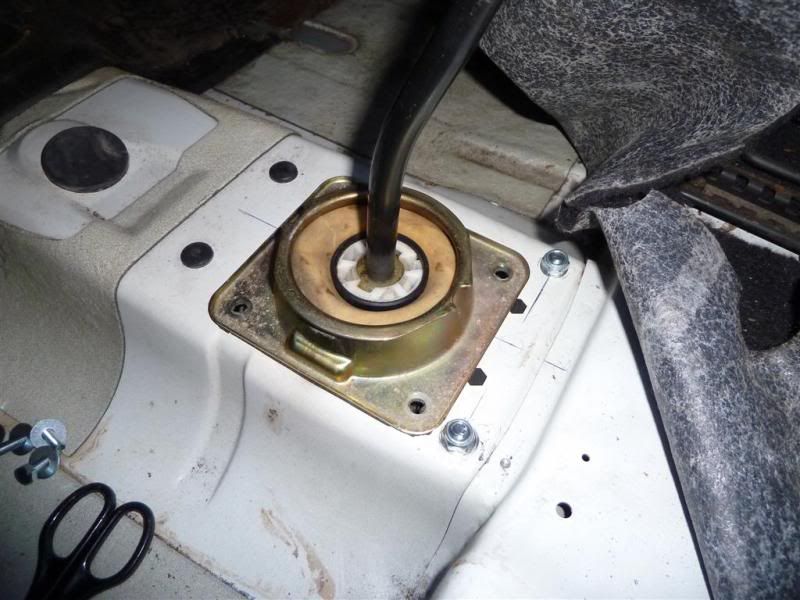
And then bolted that down:
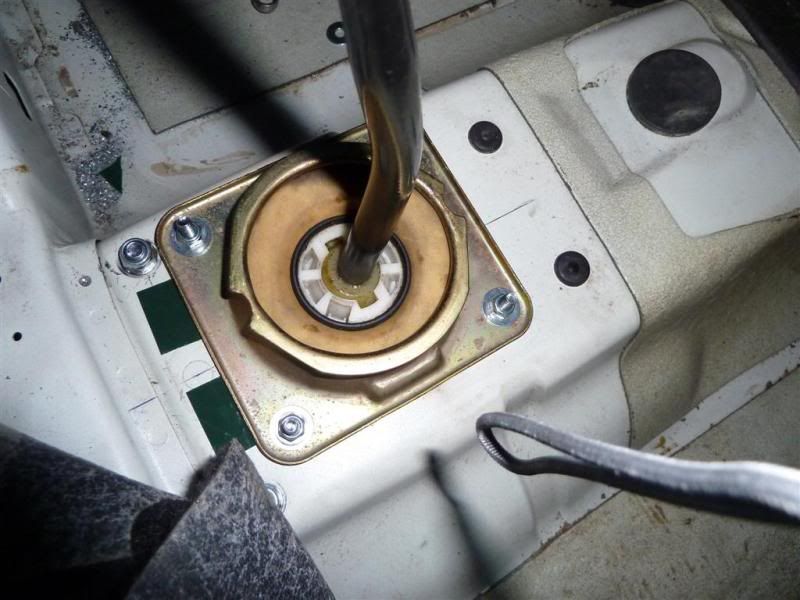
Although the tape itself would probably have been more than enough!
Back together:
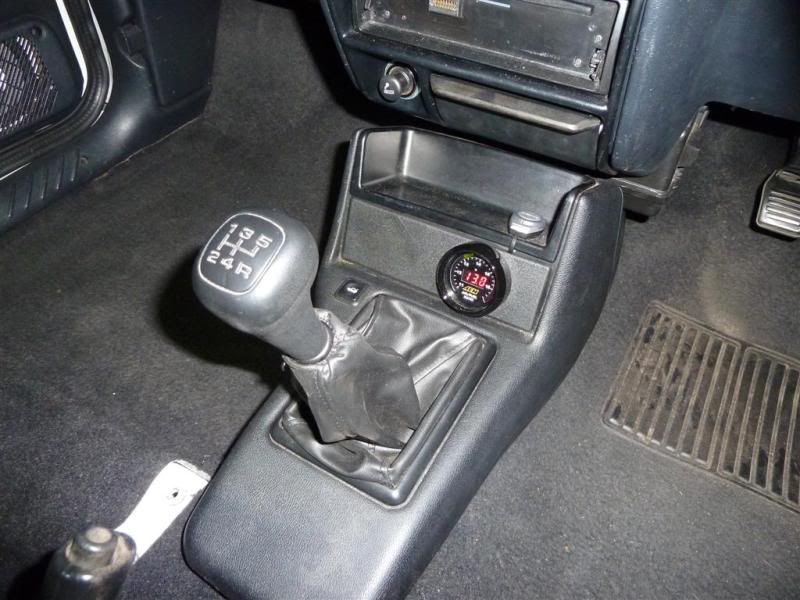
And looking very dirty
Definitely a lot more positive than the old linkage, even if it was a bit of hassle! It's certainly not as easy as fitting the linkage to a MK3.5... There may well be a better way to do it, but this was how I did it and it seems to have worked quite nicely For now!
Well once again, it's been a while...
I have done a few things, but nothing exciting at the moment. I've put a 2.0 in and an iB5 gearbox from an Escort, so it's now rear starter too. To be honest, I only really fitted the 2.0 because I couldn't be bothered taking an angle grinder to the 1.8 block just to make room for the rear-mounted starter that the iB5 required
Anyway, having fitted the iB5, I now had a centre return spring in the box as well as the old 5 speed gear linkage, which made for quite heavy side-to-side movement of the gear lever. So after a while of searching for a Puma or Zetec S gear linkage, I managed to find a Zetec S one on here and picked it up from Ford Fair
Ta-da!

And just to compare to an old MK3 5 speed linkage (not the one that was fitted to my car):

So a few nights ago, I decided I'd make a start on fitting it. I removed the old MK3 linkage, removed the passenger seat and centre console, and lifted up the carpet to make it a bit easier, what with expecting to have to cut the floor pan slightly in order to make it fit and all that (see Excursion's Puma Gear Linkage Conversion page: http://www.mwstewart.co.uk/articles/pumalinkage/). I then bolted up the stabiliser rod so I could get an idea of where I would need to cut to allow the selector to poke through nicely:

This was all looking good, until... DUN DUN DUNNN! There was a problem. In fact, a number of problems.
First problem (this might not be very clear):


The part of the linkage that slides into the rubber/metal mount (which in turn bolts to the floor), actually fouls the floor pan before I'm even able to raise the selector anywhere near to its correct position within the car.
The second issue is that the rubber/metal mount itself is too wide to sit comfortably (and flat against the underside of the floor) inside that exhaust tunnel. I couldn't get an ideal photo from the underside, but to give you an idea of the difference in width:


I suddenly remembered that the MK3 floorpan is very different to the MK3.5 floorpan, hence the problems...
I decided that chopping the plastic slide thingy down wasn't going to solve much, because the selector was still going to be too far back to allow me to fit the mount anywhere ideal for me to bolt it to the floor (even if it was an ideal width to fit inside the exhaust tunnel), so I took more drastic action
Seeing as this wasn't going to fit at its current length, I thought I might as well make the selector fit centrally within the existing opening of the floor. To do this, I needed to cut the stabiliser and selector rods down by about 17mm:


Eek!

So I eventually ended up with:


This was the hardest bit, bloody trying to keep the ends aligned to weld it back together!

After some dodgy welding, I ended up with:

Unfortunately that's all I've got of the welded up stuff...
I was going to put some tubing inside each, or strengthen it on the outside, but a welder I know reckoned it'd be good enough as it was, so it was left as that! I did weld up a couple of bits and couldn't break them, so I think it'll hold OK
The next issue was the mount. Firstly, I trimmed the edges slightly, just to get a rough idea of its location when fitted and also to get it closer to the floor to see just how much more trimming would be required to get it to fit.


Again, no photo, but in the end I had to trim it slightly more, and then deepen the original bolt holes in order to make it narrow enough to fit flat against the underside of the floor. I originally tried to weld some bolts in the open holes, but was concerned that it would damage the rubber too much, so decided against that idea in the end!
With the mount now the correct size, I fitted it to the linkage to see where I would need to drill the holes to fit it to the floor. Unfortunately, I could not bring the mount far enough forward to drill and bolt it to the same piece of panel as the original linkage bolted to and allow for movement of the selector within the mount at the same time. Fixing it further back where the panels overlap was not an option as the metal isn't completely flat on the underside (it starts to angle downwards), and inside the car would also not give a completely flat surface for a nut and washer to sit nicely.
To allow me to move the mount further forwards, I removed some of the plastic webbing on the rear of the selector...
Bottom three webs:

Top two webs:

This gave me just over 5mm more room for the selector to slide within the mount while now being able to fix the mount to the more ideal floor panel.
So I made my holes:

... and bolted it up!:

You can see where I considered drilling the panel overlap to bolt the mount!
Happy with that, I used some double-sided foam tape to seal the original plate back over the hole, and make a nice snug fit against the foam doughnut jobby:


And then bolted that down:

Although the tape itself would probably have been more than enough!
Back together:

And looking very dirty
Definitely a lot more positive than the old linkage, even if it was a bit of hassle! It's certainly not as easy as fitting the linkage to a MK3.5... There may well be a better way to do it, but this was how I did it and it seems to have worked quite nicely
- Smo
- Elite Post Master


- Posts: 8658
- Joined: Sun Dec 29, 2002 12:33 am
- Location: My indecisive mind, in Thanet, Kent.
Car: 1990 Ford Fiesta Popular Plus
Re: Popular Plus - 21/08/11 - Page 13 - Zetec S Gear Linkage
Love this, nice work with the ZS linkage 
Project Car Now Scrapped - 1990 Fiesta 1.1 LX
First Car Now Sold- 1993 Vauxhall Astra 1.4 8V
Current Car - 1995 Vauxhall Astra 1.6 Sport
First Car Now Sold- 1993 Vauxhall Astra 1.4 8V
Current Car - 1995 Vauxhall Astra 1.6 Sport
- FiestaBen
- Elite Post Master


- Posts: 1569
- Joined: Tue Sep 30, 2008 2:10 pm
- Location: Welwyn Garden City
- Your car: Vauxhall Astra Sport
Car: 1995 Vauxhall Astra
Re: Popular Plus - 21/08/11 - Page 13 - Zetec S Gear Linkage
Awesome stuff. What are the difference between the mk3 and 3.5 floor pans then?
- - Danny Boy -
- Elite Post Master

- Posts: 3844
- Joined: Mon Sep 10, 2007 5:49 pm
- Location: Portsmouth
- Your car: Fiesta Si 2.0
Re: Popular Plus - 21/08/11 - Page 13 - Zetec S Gear Linkage
Nice one simon I was wondering how much of a pain a ZS linkage would be to fit on mine as my linkage stabiliser is bent so it pops out of reverse all the time  how much of a pain would it be to fit to my 3.5? And I was speaking to your dad a while ago in maplins and he said something about fitting a 2.0 nice one matey noticed much difference
- russ-RST
- Elite Post Master

- Posts: 1438
- Joined: Thu Apr 01, 2010 11:05 am
- Location: margate kent
- Your car: fiesta rs turbo
Re: Popular Plus - 21/08/11 - Page 13 - Zetec S Gear Linkage
omg 
im gonna have fun fitting my zetec s linkage to the mk2.
That aside good work simon
im gonna have fun fitting my zetec s linkage to the mk2.
That aside good work simon


~nomad~ :Good god I love Clark.
- knuckles
- Elite Post Master


- Posts: 6841
- Joined: Thu May 19, 2005 2:40 pm
- Location: Hertfordshire
- Your car: Fiesta Rs turbo
- hb69
- Elite Post Master


- Posts: 4995
- Joined: Mon Dec 12, 2005 7:56 pm
- Location: Kent
- Your car: Fiesta 1.1 LX
- Excursion
- Bulletin Board User


- Posts: 15265
- Joined: Thu Jan 01, 1970 1:00 am
- Location: Skynet
- Your car: Ford Fiesta
Car: 1990 Ford Fiesta XR2i
Re: Popular Plus - 21/08/11 - Page 13 - Zetec S Gear Linkage
Cheers all you lovely ladies 
Danny, all I know is that they're different I've never really taken much notice of the MK3.5s, but obviously this is one area that is different, and I know the seats mount differently. I've read various people say that the floor is a lot stronger, but I don't know the ins and outs of it!
Russ, Mr. Excursion has a brilliant write up on fitting the linkage to a MK3.5 (http://www.mwstewart.co.uk/articles/pumalinkage/), but as it says in there, you might want to think about it before fitting it to a non-iB5 box! Also, if you did choose to use one with your existing box, you'll have to come up with some sort of centre return springy thingy as neither your gearbox or a Puma/Zetec S/etc linkage have a centre return springy thingy The 2.0 is OK, definitely more torque, but I don't think it's quite as fun as the 1.8 was for ragging it to death. The 2.0 is a good all-rounder engine and you can drive fast without having to push it hard, but if you push it hard, you don't really get much back! If that makes sense? In my head it does, so that's all that matters
Thanks, Henry, your opinion makes me feel all warm and giddy.
Ooh, and I've done something else today... Watch this space! Well, the space below this space
Danny, all I know is that they're different
Russ, Mr. Excursion has a brilliant write up on fitting the linkage to a MK3.5 (http://www.mwstewart.co.uk/articles/pumalinkage/), but as it says in there, you might want to think about it before fitting it to a non-iB5 box! Also, if you did choose to use one with your existing box, you'll have to come up with some sort of centre return springy thingy as neither your gearbox or a Puma/Zetec S/etc linkage have a centre return springy thingy
Thanks, Henry, your opinion makes me feel all warm and giddy.
Ooh, and I've done something else today... Watch this space! Well, the space below this space
- Smo
- Elite Post Master


- Posts: 8658
- Joined: Sun Dec 29, 2002 12:33 am
- Location: My indecisive mind, in Thanet, Kent.
Car: 1990 Ford Fiesta Popular Plus
Popular Plus - 21/08/11 - Page 13 - Zetec S Rear Beam
21/08/11 - Zetec S Rear Beam
Today, I fitted a Zetec S rear beam. I've only had this beam for about 4 or 5 years now, or however long roughly it's been since Max wrote off his white Fiesta!
First off, I've had the beam in bits for a few years now and hadn't really looked after any of the near-new components that were on it when I got it - in other words, I'd left the shoes, wheel cylinders, backplates, drums, etc all to rust.
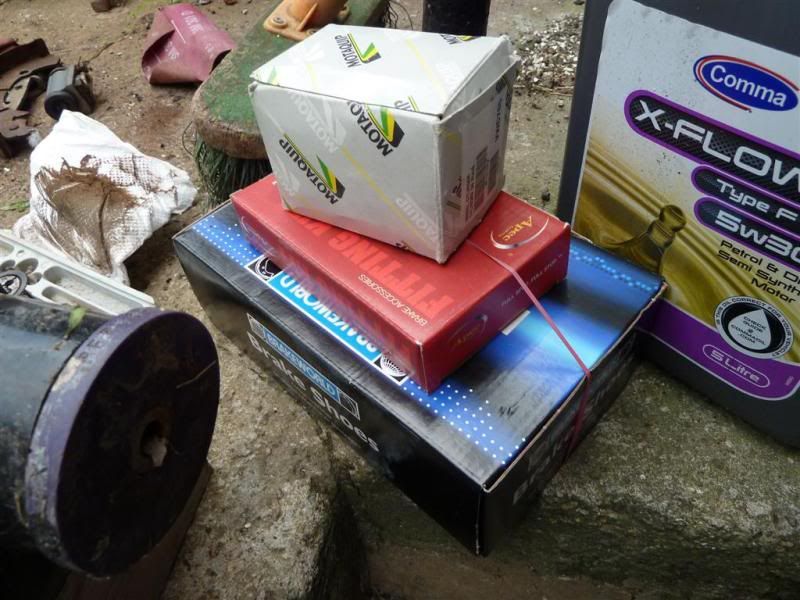
Prior to today, I got the back plates blasted and re-painted them quickly in Hammerite, just for a bit of protection. I also bought some new shoes through work, a fitting kit from our competitors around the corner from us, and some wheel cylinders for a bargain price on eBay. With all this, I was ready to start putting the beam back together
Boxes of bits:
So today...
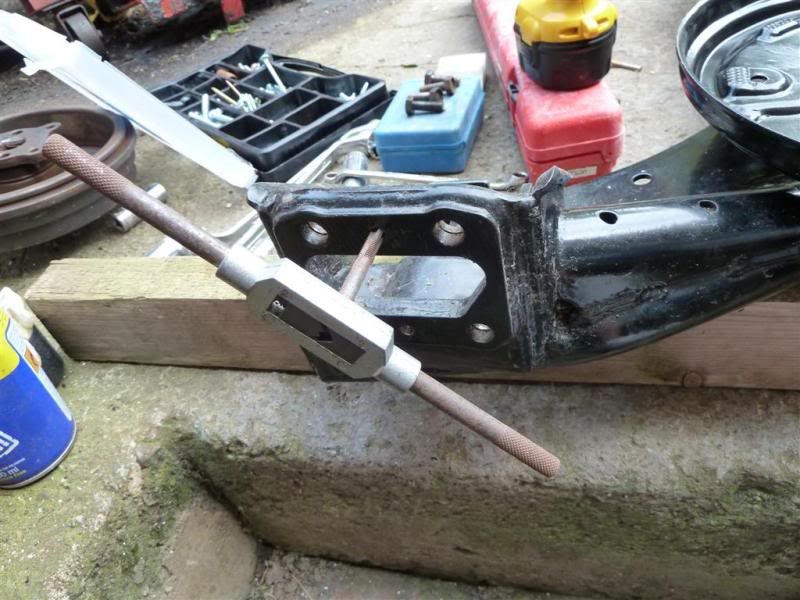
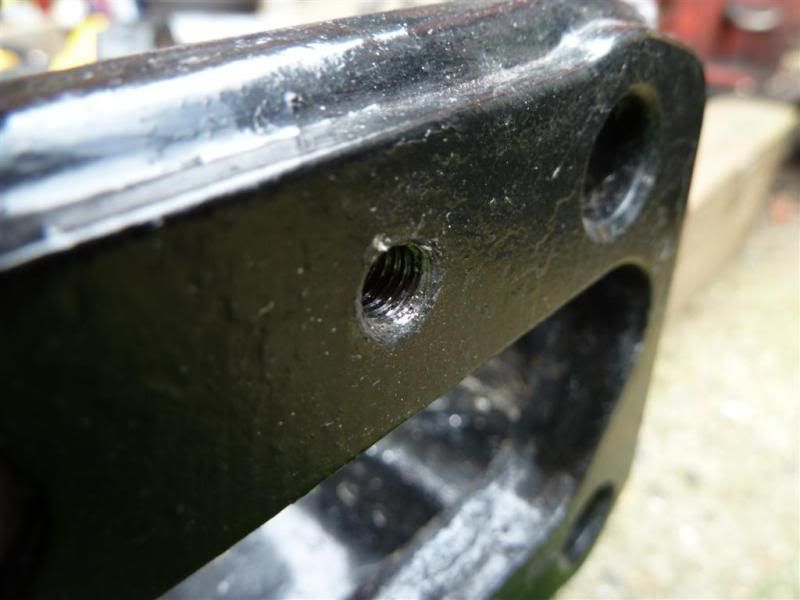
Firstly, I'd drilled the old rivets that held the backplates to the beam, so I knocked the remains out of the beam and decided I would bolt them back on because I couldn't find my bloody rivet gun anywhere. The holes in the beam are just about right for an M6 thread, so out came the tap
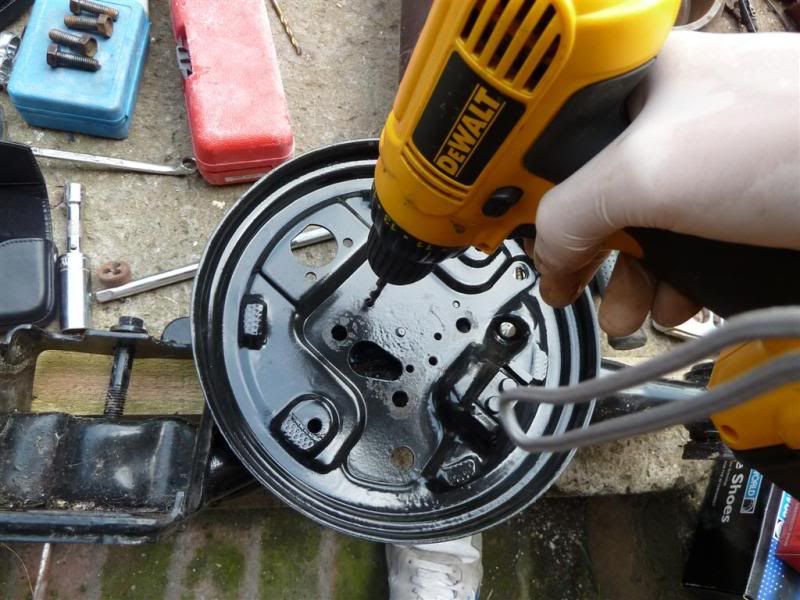
Drilled out the backplates just slightly to 6mm:
And on they went:
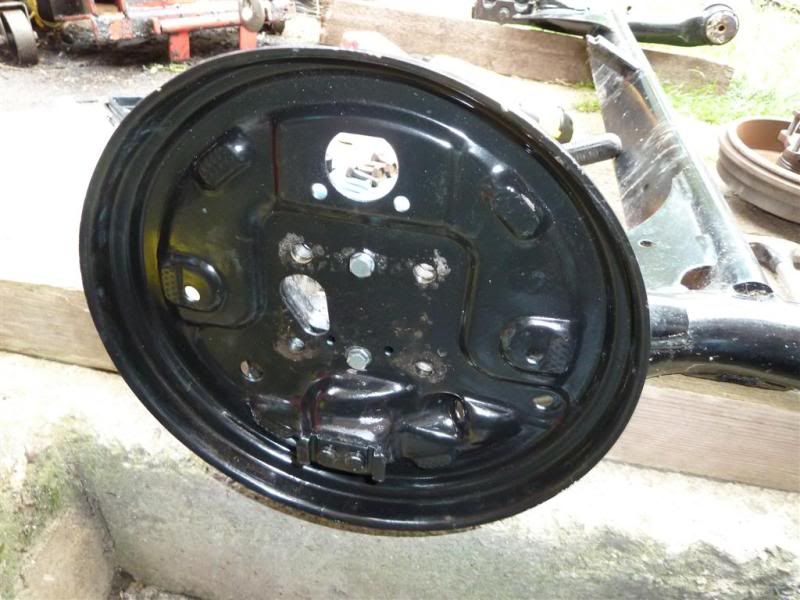
I put some nuts and washers on the back too, although it's not really necessary because they don't serve much purpose other than to keep the backplate in place when the stub axle isn't bolted up!
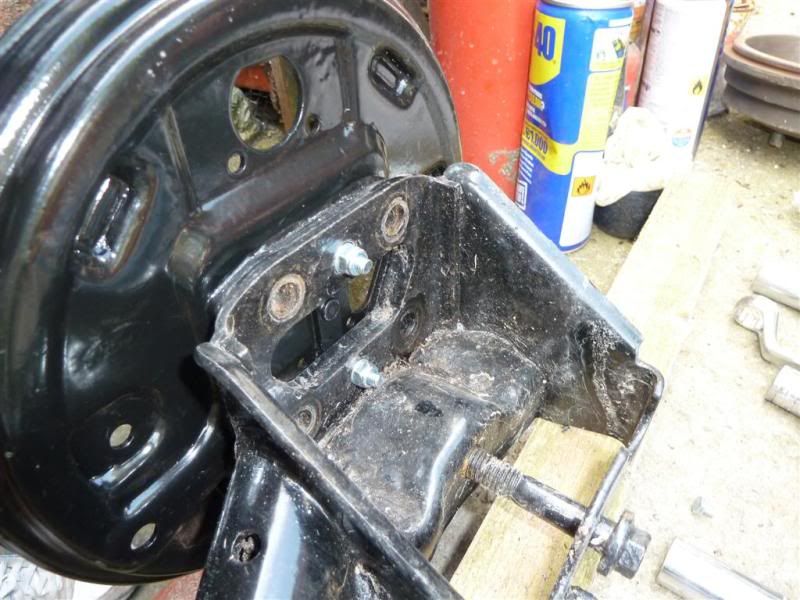
Wheel cylinders, shoes, springs, etc, all on:
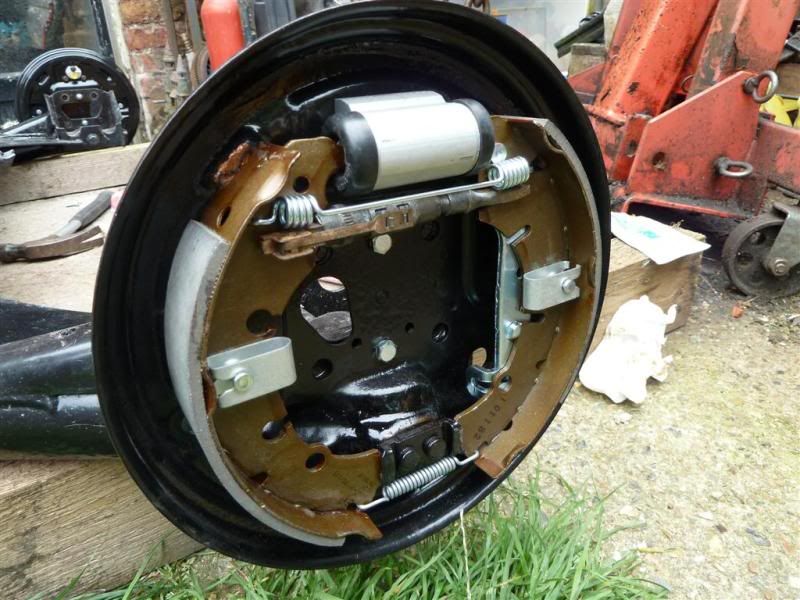
Powerflex bushes already in the beam, but they weren't in properly, so I popped the tubes out, pushed them in further, and then popped the tubes back in:
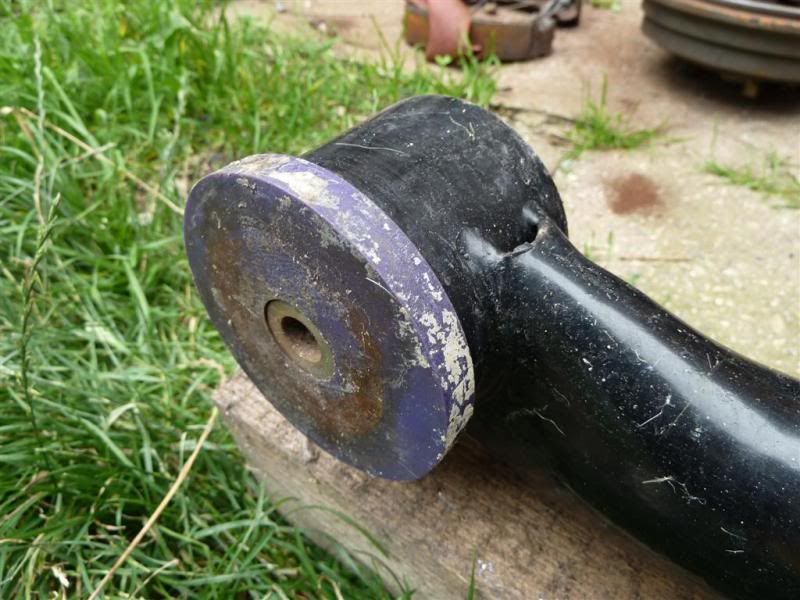
A bit grotty looking as I had masking tape on them for years while I was painting the beam up... Really wish I hadn't bothered now
Next, I got everything ready:
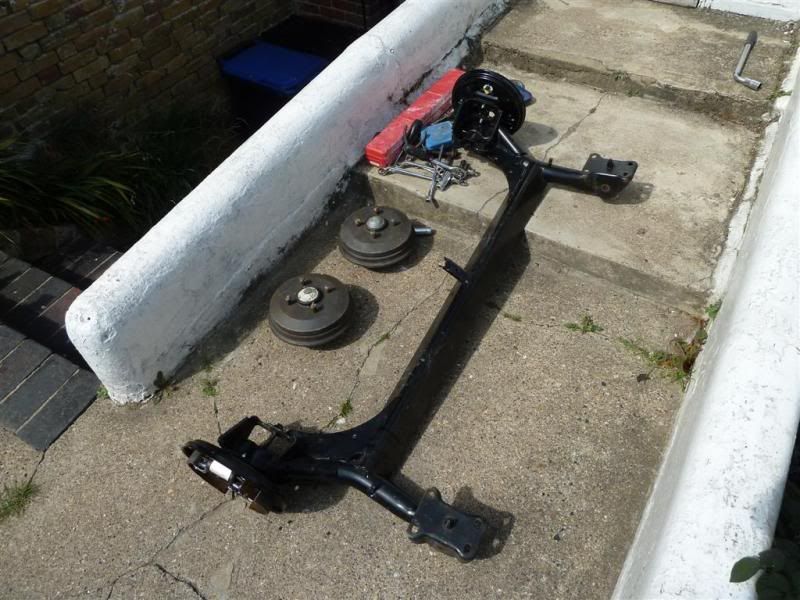
Lovely, isn't it?
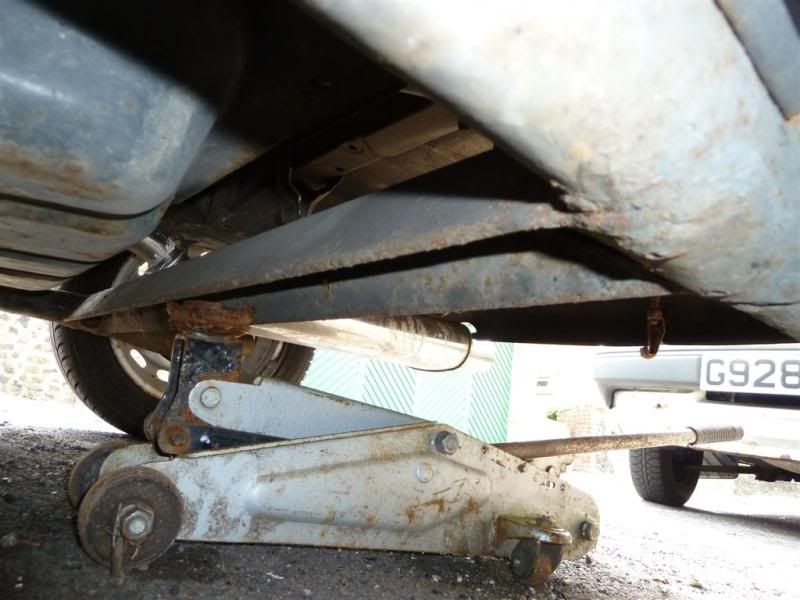
Had to start removing the old beam, so out came Jack:
Loosened the beam mounting bracket bolts:
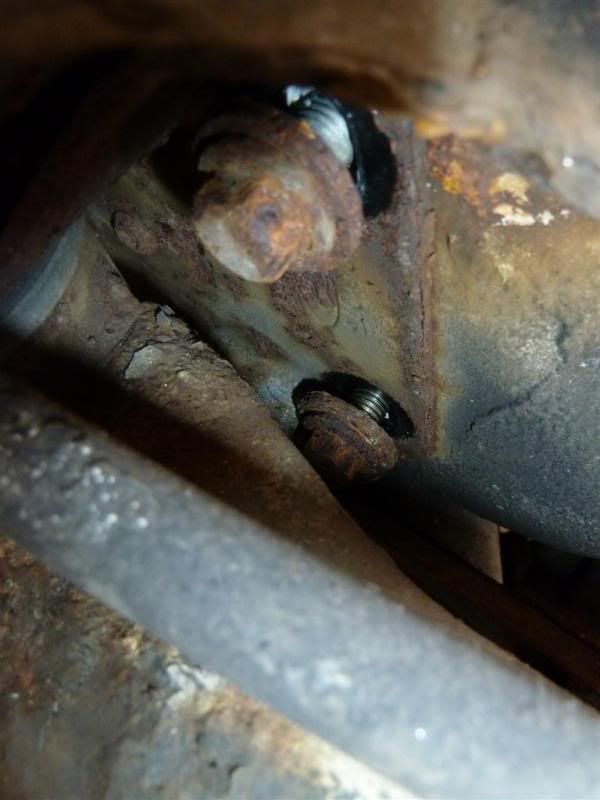
These actually were very easy to loosen... Surprising really when I know of a few people that have had nightmares doing them!
Also loosened off the shocks at the bottom, the stub axle bolts and the wheel nuts, although not in that order. No pics, sorry Once everything was undone, the car was jacked up and then lowered on to axle stands and popped the drums off:
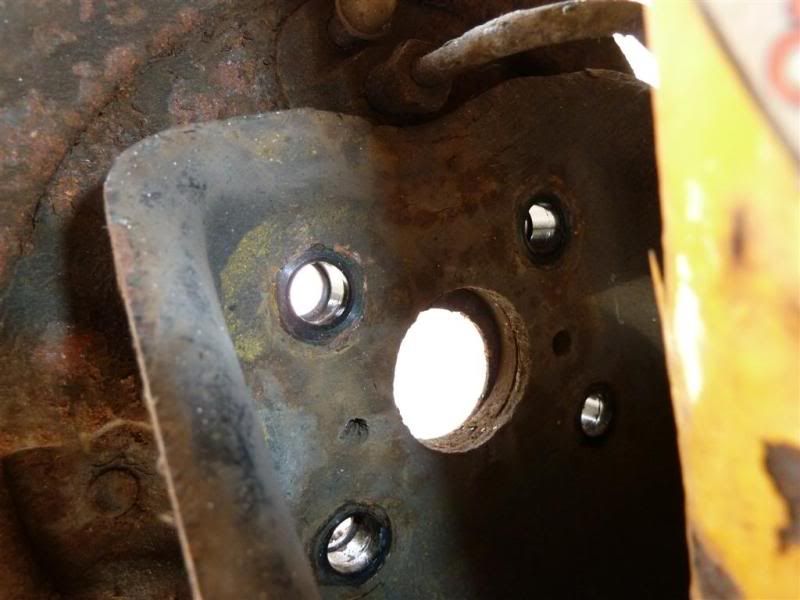
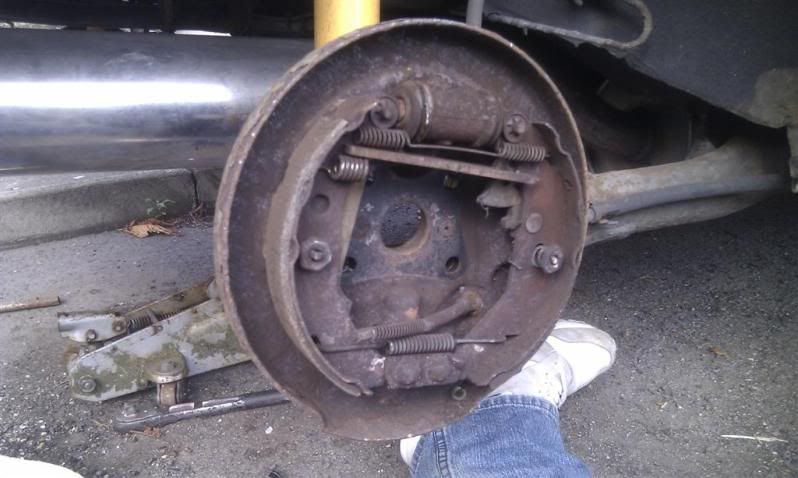
(Sorry, crappy camera phone - it would be a good camera phone if I cleaned the dust off the lens, but I really couldn't be bothered at the time.)
The driver's side cylinder had a slight leak, but they've done well considering they've never been touched in the 11 years and over 60,000 miles I've had the car for!
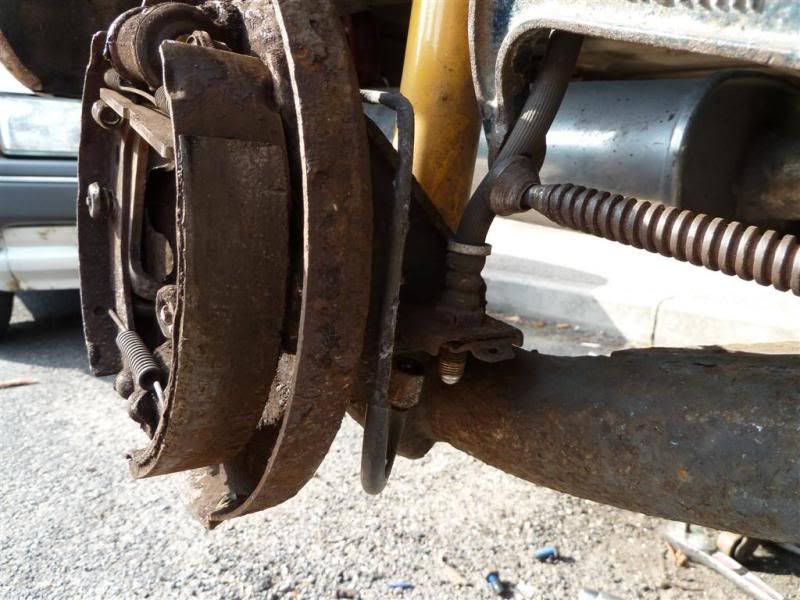
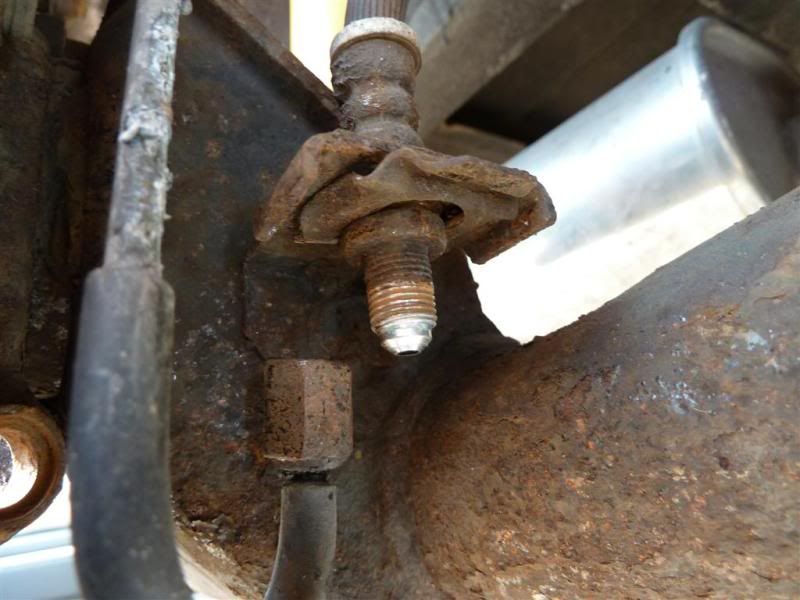
So, handbrake cables off, hoses clamped, and short hard pipes undone:
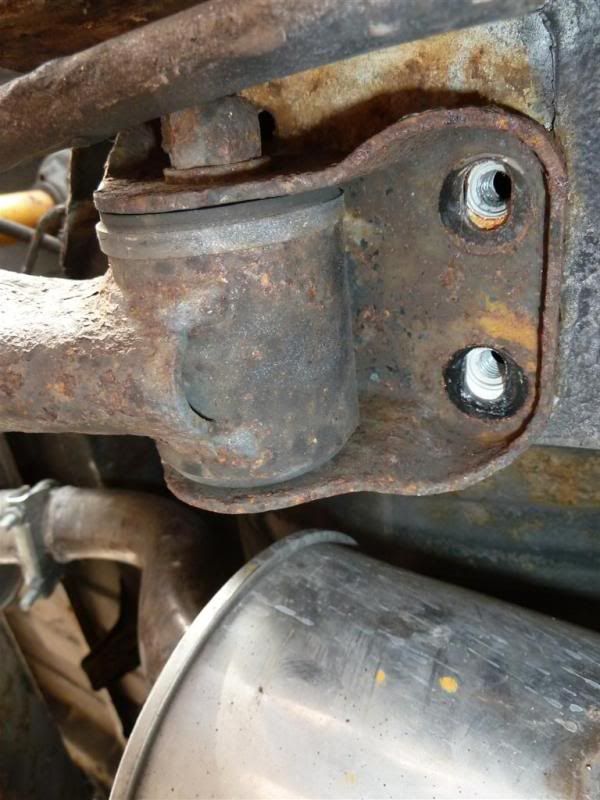
Out came the shock bolts, and out came the mounting bracket bolts:
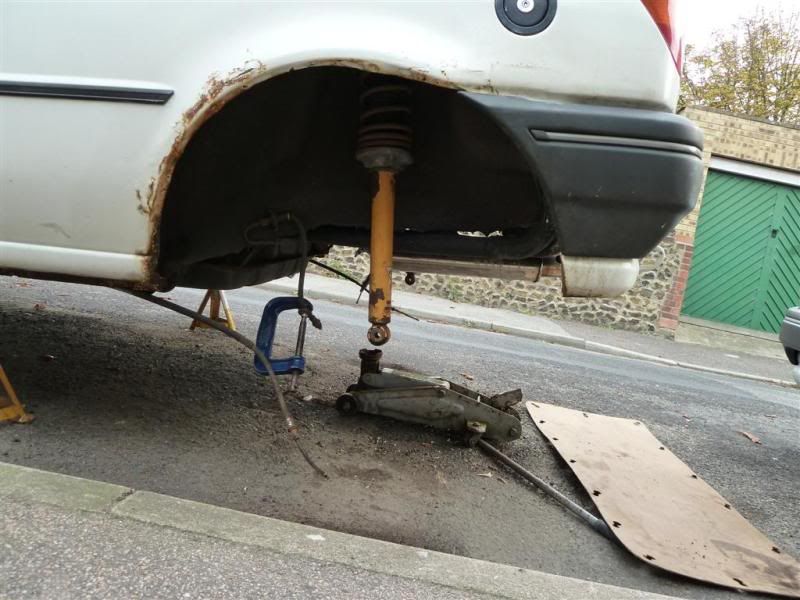
And down comes the old beam:
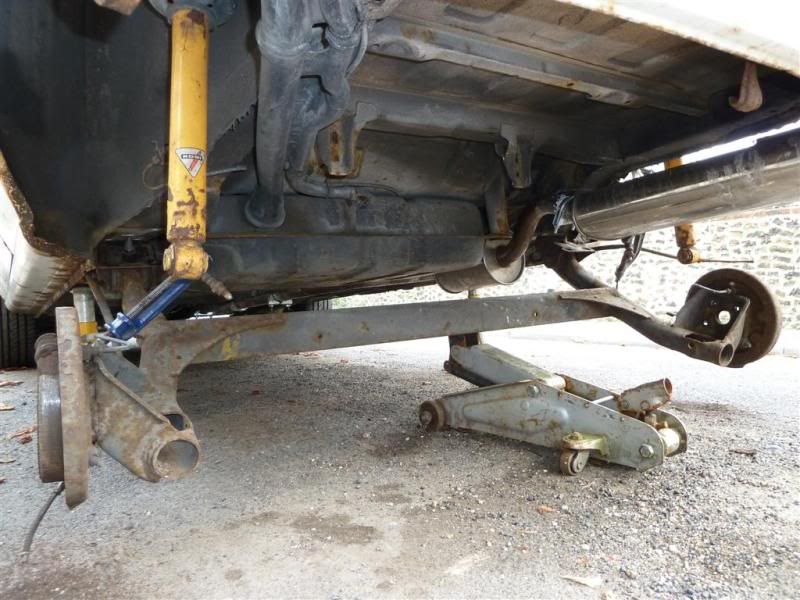
Big scary space!
Properly rusty, I know...
Against the Zetec S beam:
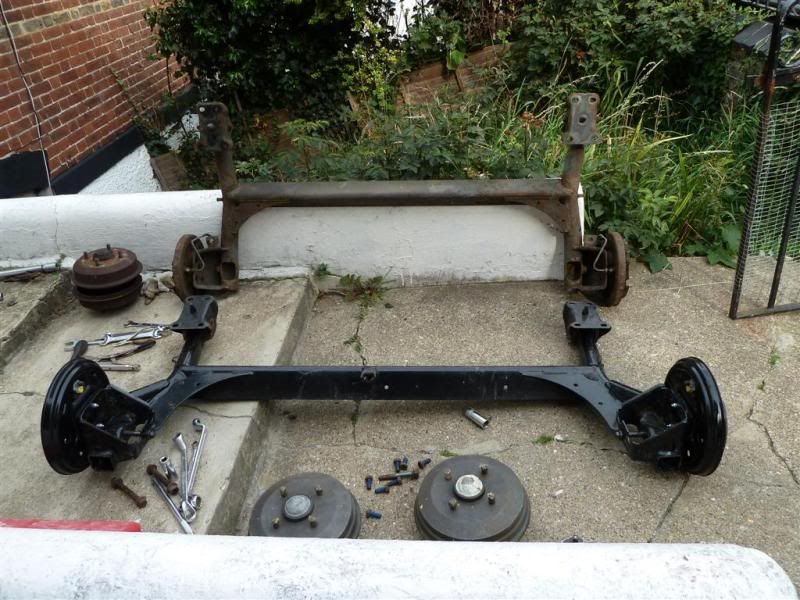
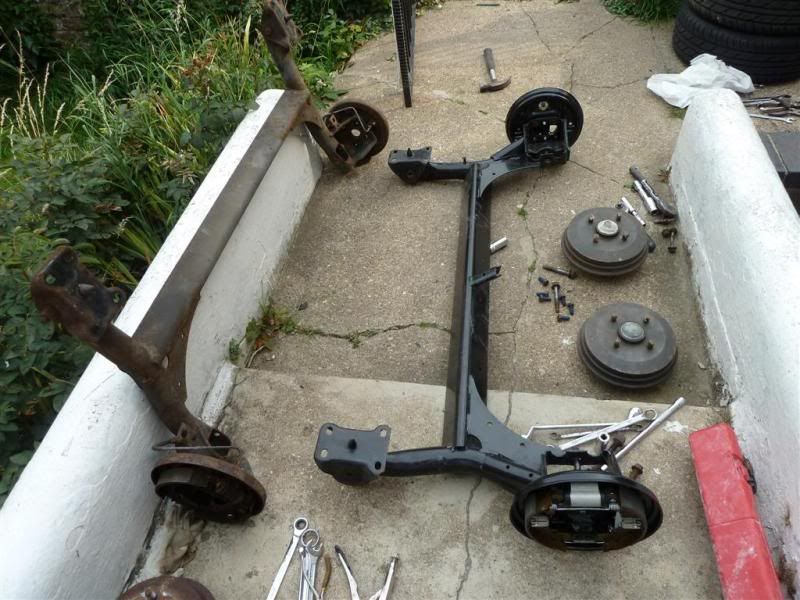
Next up, I really should have bolted these to the new beam first, and then brought the whole lot up to the shell, but in this case, I decided to bolt the new mounting brackets up first:
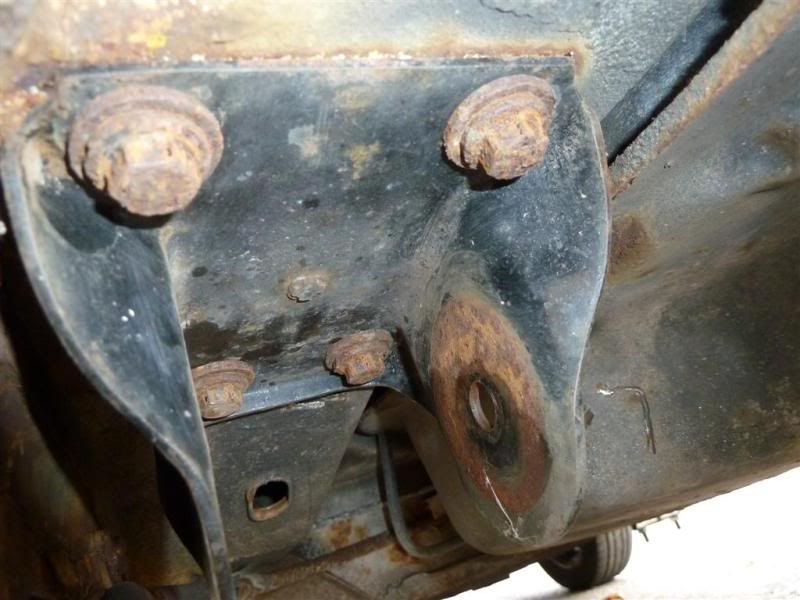
Big mistake - it really does make it so much harder when bringing the beam up to the brackets! So if you end up doing this, definitely bolt the brackets to the beam first!
You can see here the bush coming up into the bracket:
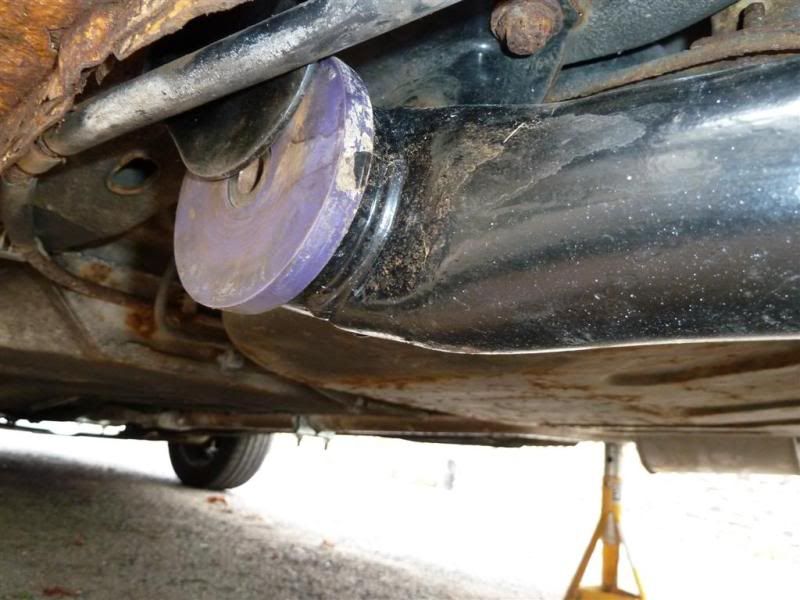
I cannot stress how awkward it is to get it to move into position, and then how much harder it is to get the bolts through, especially on the driver's side where the mid section silencer is in the way...
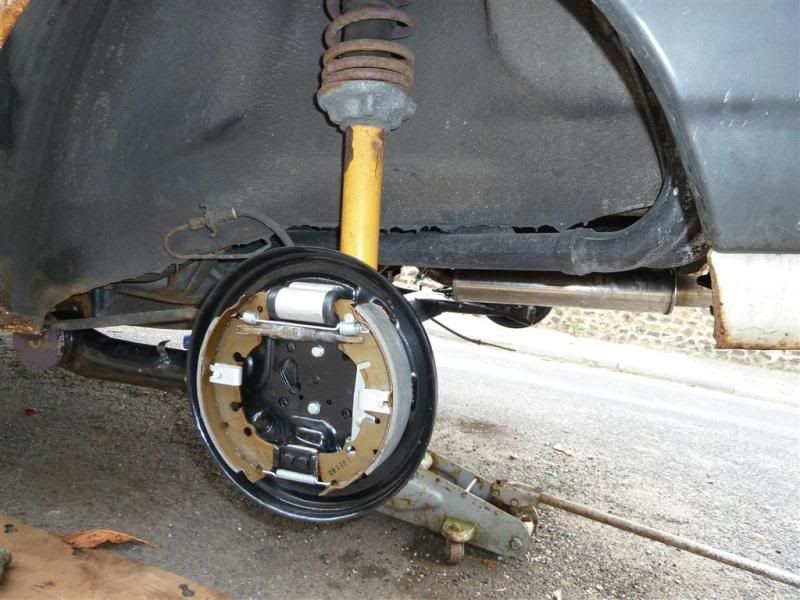
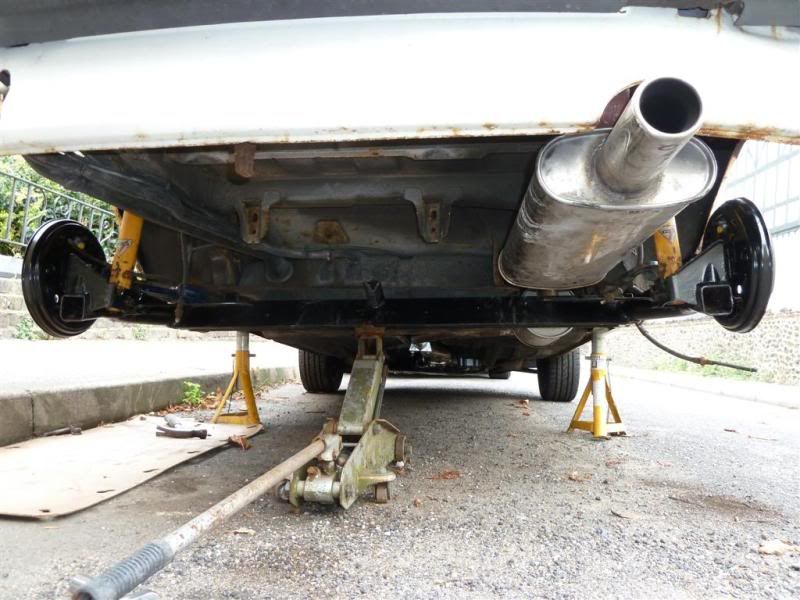
That exhaust really needs to go...
Just wanted to get stuff back together at this point, so a few photos missing.
Shocks bolted back up, beam brackets all done up tight, beam-to-bracket bolts done up.
The Zetec S beam doesn't have a bracket for the old hard pipes to fix to, so as a temp fix, I've used them, but it's not ideal:
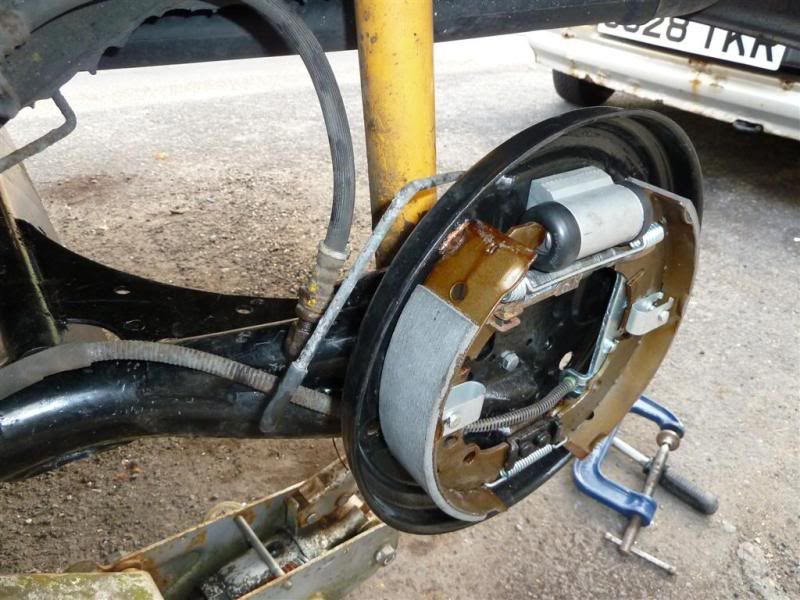
I'm not 100% sure how they are on a Zetec S, but I'll have a look tomorrow... What I'll possibly end up doing is making some brackets up and then some new brake pipes at work to make everything safe and tidy. But how I've done it just allows me to at least use and move the car about for the moment.
Dodgy brake drums back on:
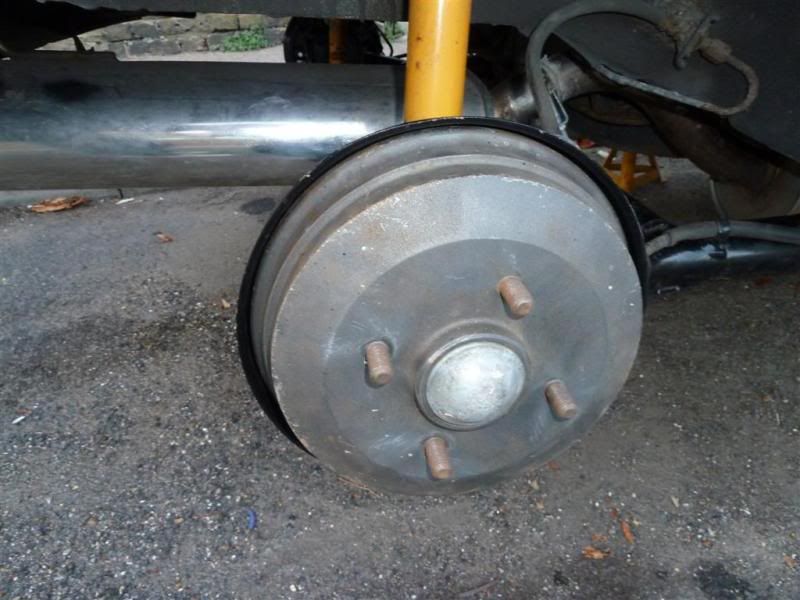
One of the whole beam in place:
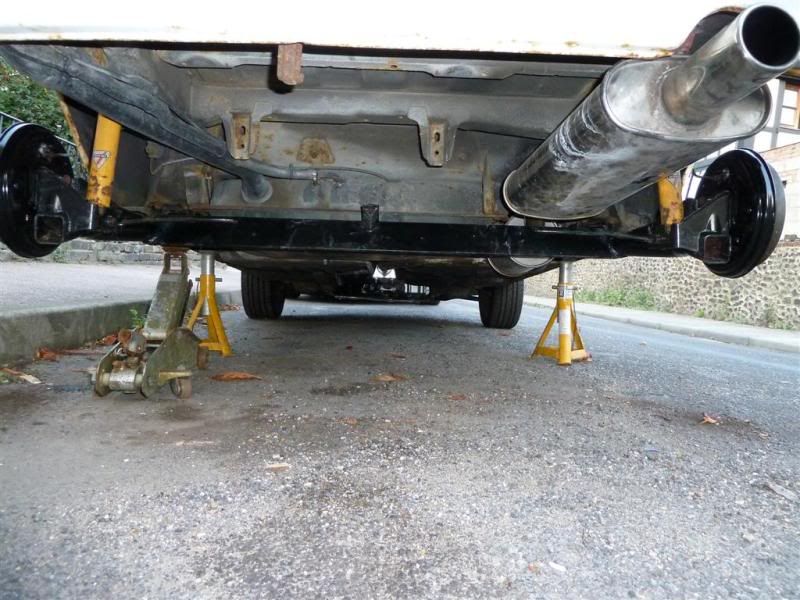
And then later tonight I decided to get a really poor photo at night of the wheels back on and the car back on the ground:
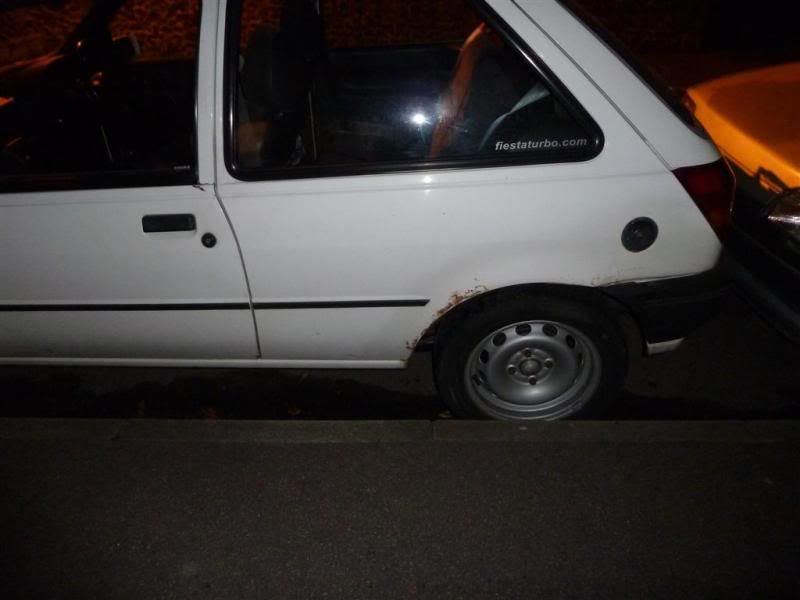
Piece of cake:

Sod doing that again anytime soon...
Today, I fitted a Zetec S rear beam. I've only had this beam for about 4 or 5 years now, or however long roughly it's been since Max wrote off his white Fiesta!
First off, I've had the beam in bits for a few years now and hadn't really looked after any of the near-new components that were on it when I got it - in other words, I'd left the shoes, wheel cylinders, backplates, drums, etc all to rust.
Prior to today, I got the back plates blasted and re-painted them quickly in Hammerite, just for a bit of protection. I also bought some new shoes through work, a fitting kit from our competitors around the corner from us, and some wheel cylinders for a bargain price on eBay. With all this, I was ready to start putting the beam back together
Boxes of bits:

So today...
Firstly, I'd drilled the old rivets that held the backplates to the beam, so I knocked the remains out of the beam and decided I would bolt them back on because I couldn't find my bloody rivet gun anywhere. The holes in the beam are just about right for an M6 thread, so out came the tap


Drilled out the backplates just slightly to 6mm:

And on they went:

I put some nuts and washers on the back too, although it's not really necessary because they don't serve much purpose other than to keep the backplate in place when the stub axle isn't bolted up!

Wheel cylinders, shoes, springs, etc, all on:

Powerflex bushes already in the beam, but they weren't in properly, so I popped the tubes out, pushed them in further, and then popped the tubes back in:

A bit grotty looking as I had masking tape on them for years while I was painting the beam up... Really wish I hadn't bothered now
Next, I got everything ready:

Lovely, isn't it?
Had to start removing the old beam, so out came Jack:

Loosened the beam mounting bracket bolts:

These actually were very easy to loosen... Surprising really when I know of a few people that have had nightmares doing them!
Also loosened off the shocks at the bottom, the stub axle bolts and the wheel nuts, although not in that order. No pics, sorry


(Sorry, crappy camera phone - it would be a good camera phone if I cleaned the dust off the lens, but I really couldn't be bothered at the time.)
The driver's side cylinder had a slight leak, but they've done well considering they've never been touched in the 11 years and over 60,000 miles I've had the car for!
So, handbrake cables off, hoses clamped, and short hard pipes undone:


Out came the shock bolts, and out came the mounting bracket bolts:

And down comes the old beam:

Big scary space!

Properly rusty, I know...
Against the Zetec S beam:


Next up, I really should have bolted these to the new beam first, and then brought the whole lot up to the shell, but in this case, I decided to bolt the new mounting brackets up first:

Big mistake - it really does make it so much harder when bringing the beam up to the brackets! So if you end up doing this, definitely bolt the brackets to the beam first!
You can see here the bush coming up into the bracket:

I cannot stress how awkward it is to get it to move into position, and then how much harder it is to get the bolts through, especially on the driver's side where the mid section silencer is in the way...


That exhaust really needs to go...
Just wanted to get stuff back together at this point, so a few photos missing.
Shocks bolted back up, beam brackets all done up tight, beam-to-bracket bolts done up.
The Zetec S beam doesn't have a bracket for the old hard pipes to fix to, so as a temp fix, I've used them, but it's not ideal:

I'm not 100% sure how they are on a Zetec S, but I'll have a look tomorrow... What I'll possibly end up doing is making some brackets up and then some new brake pipes at work to make everything safe and tidy. But how I've done it just allows me to at least use and move the car about for the moment.
Dodgy brake drums back on:

One of the whole beam in place:

And then later tonight I decided to get a really poor photo at night of the wheels back on and the car back on the ground:

Piece of cake:

Sod doing that again anytime soon...
- Smo
- Elite Post Master


- Posts: 8658
- Joined: Sun Dec 29, 2002 12:33 am
- Location: My indecisive mind, in Thanet, Kent.
Car: 1990 Ford Fiesta Popular Plus
Re: Popular Plus - 21/08/11 - Page 13 - Zetec S Rear Beam
By the way, the cake is a Tesco madeira party cake (serves 16 apparently - not if I'm eating it...), and it is actually really nice considering it only cost 4 quid. Yummy!
- Smo
- Elite Post Master


- Posts: 8658
- Joined: Sun Dec 29, 2002 12:33 am
- Location: My indecisive mind, in Thanet, Kent.
Car: 1990 Ford Fiesta Popular Plus
Re: Popular Plus - 21/08/11 - Page 13 - Zetec S Rear Beam
Quite like the Madeira cake, I favoured an Iceland chocolate fudge cake this weekend though. £1.50 and serves 4, couldn't argue with those stats.
- hb69
- Elite Post Master


- Posts: 4995
- Joined: Mon Dec 12, 2005 7:56 pm
- Location: Kent
- Your car: Fiesta 1.1 LX


Twitter
The second 20th Anniversary article, a dive into the history of how the site came about is available here: https://t.co/kbCfZ4sf0R
17:44, 4th December 2021 Twitter Web App
To celebrate https://t.co/wXVkvJipaS being 20 years old this year, I've written a series of articles detailing the… https://t.co/B0vE0Y3KvP
17:42, 4th December 2021 Twitter Web App
Follow fiestaturbo.com on Twitter:
http://twitter.com/fiestaturbo/
Facebook
New article! fiestaturbo.com is 20 years old this year and I'm writing a series delving into the history of it. …
Saturday, 4th December 2021 12:49
Some awesome Escorts from the Fair - FORD FAIR 2021: ESCORT EXHIBITION - …
Sunday, 31st October 2021 17:05
All the best Focuses from Ford Fair - FORD FAIR 2021: FOCUS PEEKING - Which was your …
Thursday, 7th October 2021 22:21
Become a fan:
http://www.facebook.com/fiestaturbo/
RSS Feeds
Subscribe to the RSS feed
What is RSS?
RSS is a technology that lets you use special applications or modern browsers to notify you you when a site is updated. You can then read the updated content in that application or your browser.
To subscribe to these RSS feeds you need to copy the links above. For instructions on how to add it to the feeds you keep track of, consult the documentation of your RSS reader.